Category Archives: Phone – See ‘Radio’ for more

Building userdebug android images for Pixel

Those are the steps I took to build userdebug images for google Pixel on Ubtuntu 16.04. As the original google documentation is so unorganized and difficult to understand I’ve summed up the important parts to get a quick build for any device. I’m quite unsure about the package dependencies and there might be some more packages you need. Let me know if you needed more packages on clean install of Ubuntu.

1. First start with installing necessary packages

sudo apt-get update
sudo apt-get install bc bison build-essential curl flex g++-multilib gcc-multilib git gnupg gperf imagemagick lib32ncurses5-dev lib32readline-dev lib32z1-dev libesd0-dev liblz4-tool libncurses5-dev libsdl1.2-dev libssl-dev libwxgtk3.0-dev libxml2 libxml2-utils lzop pngcrush rsync schedtool squashfs-tools xsltproc zip zlib1g-dev openjdk-8-jdk

2. Building android somehow requires some x86 libraries so install them as well

sudo dpkg --add-architecture i386
sudo apt-get update
sudo apt-get install libc6:i386 libncurses5:i386 libstdc++6:i386

3. Download repo client and install it somewhere

mkdir ~/bin
PATH=~/bin:$PATH

curl https://storage.googleapis.com/git-repo-downloads/repo > ~/bin/repo
chmod a+x ~/bin/repo

4. Make source directory and add git information for checkout

mkdir android_dev
cd android_dev

git config --global user.name "Your Name"
git config --global user.email "someaddress@someprovider.com"

5. Download actual source and build environment
Branch names can be found at https://source.android.com/setup/start/build-numbers

repo init -u https://android.googlesource.com/platform/manifest -b android-8.1.0_r28

repo sync

make clobber

6. (OPTIONAL) Download nonfree drivers, if you skip this step vendor.img will not be built.
Matching drivers can be found at https://developers.google.com/android/drivers

wget https://dl.google.com/dl/android/aosp/google_devices-sailfish-opm4.171019.016.b1-839e6b26.tgz
wget https://dl.google.com/dl/android/aosp/qcom-sailfish-opm4.171019.016.b1-3c7f92b3.tgz

tar xvf google_devices-sailfish-opm4.171019.016.b1-839e6b26.tgz
tar xvf qcom-sailfish-opm4.171019.016.b1-3c7f92b3.tgz

./extract-google_devices-sailfish.sh
./extract-qcom-sailfish.sh

7. Prepare build options and make
Available build configurations can be found at https://source.android.com/setup/build/running

source build/envsetup.sh

lunch aosp_sailfish-userdebug

make -j8

Resulting image files can be found at out/target/product/<device_name>


Troubleshooting #1. If build fails with “out of heap space” error, execute the commands below and continue make

export JACK_SERVER_VM_ARGUMENTS="-Dfile.encoding=UTF-8 -XX:+TieredCompilation -Xmx4g"
jack-admin kill-server && jack-admin start-server

Converting MP3/WAV to ulaw/GSM

When you want to convert typical MP3/WAV files for your PBX like Asterisk, you can use sox and lame to do it easily.


lame --decode somemp3file.mp3 output.wav

First, convert the MP3 to WAV file.

Then,
For u-law:

sox -V output.wav -r 8000 -c 1 -t ul result.ulaw

For GSM:

sox output.wav -r 8000 -c 1 result.gsm resample -ql

Pre-converting your input sound files usually give much better results than using internal modules for transcoding.

SKT의 Band 1 (2.1GHz) LTE 정보

대략 3개월 전쯤부터 시내에 나가면 휴대폰에서 LTE가 잡히기 시작했습니다.
제가 지금 쓰는 엑스페리아 A는 LTE 밴드 1,19, 21밖에 지원을 안하는데 국내에서 잡힙니다. 일본전용인 밴드 19, 21은 제외하고 3G에 쓰이는 밴드1의 재활용일것이라 생각했습니다.
국내에는 3,5,8 밴드가 기존에 쓰이는것으로 알려져있습니다.

이번주부터 드디어 집에서도 새로운 밴드로 LTE가 사용이 가능해지더군요.

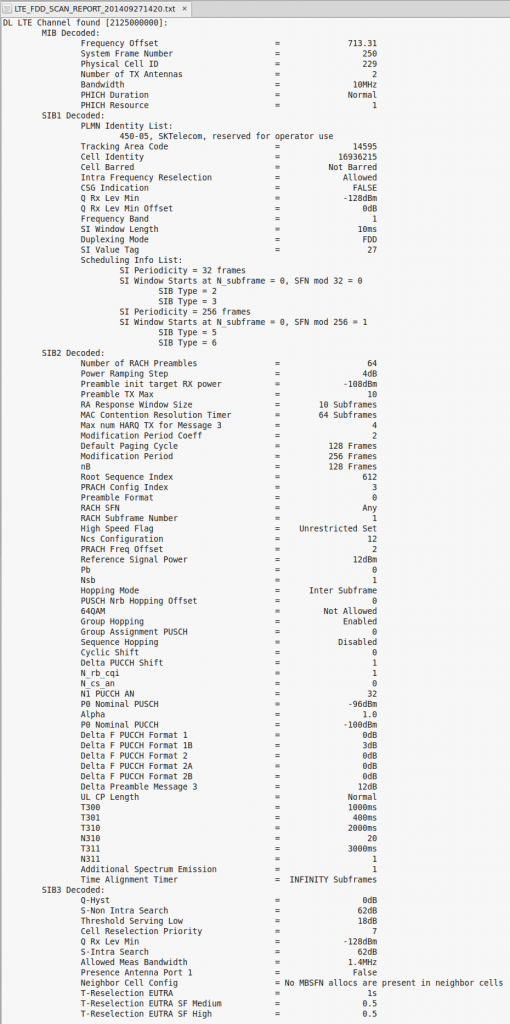
계측장비를 이용해서 어떤망인지 직접 확인한 결과를 올립니다. 제 예상대로 밴드 1이 맞습니다.

lte

자세하게 보고싶으신 분은 클릭하시면 원본화질로 보실 수 있습니다.

여기서 일반 사용자분들이 괄목할 정보들을 정리해 보자면..

우선 대역폭이 20MHz가 아닌 10MHz입니다.
EARFCN 150(2.125GHz Downlink) 한가지만 잡히고 다른 주파수는 잡히지 않습니다. 다른 통신사도 잡히지 않습니다.
레퍼런스 파워가 높지 않습니다. 12dBm에다가 10MHz의 블록수를 곱하면 enodeb에서 2W정도로 신호를 송출중이란 뜻인데 해외에 비해 확실히 망 구조가 조밀합니다.
하지만 일부 기지국만 2.1GHz를 가동중인듯 합니다.

LTE는 WCDMA와 같이 1.92MHz의 배수로 샘플링을 해야합니다
후.. 전에 장비에 전원을 잘못 연결하는 바람에 외장 GPS VCTCXO가 고장난 관계로 2의배수에서 소프트웨어 리샘플링을 하니 스캔하는데 시간이 오래 걸리네요.
조만간에 61.44MHz TCXO를 구입해서 지역별로 측정을 해봐야겠습니다.

지역별로 제가 다녀본 바로는 광역시 이상 시내쪽은 거의 잡힙니다.

대구 부산은 외곽도 어느정도 커버되고 있는듯 합니다.

그리고 요즘들어 몇몇 분이 호소하시는 수신률 문제도 이 때문으로 보입니다.
2.1ghz는 기지국이 기존망만큼 활성화가 되어있지 않다보니 이쪽으로 휴대폰이 접속되게 되면 수신률이 낮아 보이는 것입니다.
수신률이 캐리어 전체 수신률의 평균을 내는게 아닌 현재 접속되어있는 하나의 기지국 기준으로 계산을 하나 보니 생기는 현상입니다.
하지만 그렇다고 해서 기존 기지국이 사라지는게 아니고 수신률이 일정수준 이상으로 약해지면 기존망으로 핸드오버를 시도하니 크게 걱정하실 필요는 없으실듯 합니다.
하지만 잦은 핸드오버는 딜레이를 유발하고 배터리를 빨리 소모합니다.

Kicking spammers out of your Asterisk server

If you have your asterisk server connected to the public internet, there always will be some bad boys trying to brute-force into your PBX.

A few months before I found my asterisk server dead. Looking through the logs I was surprised to find that it was the spammers trying to brute force the password, eventually filling up the entire disk with error logs and crashing the server. Unfortunately that server operated on a single partition scheme with everything allocated for / .


[Sep 12 20:24:02] NOTICE[28190] chan_sip.c: Registration from '"249" ' failed for '37.8.53.84:10937' - No matching peer found
[Sep 12 20:24:02] NOTICE[28190] chan_sip.c: Registration from '"249" ' failed for '37.8.53.84:10937' - No matching peer found
[Sep 12 20:24:21] NOTICE[28190] chan_sip.c: Registration from '"497" ' failed for '37.8.53.84:5060' - No matching peer found
[Sep 12 20:24:21] NOTICE[28190] chan_sip.c: Registration from '"497" ' failed for '37.8.53.84:5060' - No matching peer found

Yesterday same thing happened again, but luckily I found it early enough to block it before it crashes the server.


iptables -I INPUT -s 37.8.53.84 -j DROP

I used iptables to filter out those garbage packets.
To view the blocked ip list use the following command.


iptables -n -L

It can be rather annoying when it comes to a production server where there are so many logs to inspect.
I recommend creating a script to automate the tasks if that is the case.