Adding a startup script as a service in Ubuntu

I write this up because I don’t want to look it up everytime I need it. This will create a simple service that executes a script in Ubuntu systemd.


1. Create a file: /etc/systemd/system/service-name.service

[Unit]
Description=Some Description of your service
After=network.target
After=systemd-user-sessions.service
After=network-online.target

[Service]
User=root
Type=simple
ExecStart=/path/to/your/script/start-all.sh
Restart=on-failure
RestartSec=30
StartLimitInterval=350
StartLimitBurst=10

[Install]
WantedBy=multi-user.target

2. Reload systemd

systemctl daemon-reload

3. Make that your script executable with:

chmod u+x /path/to/your/script/start-all.sh

4. Start it:

sudo systemctl start service-name

5. Enable it to run at boot

sudo systemctl enable service-name

tip: #!/bin/sh is necessary at the beginning of the script or startup will fail with error 203

Fix freezing Solaris kernel on boot

During an attempt to install Solaris on a real machine, I found a strange bug that caused Solaris kernel to freeze on the first boot.

This affected all post-skylake systems regardless of drive type so I originally suspected it to be related to the xHCI handoff bug with hackintosh setups, but it was actually something different.

With -v option, the last debug message shown was

root on /ramdisk:a fstype ufs

No other mentions of such bug were found on any solaris forums, but hopefully I found a similar issue on SmartOS, a solaris baed bare-metal OS: https://github.com/joyent/smartos-live/issues/727

For me, disabling both C7 states and Intel SpeedStep in BIOS setup fixed the issue, and Solaris kernel could boot up again like normal.


Preventing Windows guests from creating network profiles in Proxmox

Many of my servers run under the Proxmox virtual environment. For servers that doesn’t have a dedicated IP available for its guests I use iptables based NAT network to forward packets as described in my previous article: https://manatails.net/blog/2018/04/running-proxmox-with-nat/

But I came across a problem where Windows guests detect the network as ‘Unknown’ and try to create a new network profile every reboot.

2018-10-08 19_13_51-pve - Proxmox Virtual Environment

Not only it looked bad to have random names ‘Network 18’, but also the network type defaults to public network so any rules in private network get ignored until I manually set the network type to private.

I looked a bit in depth and found that the feature is called ‘Network Location Awareness’ per the original article https://msdn.microsoft.com/en-us/library/aa480195.aspx

From the page:

Digital Subscriber Line (DSL) and cable modems typically act as network address translators (NATs). As a result, their MAC addresses can be used to uniquely qualify the user’s network. NLA uses the MAC address of the user’s DSL or cable modem as the link ID.

Practically, Windows was using the MAC address of the default gateway to diffrentiate the network.

So I had to give the NAT interface a unique MAC address in order to be recognized.

2018-10-08 19_03_50-192.168.27.61 - PuTTY

Add ‘hwaddress ether’ to the interface config and give a random mac address, then windows will consistently identify the network.

2018-10-08 19_16_12-monica.mananet.net_444 - Remote Desktop Connection

Finally open regedit and go to HKEY_LOCAL_MACHINE\SOFTWARE\Microsoft\Windows NT\CurrentVersion\NetworkList then delete all entries in Profiles and Signatures to get rid of previously detected networks and reset the counter.


Adding a new disk to Proxmox VE

root@elizabeth:/etc/lvm# fdisk /dev/sdb

Welcome to fdisk (util-linux 2.29.2).
Changes will remain in memory only, until you decide to write them.
Be careful before using the write command.

Command (m for help): g

Created a new GPT disklabel (GUID: DBD738EC-7ED5-4FC0-9474-1018CF3E4F12).

Command (m for help): n
Partition number (1-128, default 1):
First sector (34-500118158, default 2048):
Last sector, +sectors or +size{K,M,G,T,P} (2048-500118158, default 500118158):

Created a new partition 1 of type 'Linux filesystem' and of size 238.5 GiB.

Command (m for help): t
Selected partition 1
Hex code (type L to list all codes): 8e
Type of partition 1 is unchanged: Linux filesystem.

Command (m for help): p
Disk /dev/sdb: 238.5 GiB, 256060514304 bytes, 500118192 sectors
Units: sectors of 1 * 512 = 512 bytes
Sector size (logical/physical): 512 bytes / 512 bytes
I/O size (minimum/optimal): 512 bytes / 512 bytes
Disklabel type: gpt
Disk identifier: DBD738EC-7ED5-4FC0-9474-1018CF3E4F12

Device Start End Sectors Size Type
/dev/sdb1 2048 500118158 500116111 238.5G Linux filesystem

Command (m for help): w
The partition table has been altered.
Calling ioctl() to re-read partition table.
Syncing disks.

root@elizabeth:/etc/lvm# pvcreate /dev/sdb1
Physical volume "/dev/sdb1" successfully created.
root@elizabeth:/etc/lvm# vgcreate ssd2 /dev/sdb1
Volume group "ssd2" successfully created
root@elizabeth:/etc/lvm# lvcreate --type thin-pool -L 100G -n data ssd2
Logical volume "data" created.
root@elizabeth:/etc/lvm# lvextend -l +100%FREE ssd2/data
Size of logical volume ssd2/data changed from 100.00 GiB (25600 extents) to 238.47 GiB (61049 extents).
Logical volume ssd2/data successfully resized.

Then it is possible to add the newly created LVM-Thin volume from the Web interface.

Building userdebug android images for Pixel

Those are the steps I took to build userdebug images for google Pixel on Ubtuntu 16.04. As the original google documentation is so unorganized and difficult to understand I’ve summed up the important parts to get a quick build for any device. I’m quite unsure about the package dependencies and there might be some more packages you need. Let me know if you needed more packages on clean install of Ubuntu.

1. First start with installing necessary packages

sudo apt-get update
sudo apt-get install bc bison build-essential curl flex g++-multilib gcc-multilib git gnupg gperf imagemagick lib32ncurses5-dev lib32readline-dev lib32z1-dev libesd0-dev liblz4-tool libncurses5-dev libsdl1.2-dev libssl-dev libwxgtk3.0-dev libxml2 libxml2-utils lzop pngcrush rsync schedtool squashfs-tools xsltproc zip zlib1g-dev openjdk-8-jdk

2. Building android somehow requires some x86 libraries so install them as well

sudo dpkg --add-architecture i386
sudo apt-get update
sudo apt-get install libc6:i386 libncurses5:i386 libstdc++6:i386

3. Download repo client and install it somewhere

mkdir ~/bin
PATH=~/bin:$PATH

curl https://storage.googleapis.com/git-repo-downloads/repo > ~/bin/repo
chmod a+x ~/bin/repo

4. Make source directory and add git information for checkout

mkdir android_dev
cd android_dev

git config --global user.name "Your Name"
git config --global user.email "someaddress@someprovider.com"

5. Download actual source and build environment
Branch names can be found at https://source.android.com/setup/start/build-numbers

repo init -u https://android.googlesource.com/platform/manifest -b android-8.1.0_r28

repo sync

make clobber

6. (OPTIONAL) Download nonfree drivers, if you skip this step vendor.img will not be built.
Matching drivers can be found at https://developers.google.com/android/drivers

wget https://dl.google.com/dl/android/aosp/google_devices-sailfish-opm4.171019.016.b1-839e6b26.tgz
wget https://dl.google.com/dl/android/aosp/qcom-sailfish-opm4.171019.016.b1-3c7f92b3.tgz

tar xvf google_devices-sailfish-opm4.171019.016.b1-839e6b26.tgz
tar xvf qcom-sailfish-opm4.171019.016.b1-3c7f92b3.tgz

./extract-google_devices-sailfish.sh
./extract-qcom-sailfish.sh

7. Prepare build options and make
Available build configurations can be found at https://source.android.com/setup/build/running

source build/envsetup.sh

lunch aosp_sailfish-userdebug

make -j8

Resulting image files can be found at out/target/product/<device_name>


Troubleshooting #1. If build fails with “out of heap space” error, execute the commands below and continue make

export JACK_SERVER_VM_ARGUMENTS="-Dfile.encoding=UTF-8 -XX:+TieredCompilation -Xmx4g"
jack-admin kill-server && jack-admin start-server

Running Proxmox with NAT

The default proxmox installation only supports basic NAT function with limited capabilities.

In order to create a working internal network you need to define a new network manually

Add the following entry to /etc/network/interfaces

vmbr0 is the WAN interface, if you use a different interface change it accordingly.


auto vmbr1
iface vmbr1 inet static
address  10.0.0.1
netmask  255.255.255.0
bridge_ports none
bridge_stp off
bridge_fd 0


post-up echo 1 > /proc/sys/net/ipv4/ip_forward


post-up iptables -t nat -A POSTROUTING -s '10.0.0.0/24' -o vmbr0 -j MASQUERADE
post-down iptables -t nat -D POSTROUTING -s '10.0.0.0/24' -o vmbr0 -j MASQUERADE


And add port forwarding rules like this:

post-up iptables -t nat -A PREROUTING -i vmbr0 -p tcp --dport 222 -j DNAT --to 10.0.0.100:22
post-down iptables -t nat -D PREROUTING -i vmbr0 -p tcp --dport 222 -j DNAT --to 10.0.0.100:22


Apply the settings with:
/etc/init.d/networking restart

인천공항 제 2터미널 이용기

인천공항 2터미널이 개장한지 2주나 지나서 처음으로 이용해보게 되었습니다.


KTX를 타고 2터미널 도착


상승


공항 역사


무빙워크 타는것까지는 1터미널하고 비슷한데


…사실 다 비슷합니다


일단 비행기 시간부터 확인해주고


중앙엔 한글을 이용한 조형물이 설치되어 있습니다.


대한항공 비즈니스/퍼스트는 아예 체크인을 다른 공간에서 하도록 되어있습니다.


뭔가 홍콩 첵랍콕 국제공항이 떠오르는 중앙 모습


그런데 전망대도 생겼네요


아직 완공된건 아니라고 합니다.


???


창문 밖으로는 면세구역이 보이네요


왼쪽에는 전망대와 VR 체험대가 있습니다.

역광이라 사진을 찍을수가 없었는데 VR은 나름 괜찮습니다.

자기가 수하물이 되어서 컨베이어 벨트따라 이동하는 VR입니다.


그렇다고 하네요


창문밖 풍경


이건 카메라 여러대로 사진찍어서 매트릭스 효과 주는 촬영장인데

모니터에선 앞서 찍은 사람들이 나옵니다.


그런데 앞에 찍은 아저씨들이 갓갓이네요

ㅋㅋㅋㅋㅋㅋㅋㅋㅋㅋㅋㅋㅋㅋㅋㅋ

혼자 보기 아까운 작품들이라 움짤로 만들어 드렸습니다.


반대쪽엔 설명회 같은걸 하고 있습니다.


사실 여긴 별로 재미없긴 한데


내려오면서 보이는 터미널 전경


이런게 왜 터미널 중앙에…

차라리 양념감자 연구소라고 이름붙혔으면 인정했을텐데


출국심사 후..

원형스캐너도 있긴한데 거긴 사진찍으면 안되는곳이니 사진은 찍지 않습니다.


정원 스타일로 꾸며놓은듯한 쉼터

중간에 저 공같은건 안에 들어갈수도 있는데 무슨 의미인지 잘 모르겠네요


면세구역에 VR 체험관이 또 있고


이런것도 있고 재밌어보이는게 많았습니다.

옆에선 로봇팔로 커피를 만들고 HTC VIVE를 이용한 축구 VR도 있습니다.

다 좋은데 날씨가 심상치않다


옆에선 사물놀이 공연이 준비중


카카오샵과 뽀로로…


왼쪽으로 터미널 내 호텔이 보이는데


나중에 알고보니 시설대비 비싼 요금으로 욕먹는 호텔이더군요


한 층 위로 올라가면 있는 푸드코트

우리나라에선 보기 드문 타코벨도 입점해 있습니다.


이제 출발할시간


인천에서도 매너티는 최고 존엄입니다.


해로운것을 멀리하고 매너티를 가까이 해야합니다.

KT DW02-412H 커스텀 펌웨어 적용하기

주의사항: 이 작업은 공유기의 펌웨어를 덮어 쓰는 작업으로 잘못될 시 공유기가 벽돌상태가 될 수 있습니다.

또한 DW02-412H와 같은 모델이지만 내부 구조가 다른 모델이 있는지는 확인이 불가능합니다. 아래 이미지가 현재 쓰시는 공유기와 호환이 가능한지 확인이 불가능한점 양해바랍니다.

복구를 위한 kt펌웨어는 가지고 있으나 저작권 문제로 인해 올려드리기는 어려울것 같습니다.

그리고, OpenWRT는 숙련된 사람들을 위한 배포판이기 때문에 기본 설정이 많이 어려울 수 있습니다. 리눅스 관련 지식이 있는 분들이 하시는것을 추천합니다.


DW02-412H 모델에 openwrt 커스텀 펌웨어를 설치하는 과정입니다.

공유기 자체 펌웨어 업데이트 시스템의 문제로 인하여 두번에 걸쳐 업데이트를 해야 완전히 설치됩니다.


*공유기가 WAN포트로 인터넷에 연결할 수 있는 상황이여야 합니다.

1. 펌웨어 initramfs 파일을 받습니다. http://laura.mananet.net/dw02412h/openwrt_initramfs.img

2. 올레 환경설정에서 해당 파일로 펌웨어 업데이트를 시작합니다.

3. 재부팅 후 순정 펌웨어로 다시 돌아온다면 펌웨어 업데이트를 한번 더 해줍니다.

4. telnet을 이용하여 192.168.1.1에 접속합니다.

5.다음 명령어를 입력합니다.

cd /tmp

wget http://laura.mananet.net/dw02412h/openwrt.img

mtd erase current

mtd erase firmware

mtd write openwrt.img firmware

reboot

2018-01-20 11_51_17-COM3 - PuTTY

사진참조

6. 최초 부팅은 NAND포맷 과정으로 인해 시간이 좀 더 걸릴 수 있습니다.

7. 완료되었습니다.

인도판 트리플 심 폰 리뷰

이번에 인도에서 4G 가 지원되는 트리플 심카드 폰이 있다고 해서 서브폰 용도로 구매함
가격도 저렴해서 괜찮은 선택 같았음
심지어 트리플 스탠바이 (4G + 4G + 4G) 라고 함

해외 번호로 전화받을 일 있을때 맨날 서브폰 찾는거 귀찮았었는데 이를 한번에 해결해주니 기대가 컸음

박스

조금 허접하긴 함

제조도 인도에서 함

아이폰을 벤치마킹한거같은 구성품

휴대폰 자체는 깔끔하고 괜찮았음

뒷면

액정도 선명하고 괜찮은데 왜인지 네트워크를 한개밖에 못잡음

분명 사용중인 심카드이고 인식도 잘되는데 이상하게 네트워크 연결이 실패가 뜸

한참 뺐다가 꼈다가 해봤는데

알고보니 애초에 4G+4G+4G란게 구라였음 4G+2G+2G임
하나가 4G로 연결되면 나머지는 다 2G밖에 못씀
우리나라는 2G망이 없으므로 사실상 하나밖에 연결을 못함

다음부터 인도판 물건을 살때는 두번 생각해보고 사야겠네요

SouthXchange에서 매너티코인 구매 방법

많은 분들이 개인적으로 연락주셔서 한번에 정리글을 올립니다.


SouthXchange 자체가 처음 코인을 접하는 유저에겐 좀 생소한 인터페이스이기도 하고 해서 한번 요약해드리는 겁니다만


우선 명심해야할 것이 있습니다.

코인을 구매하는데에는 현금이 들어갑니다. 실수를 하면 송금을 엉뚱한 곳으로 하거나, 잘못된 코인, 잘못된 가격으로 구매를 하면 금전적 손실이 발생할 수 있습니다.

일단 처음부터 끝까지 잘 정독하시고 글을 아무리 읽어도 이해가 되지 않는다 싶으면 안 하시는것이 좋다고 생각됩니다.
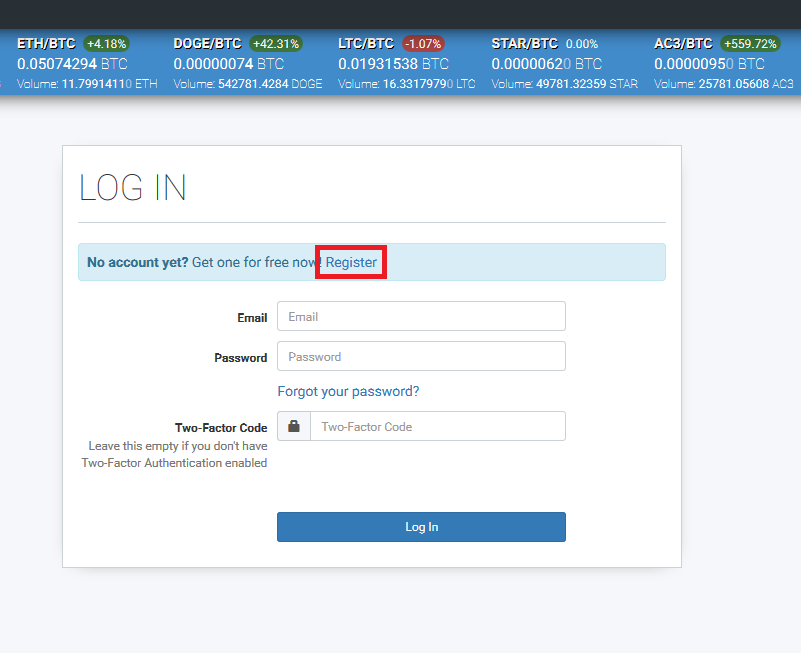


2017_12_26_00_51_16_Log_In

우선 거래소에 가입부터 해야겠죠


2017-12-26 00_51_52-Register

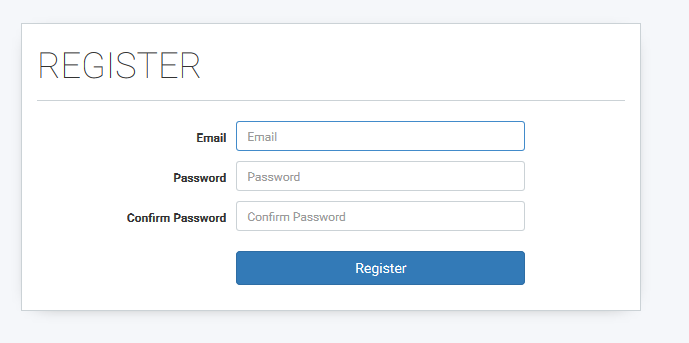
이메일과 비밀번호를 입력해 주고 인증메일을 확인해 줍니다.


2017_12_26_00_56_10_Markets

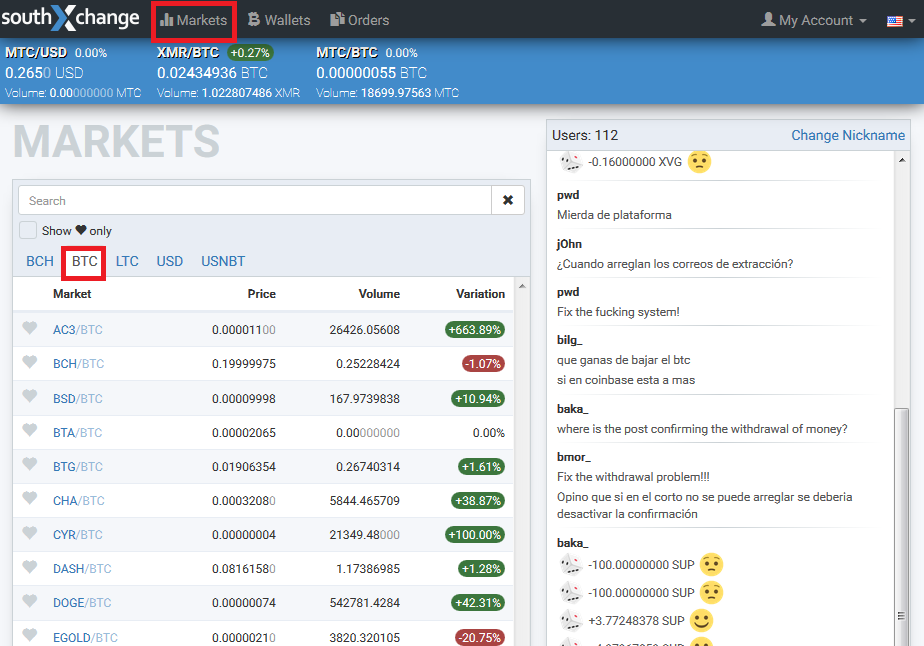
로그인을 하고 나면 우선 거래장을 찾아봅시다.

Markets 창을 열고 비트코인 (BTC)로 거래되는 거래장입니다.


2017_12_26_00_56_52_Markets

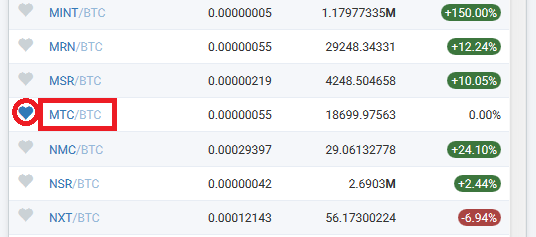
스크롤을 내리면서 매너티코인 (MTC) 를 비트코인 (BTC)과 거래하는 페이지를 찾습니다.

왼쪽에 하트모양을 눌러두시면 즐겨찾기 추가가 되어 나중에 돌아오기 편합니다.


2017_12_26_00_59_33_MTC_BTC_0.00000055

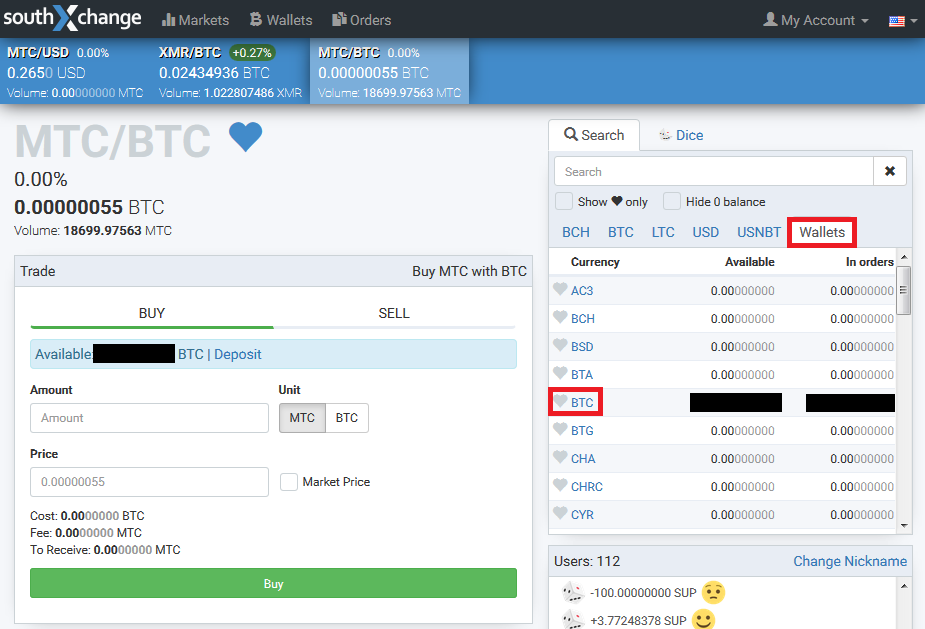
새로 가입하셨으면 가지고 있는 비트코인이 없을 테니 우선 계좌에 비트코인을 충전해 봅시다

오른쪽에 Wallets 탭에서 BTC를 찾습니다.


2017_12_26_01_01_07_Balance

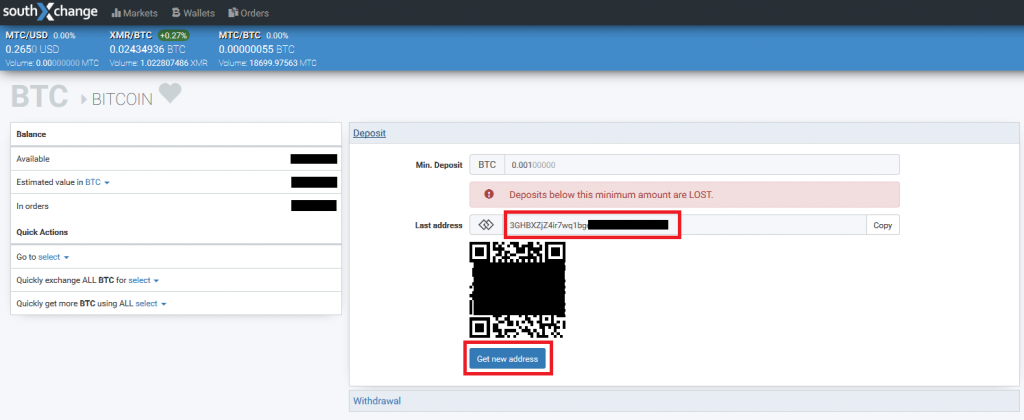
이제 비트코인 계좌를 생성해 봅시다.

Get new address 를 눌러 계좌를 생성하면 주소가 위에 Last address 부분에 표시됩니다.

이 계좌로 비트코인을 전송하면 거래소에 비트코인이 충전됩니다.


2017_12_26_01_03_49_빗썸_대한민국_대표_암호화폐_거래소

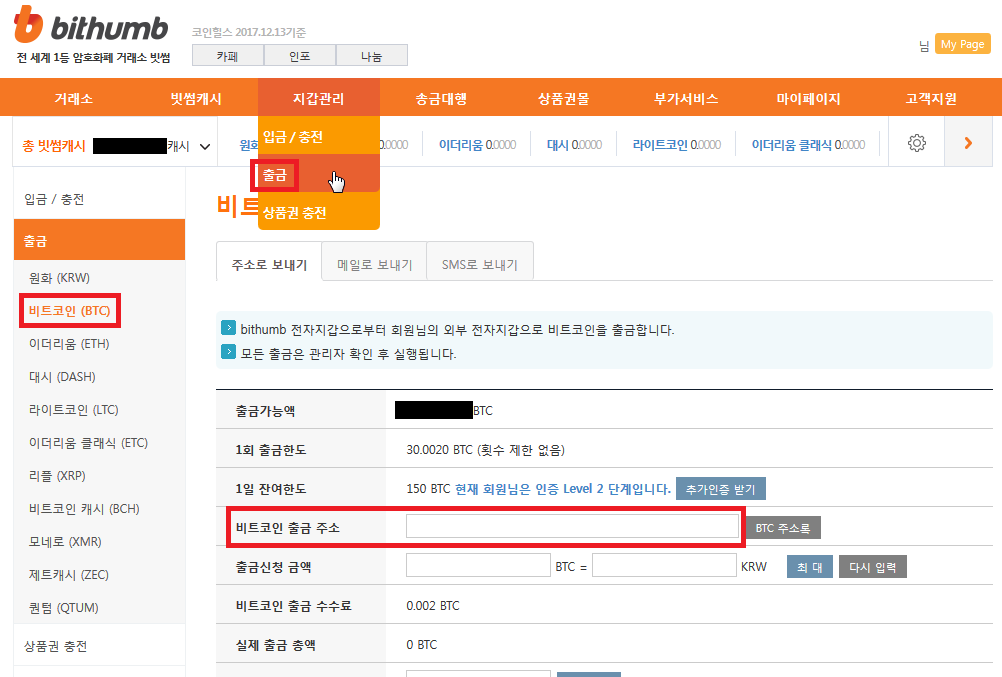
국내 거래소에서 비트코인을 구매하신 후 위와 같이 비트코인 출금 주소에 아까전의 Last address 주소를 적고 출금하시면 됩니다.

빗썸의 경우 매 출금 시 관리자가 수동으로 확인하고 출금되는 식이라 처리시간이 좀 오래 걸릴수 있습니다.


그런데 지금 비트코인의 가치가 2000만원, 출금 수수료 0.002 BTC는 4만원입니다. 수수료가 엄청 떼이니 비트코인보다는 훨씬 저렴한 라이트코인 (LTC)로 출금해서 다시 BTC로 환전하는 것이 훨씬 낫습니다. 라이트코인은 수수료 1700원정도

하는 방법은 전부 라이트코인 (LTC) 으로 바꿔서 메뉴를 눌러주시면 나머지는 똑같습니다.

어지간하면 처음에는 한 만원만 송금해보시고 정상적으로 되는거 확인한 후 나머지 송금하시는것을 추천합니다. 안그러면 처리 지연될경우에 불안해짐


2017_12_26_01_06_55_MTC_BTC_0.00000055

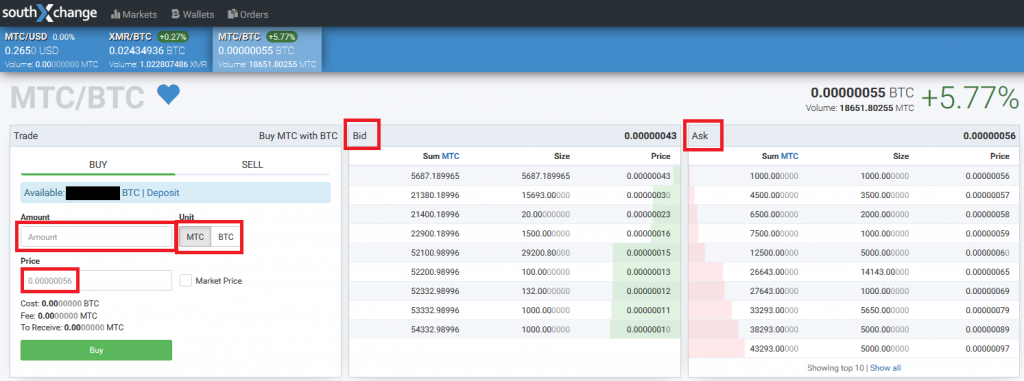
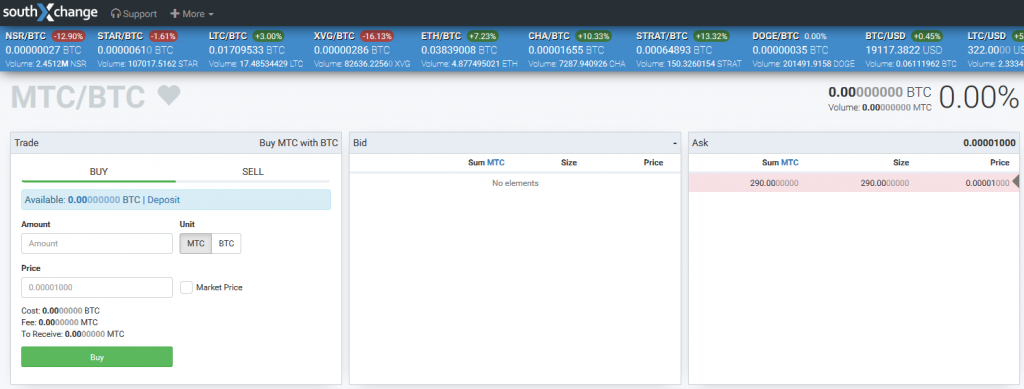
비트코인이 정상적으로 충전되었으면 다시 MTC/BTC 마켓을 방문합시다.

Bid가 매수주문 Ask가 매도주문입니다.

Amount에 구매하고 싶은 코인의 갯수를 적고 옆에 MTC를 눌러줍시다 (BTC를 누르면 해당하는 BTC의 가치만큼 MTC를 구매함)

Price는 1 코인 당 가격입니다. 기본은 매도주문중 최저인 값으로 되어 있지만 적당히 생각해보시고 어떤 가격에 구매하는게 좋은지 생각해서 구매하세요. 주식하고 똑같습니다.

바로 살려고 하지 마시고 매수주문 올려놓고 기다리는것이 좋습니다.


판매하는것도 비슷합니다. 위 화면에서 BUY대신 SELL 탭에서 같은 것을 진행하시면 됩니다.


이상으로 필요한것은 다 설명했다고 생각합니다.

코인의 가격은 시장의 요구에 따라 결정되는 것으로 오를 수도 있고 내릴 수도 있습니다.

막연히 오를 거란 기대감은 경계하세요. 코인을 사는 것은 본인의 결정이고 코인은 원래 거래를 하라고 만든 것이지 그걸로 돈놀이 하라고 만든 것이 아닙니다.


매너티코인에 가장 큰 도움이 되는 것은 매너티코인을 거래에 사용할 때입니다.


그리고 암호화폐의 특성상 제작자라 하더라도 코인이 거래가 어떻게 이루어졌는지는 알 수 없습니다.

현재 GTX1080 160개에 맞먹는 속도로 매너티코인이 채굴되고 있으며 사용자 수는 풀에서 확인된 것만 350명 가량입니다. 풀을 이용하지 않는사람을 더하면 더 많습니다.

문제가 발생할 시 거래소에 문의해야 하고 저는 이 글에 관한 문의에 답하지 않겠으며 답할 수도 없습니다.

여튼 이점을 숙지하셨으면 매너티코인에 관심을 가져 주셔서 감사드리고 잘 사용하시길 바랍니다.


A wild manatee