Due to popular request I started caching mystery gift files for later use.
Feel free to contact me should you need any of the files.
Due to popular request I started caching mystery gift files for later use.
Feel free to contact me should you need any of the files.
IIS settings – Enable directory listing and Basic authentication
Folder settings – Reject directory access permission for IUSR
A quick note in case I forget it again…
A week ago I decided to make use of the HP deskjet 1010 that I received for free when I bought my microserver.
It is pretty basic one but supports color and prints fairly fast. But the only problem I had with it is that the USB cable is too short so that I have to take my laptop near the printer every time I wanted to print something.
So I decided to connect the printer to my old server box and set up CUPS for printing over the network.
Everything went through fine but after I installed the printer opening the printer dialog box took an eternity every time I tried using it.
The problem seems to lie in the IPP handler of Windows. Somehow there is a bug in Windows that makes IPP settings and Windows internet security settings get mixed up resulting delays.
Adding the CUPS server to Internet Explorer’s Intranet zone can be a workaround.
Open Internet Explorer -> Tools -> Internet options and add the following:
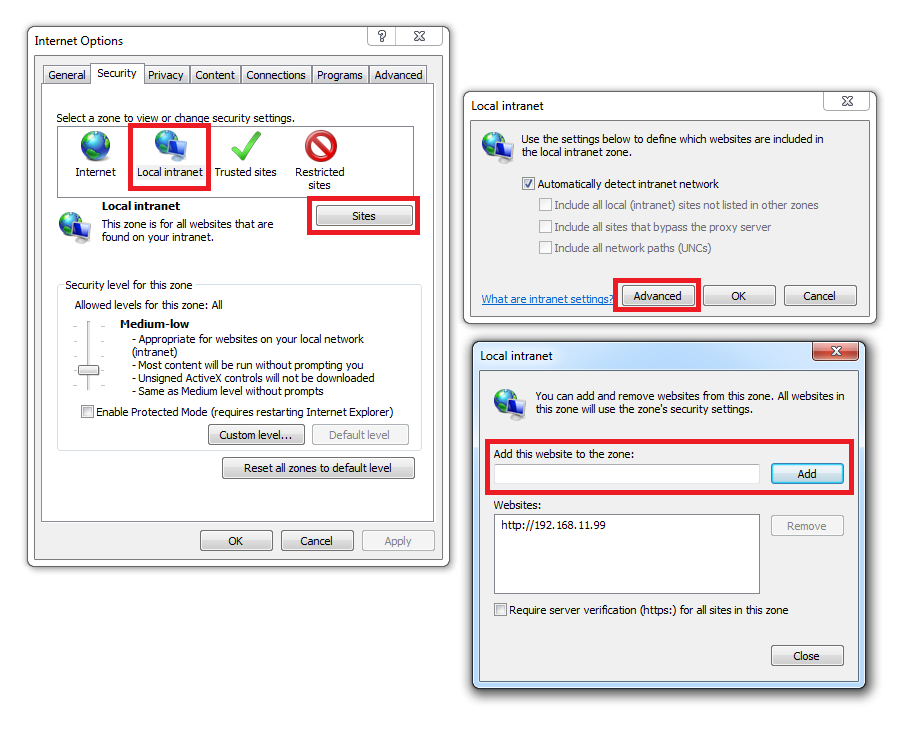
where the address is the CUPS server’s IP address. You may skip this step if the printer is in your LAN but I decided to do it anyway.
Then go to LAN settings and uncheck “Automatically detect settings”
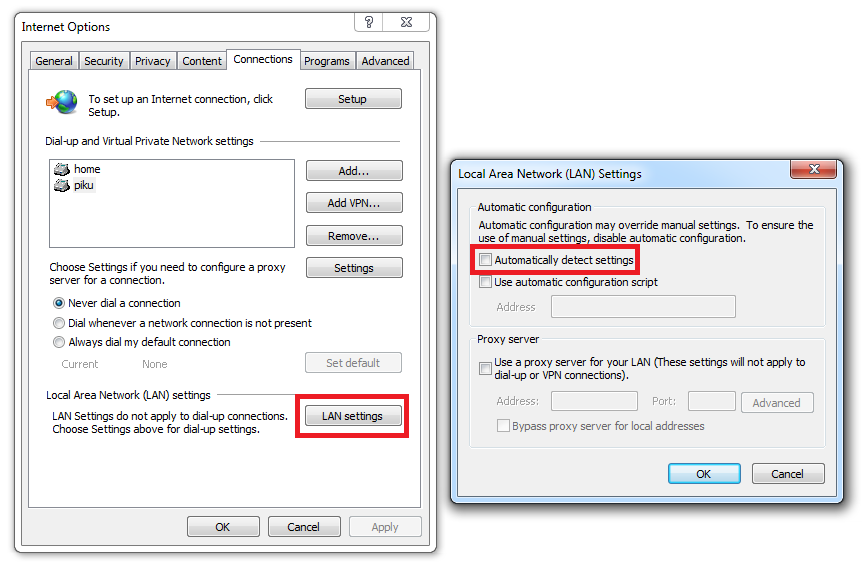
It will fix most of the problems.
While receiving the Hoopa gift from the 18th Pokemon movie series, I suddenly felt like hacking into how this entire mystery gift process works.
I looked up on GBATemp and Project Pokemon but interestingly I could not find any technical insights on it. People had pretty much no progress after capturing the encrypted connections.
So, challenge accepted.
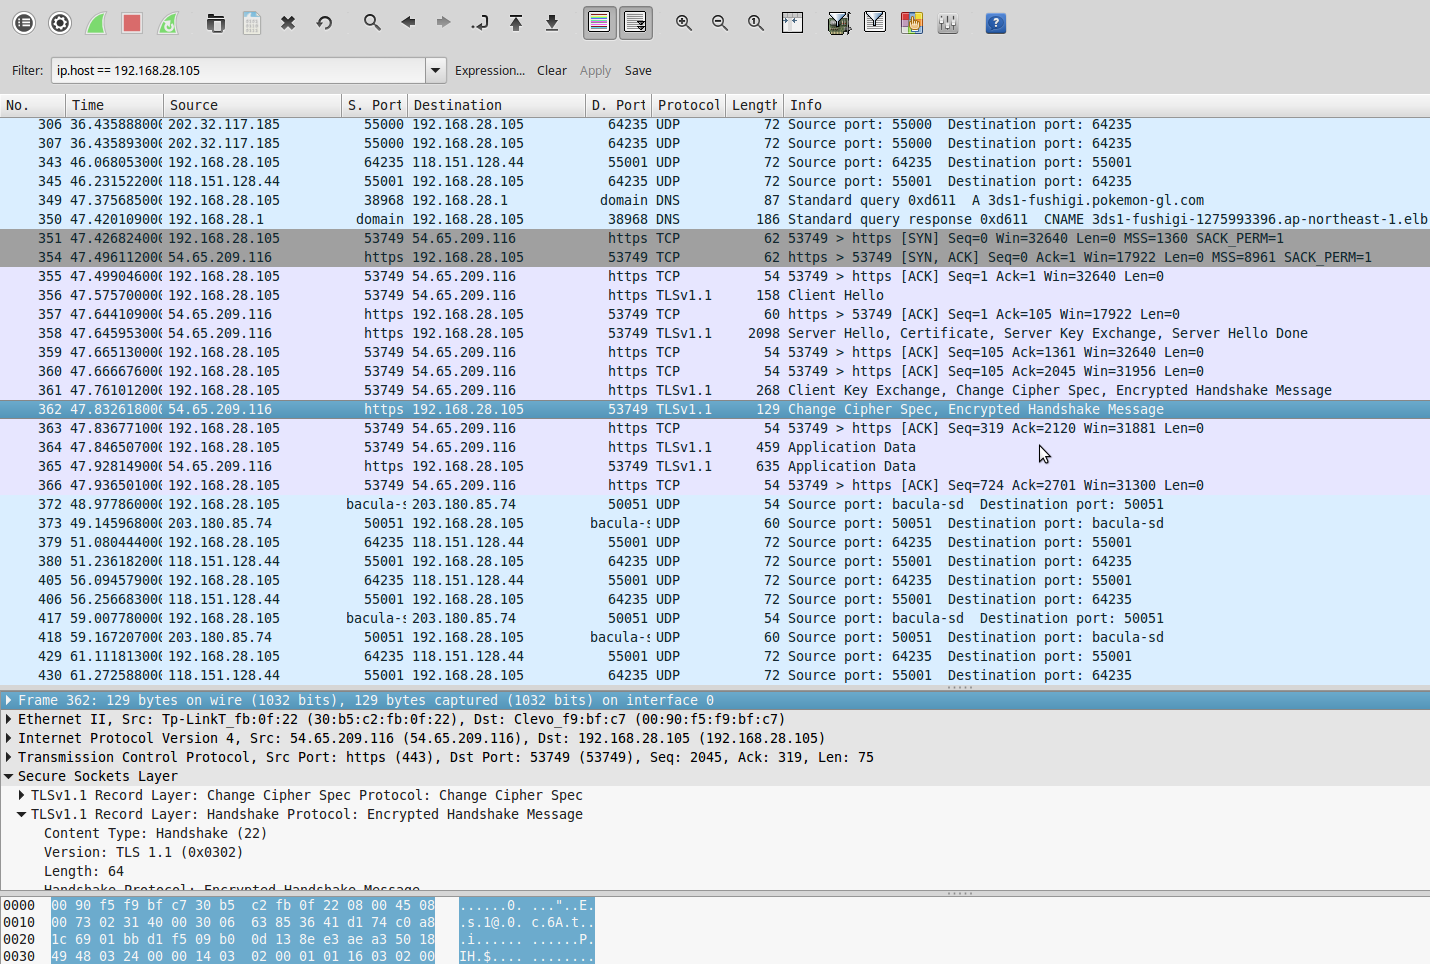
First, I went down to the basics like everyone else; Packet capture.
I used my laptop as a bogus wifi network to capture the packets from the 3DS
The 3DS was communicating with Nintendo servers with SSL as I expected.
I guess that it might be storing the certificate chain in the game file, as far as I know Wii games store their certificates within the game file.
I wasted a day trying to decompile the rom filesystem and searching for any meaningful information using grep. But eventually I found out that the certificates are not stored in the game file but it is embedded within the firmware SSL module.
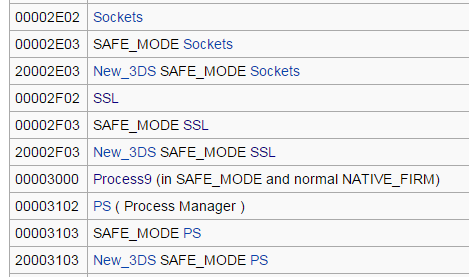
I looked up for the ID of the SSL module and extracted the cia file from nintendo update server.
As all the update cias are encrypted, I needed to decrypt them using a 3DS.
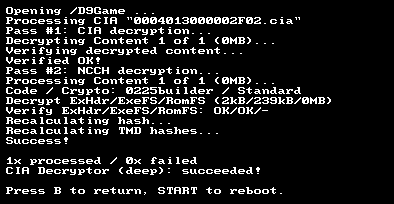
Using Decrypt9, I retrieved the decrypted CIA file.
Lets get into the actual data using ctrtool.
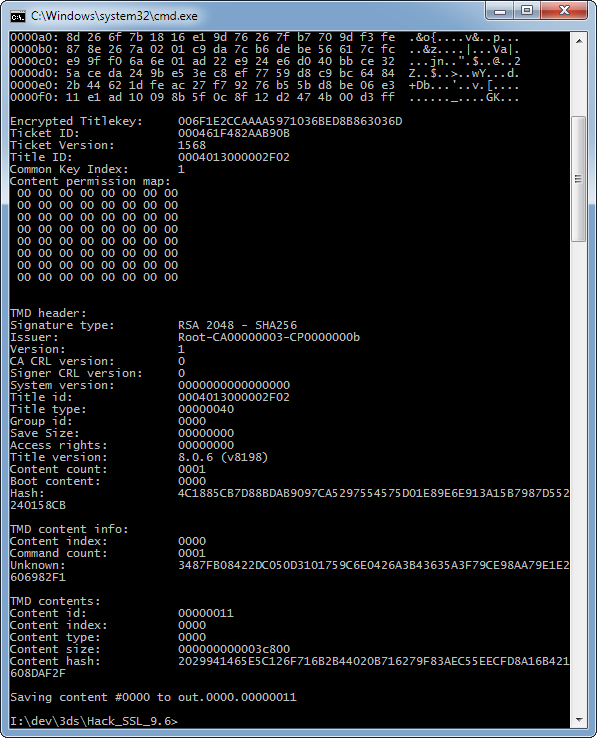
Extracted the CXI portion from the dumped CIA file.
Now we need to get it splitted into proper partition.

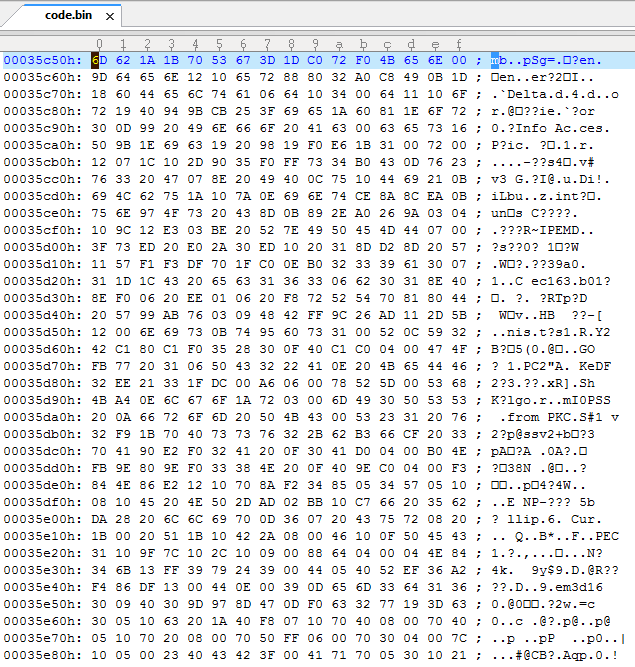
I extracted the executable code from the exefs.
Lets take a look…
It is compressed with reverse LZ77 so lets uncompress it again.
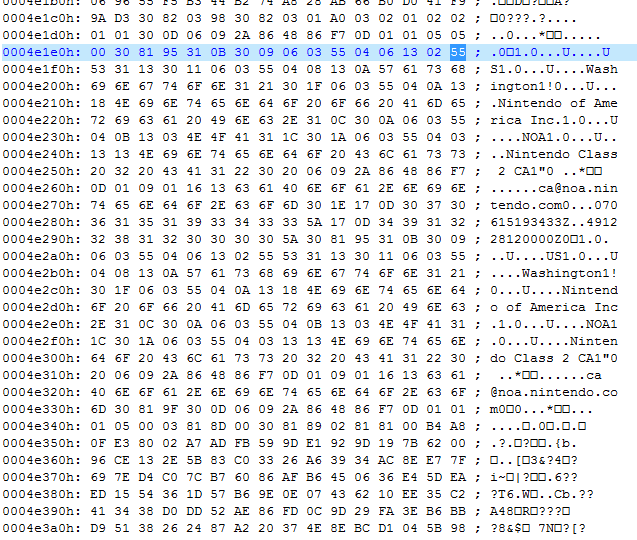
After a bit of skimming I located the actual root certificate used for connection to 3ds-fushigi server.
Thank god Nintendo didn’t use complicated cert chain. As the root certificate is directly used for the communication we replace that and the work here is done.
The format seemed to be DER so I carefully exported the corresponding bytes.
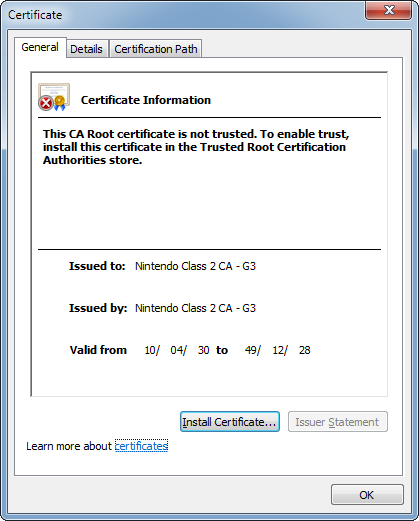
Successfully retrieved the certificate in one shot.
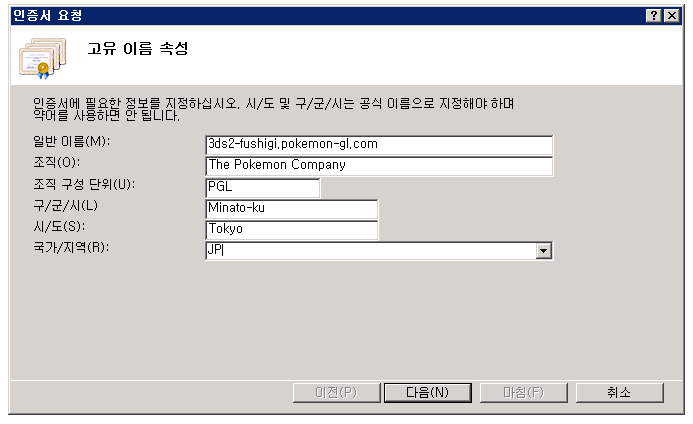
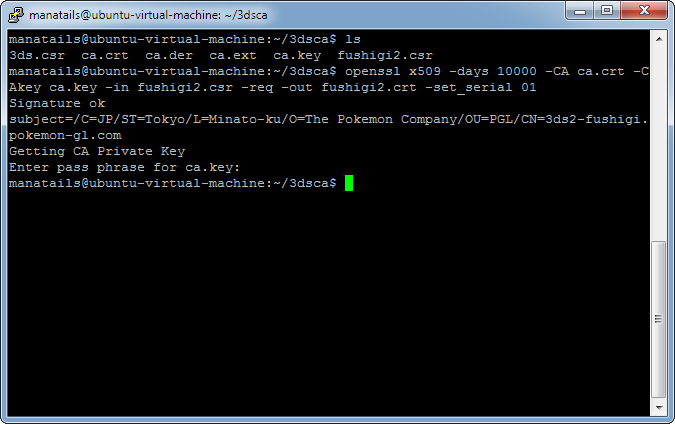
Now lets create a certificate that is almost the same except that it will use MY private key.
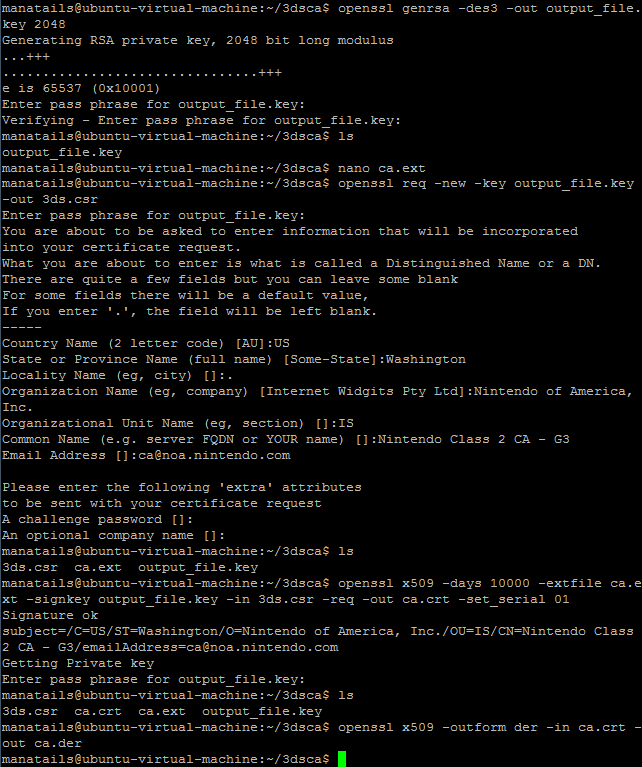
Using OpenSSL I created the copy of the certificate, self signed it and converted it to DER format again.
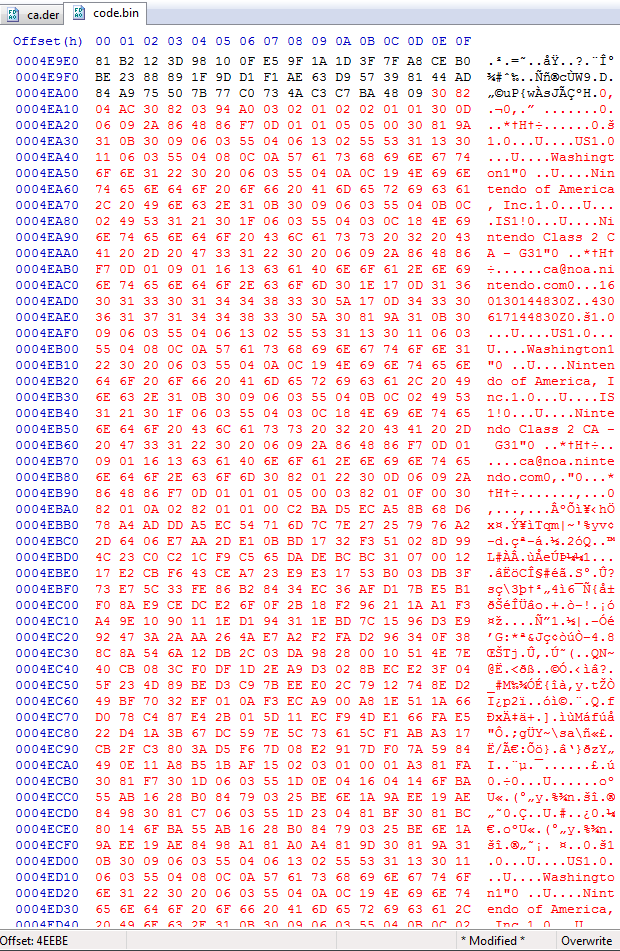
I replaced the certificate in the code binary with the new one then I recompressed the code.bin with reverse LZ77.
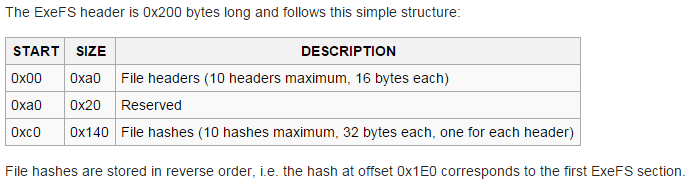
But the header of the exefs requires the hash of the code.bin file, as I could not find any software that does the job for me I ended up patching the hash myself.
Then I redid the entire CIA decompiling process in the reverse order to create the new modified CIA file.
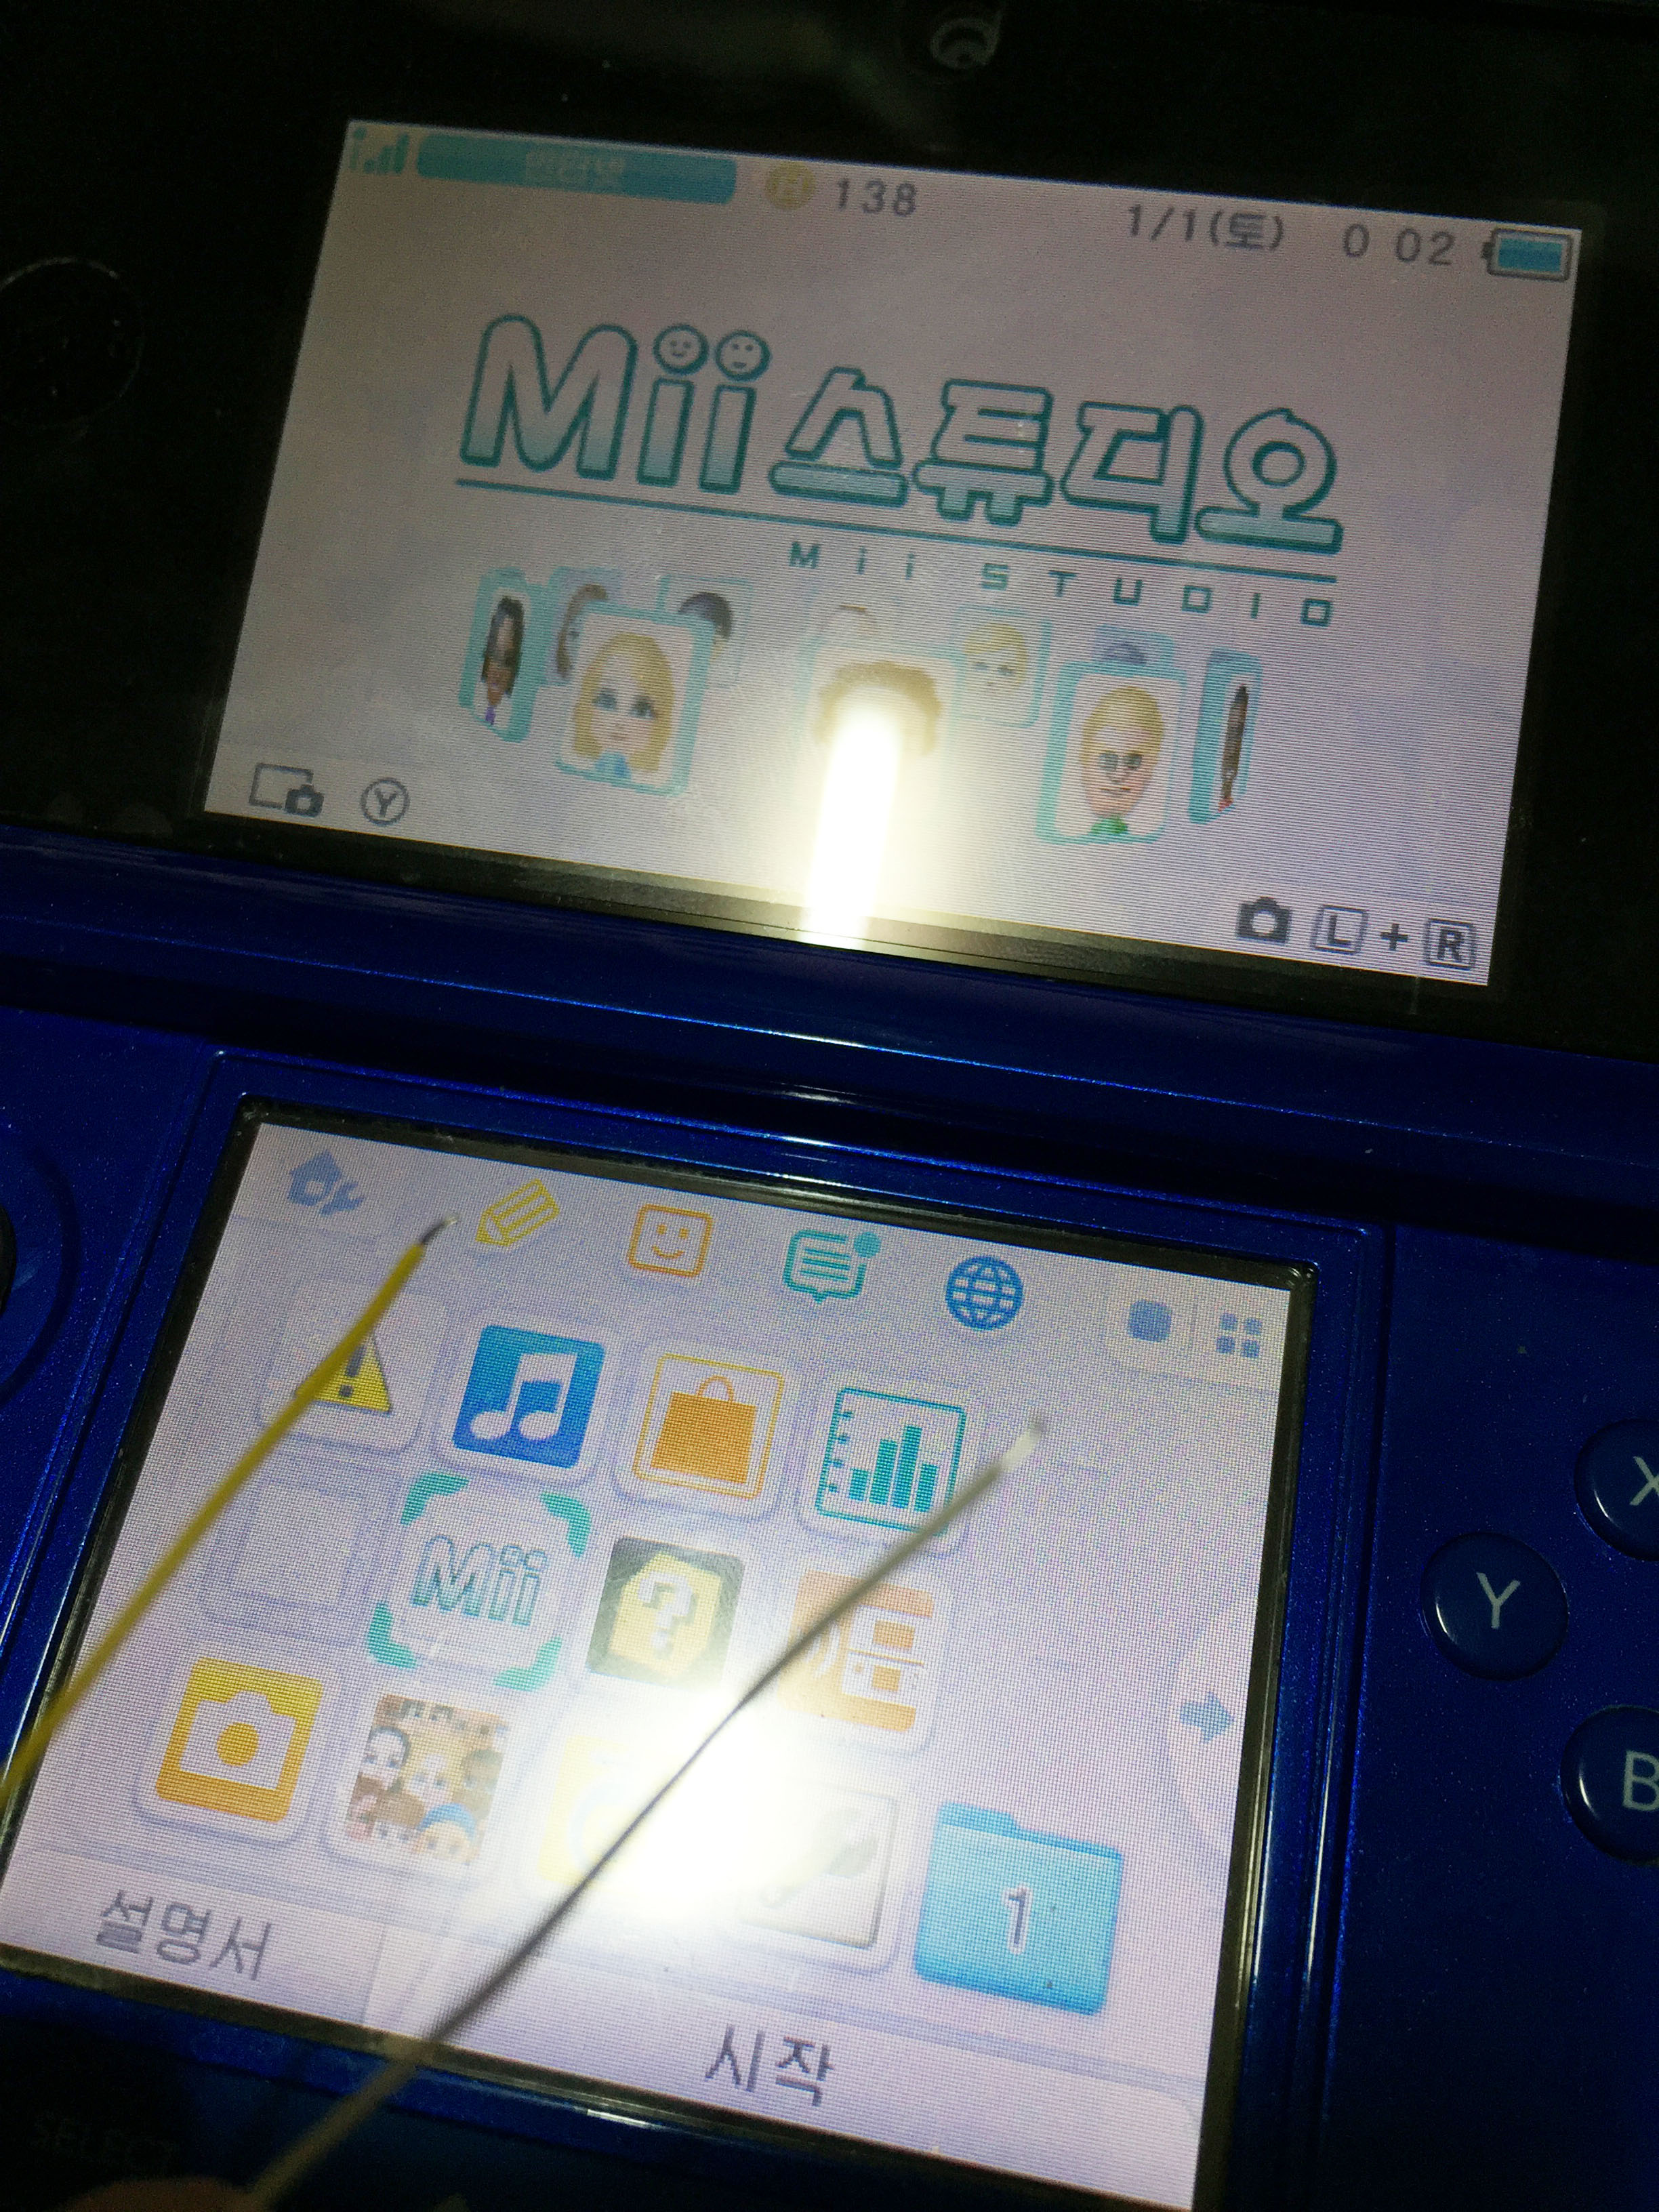
I installed the new CIA file onto the 3DS using devtool but it half bricked the 3DS upon reboot.
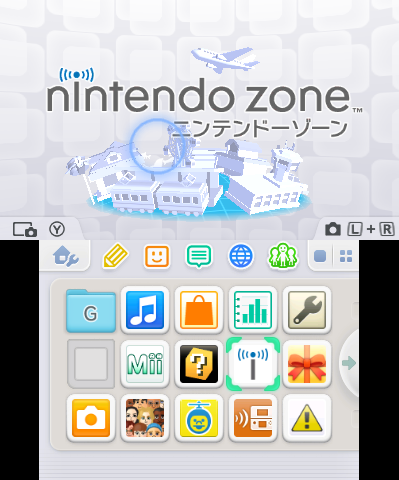
This is what a half bricked 3DS looks like. there is no menu on the bottom and it refuses to execute any of the softwares.
Trying to run Camera app using L+R freezes the console.
I wasted another 2 days trying to figure out what is going wrong, then I eventually found out that encrypting the CXI in the CIA file and using a sigpatched firmware could get around the problem.
By the time I worked on this there was no software capable of doing this but now one can use Decrypt9 to encrypt the CXI.
Anyway as the patched certificate is now in position we are moving onto server setup.
I changed the DNS settings of my 3DS and used redirected 3dsX-fushigi.pokemon-gl.com to my server’s IP address.
I created the certificate for secure https using IIS.
Then I started the mystery gift from the 3DS to see what happens.
Looking into the log I found that the 3DS was sending a request using a non-standard http format.
2016-02-03 12:07:40 *.*.*.* POST /api/serial.auth – 443 – *.*.*.* – 500 0 64 60
So I coded a secure proxy to dig into the detail.
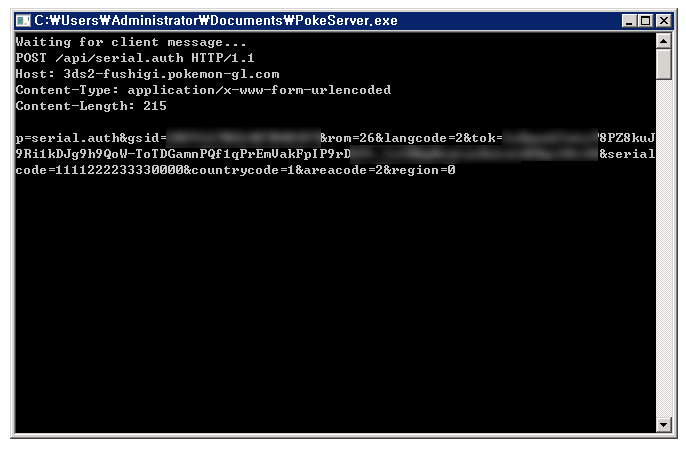
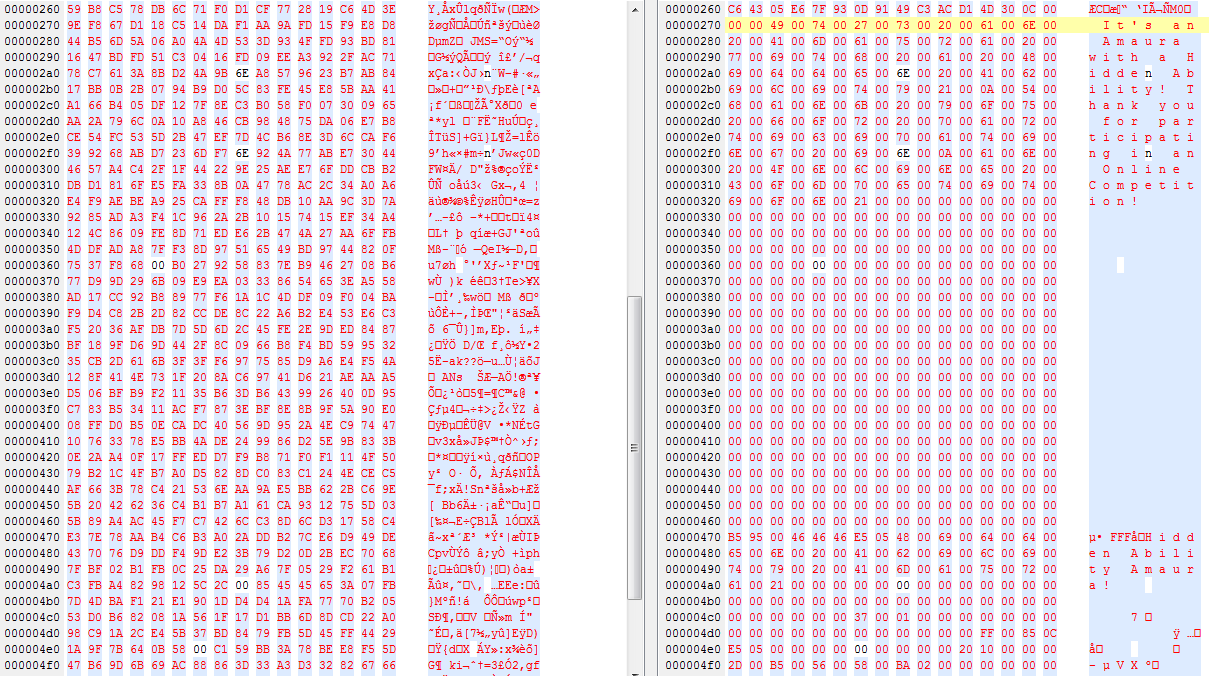
This is the request sent from the 3DS for validating the gift code with Nintendo servers.
It contains the player’s GameSync ID, language settings, rom type, country code and etc.
Also the gift code in plain format, in this case 1111222233330000.
At this point I thought pretty much everything is over… and I was wrong.
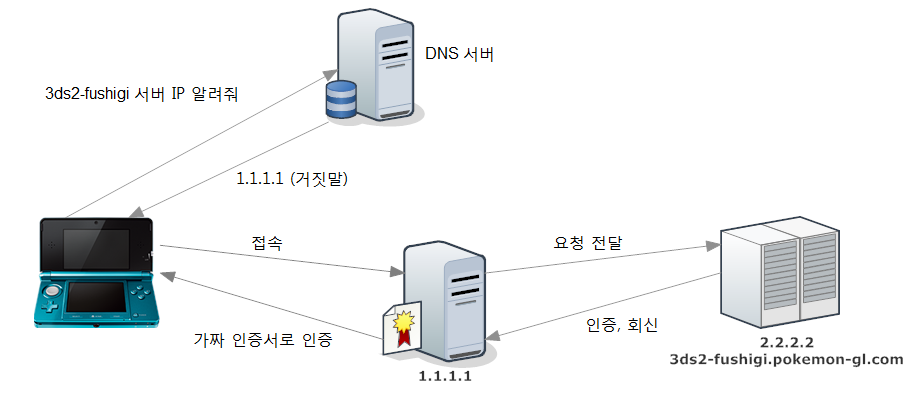
A simple diagram for non-techy users.
I used a rogue DNS to redirect the traffic to my server and my server is behaving as the Man-in-the-Middle.
But strangely the response from the Nintendo server did not contain any information about the gift Pokemon.
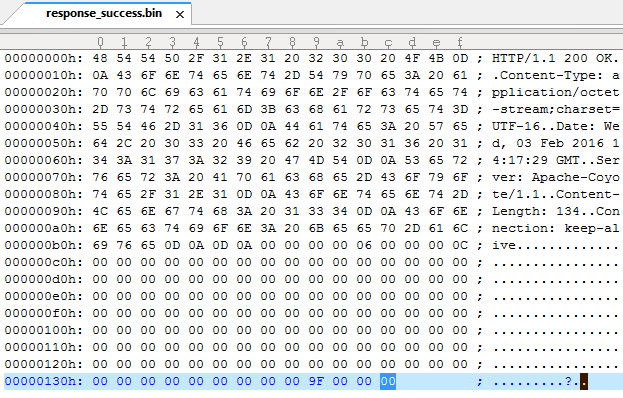
This is the original response from the fushigi server.
I used a couple different working keys for comparison and discovered that it only tells the 3DS if the code is correct or the gift number on successful validation.

I did the packet capture again to see what it does after getting the response from fushigi server.
After disconnecting from fushigi the 3DS was connecting to npfl.c.app.nintendowifi.net.
But unlike fushigi, npfl server requires client authentication using a clientside certificate.
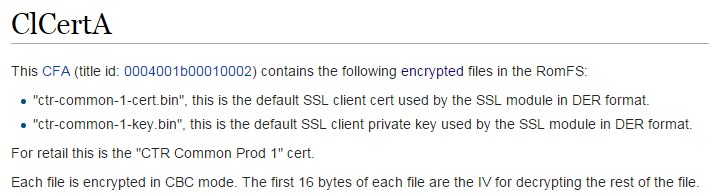
The client SSL certificate resides in a module called ClCertA
Extracting the certificate is done the same way as extracting the root certificate. But unlike the latter the client certificate is encrypted with AES-CBC, but thankfully we have a tool for that purpose.
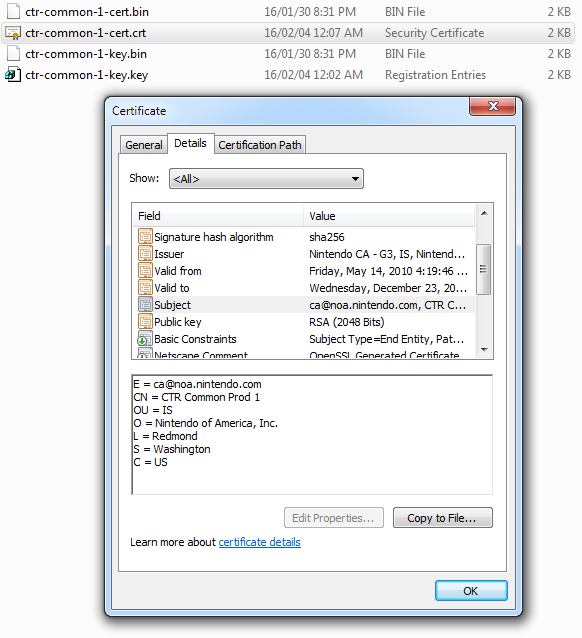
Successfully extracted the certificate and key from the module
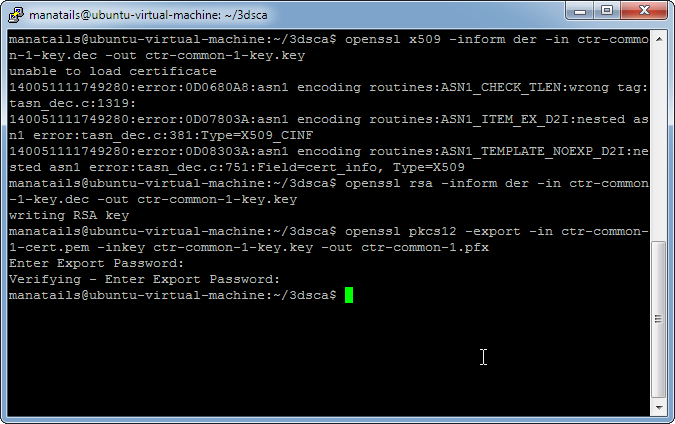
let’s convert the certificate into a more PC-friendly format.
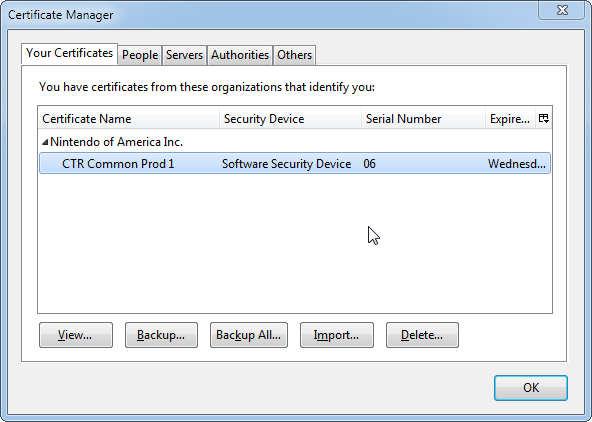
Importing the certificate into the browser now enables us to impersonate as legit nintendo 3DS’s
Now let’s see what the server has to show us.

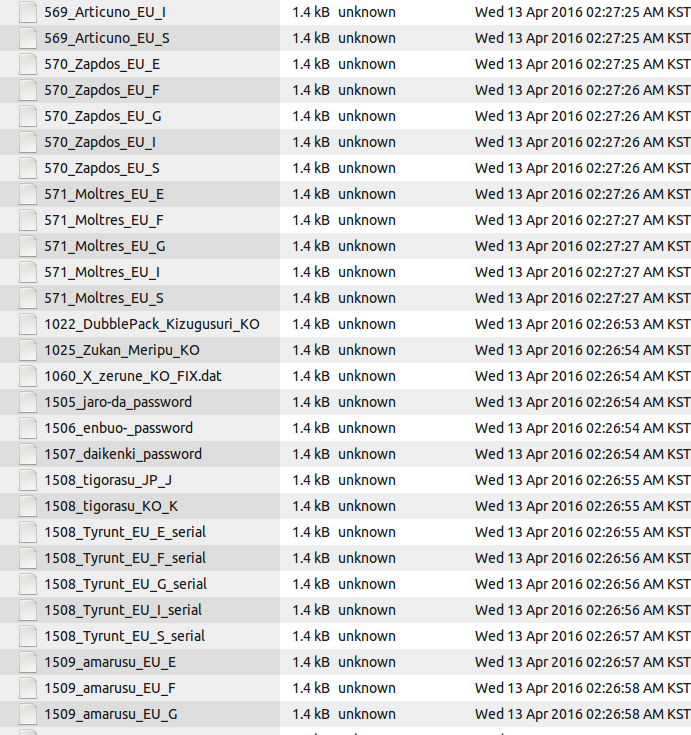
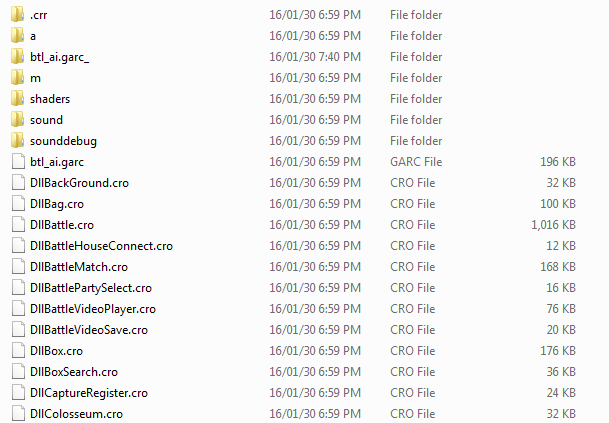
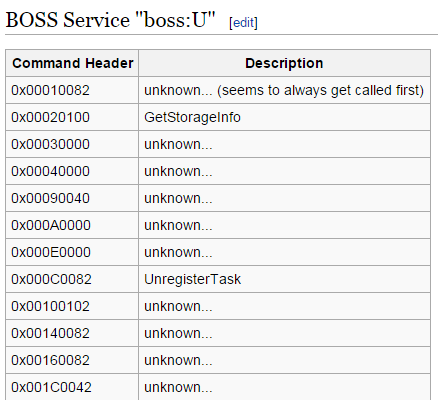
I see that the NPFL server holds the list of available gifts.
If given a gift number it will output the corresponding gift name for that number, if no input is given it shows all the available gifts.
File names are pretty much self-explanatory, although there are a couple of confusing names like M18KO_A, M18KO_HU. Which I guess means Arceus and Hoopa for the 18th Pokemon movie in Korean region.
One interesting thing to note is that when a 3DS connects to this server, it displays “Searching for gift…” message. It is _literally_ doing it.
If NPDL server gives a response and 3DS does find a gift, it will then connect to NPDL server to download the actual gift file.
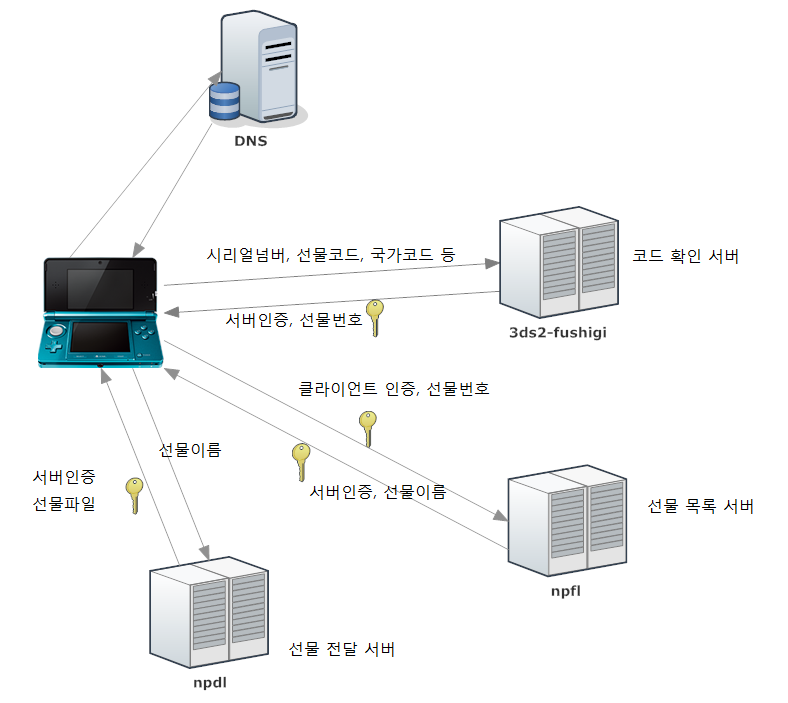
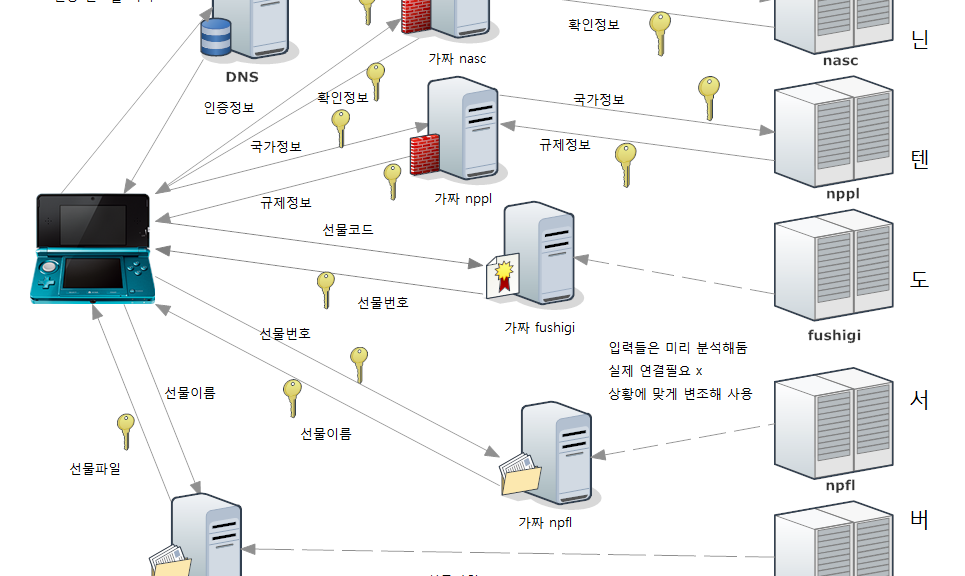
To summarize, The process is like the diagram above.
I coded a program for simulating each of the servers, but I discovered that NPFL server is using a different certificate chain than others. It is authenticated using Nintendo G3 root certificate as opposed to other servers using Nintendo Class 2 cert. I can also replace the G3 certificate in the same way I did for Class 2, but as G3 certificate is also used for connecting to NASC and NPPL server, which is used to authenticate the nintendo 3ds and the cartridge itself everytime it tries to connect to the internet. I couldn’t figure out a way to emulate those servers due to their cryptic response format, so I ended up coding a secure proxy server that redirects all the information to the legit servers.
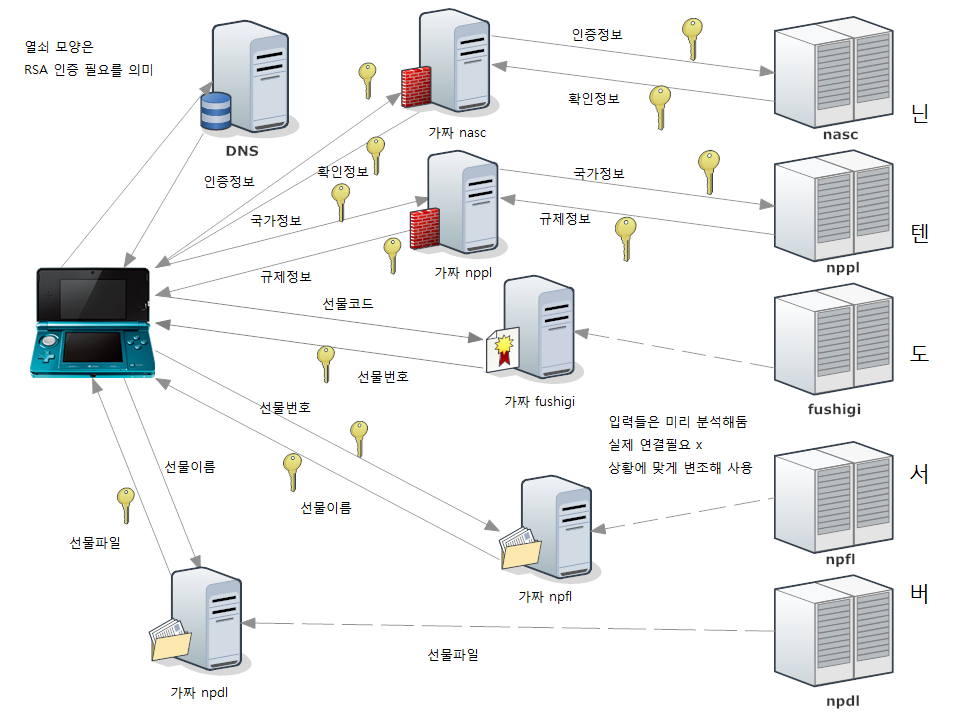
So this is the final diagram.
fushigi, npfl and npdl servers are accessed consecutively, so there is no problem running everything on a single server. But nppl and nasc servers are accessed randomly during connection, somethimes even simultaneously so they must be ran on different machines.
Anyway now I proceed to analyzing the output of the npdl server.
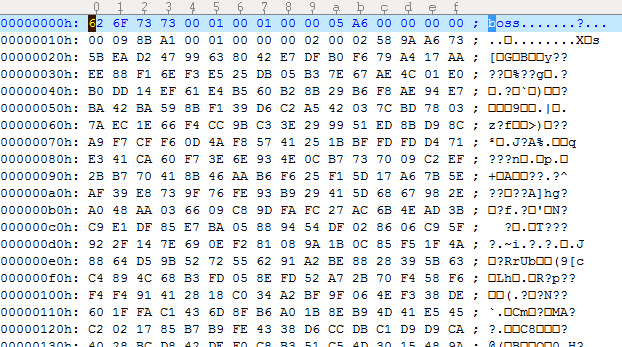
Despite so many steps it is still encrypted…
It is the BOSS format used in SpotPass, but to this date nobody bothered to document anything about the service.
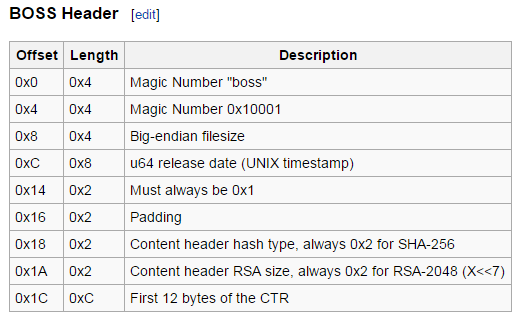
But thankfully the specs for the header are documented, I coded a boss format decrypter from the information.
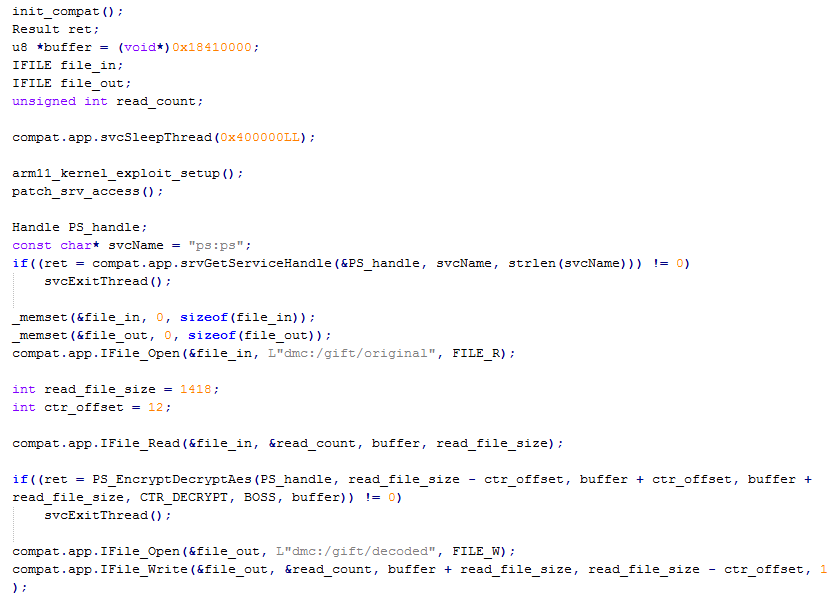
It is encrypted almost the same way as the client certificate execpt that it used AES-CTR and different set of private key. I coded another homebrew that is capable of decrypting AES-CTR from the raw data. the starting bytes of the CTR is the 12 bytes following the header plus 1 in big endian, so for this file the starting bytes will be 58 9A A6 73 5B EA D2 47 99 63 80 42 E7 01 00 00 00.
Presto! the gift is successfully decrypted. Although the actual format of the gift I will investigate later.
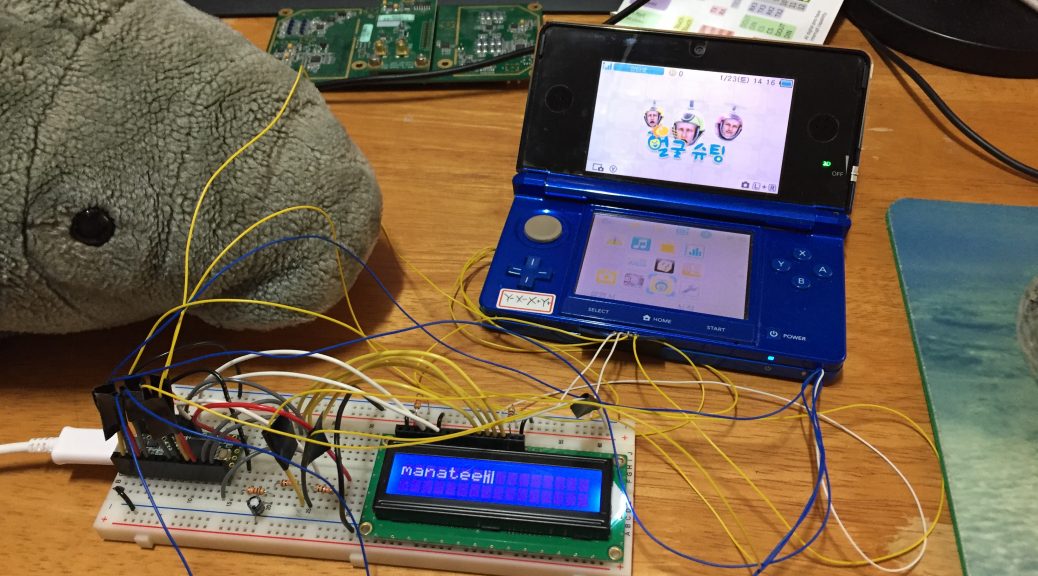
Now finally we can give ourselves a gift…
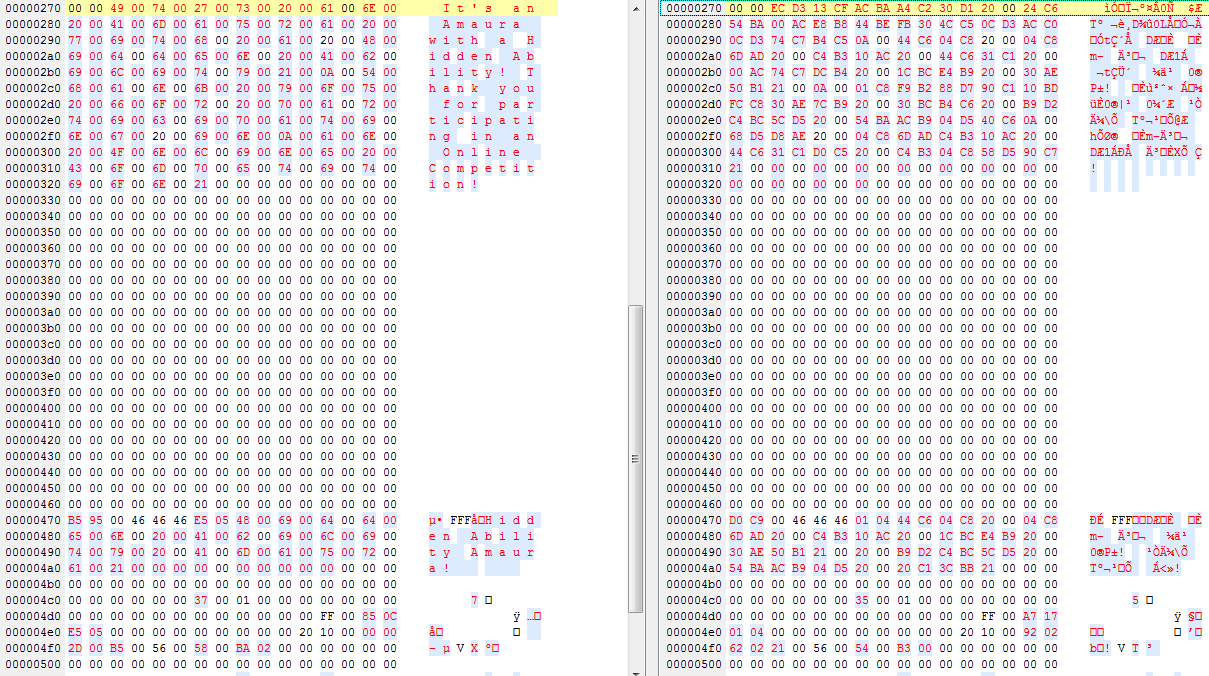
This is Amaura which my servers are gifting to my nintendo 3DS, with an arbitary gift code of MANATEE.
But as the gift file itself is also signed by nintendo, I guess there will be more stuff to be done before we can start creating our own giveaway pokemon.
The source code of the server emulators and AES-CTR decryptor will be released soon.
From Forensics Wiki:
| Field Name | Size (bytes) | Description |
|---|---|---|
| HEAD_CRC | 2 | CRC of fields from HEAD_TYPE to FILEATTR and file name |
| HEAD_TYPE | 1 | Header Type: 0x74 |
| HEAD_FLAGS | 2 | Bit Flags (Please see ‘Bit Flags for File in Archive’ table for all possibilities) |
| HEAD_SIZE | 2 | File header full size including file name and comments |
| PACK_SIZE | 4 | Compressed file size |
| UNP_SIZE | 4 | Uncompressed file size |
| HOST_OS | 1 | Operating system used for archiving (See the ‘Operating System Indicators’ table for the flags used) |
| FILE_CRC | 4 | File CRC |
| FTIME | 4 | Date and time in standard MS DOS format |
| UNP_VER | 1 | RAR version needed to extract file (Version number is encoded as 10 * Major version + minor version.) |
| METHOD | 1 | Packing method (Please see ‘Packing Method’ table for all possibilities |
| NAME_SIZE | 2 | File name size |
| ATTR | 4 | File attributes |
| HIGH_PACK_SIZE | 4 | High 4 bytes of 64-bit value of compressed file size. Optional value, presents only if bit 0x100 in HEAD_FLAGS is set. |
| HIGH_UNP_SIZE | 4 | High 4 bytes of 64-bit value of uncompressed file size. Optional value, presents only if bit 0x100 in HEAD_FLAGS is set. |
| FILE_NAME | NAME_SIZE bytes | File name – string of NAME_SIZE bytes size |
| SALT | 8 | present if (HEAD_FLAGS & 0x400) != 0 |
| EXT_TIME | variable size | present if (HEAD_FLAGS & 0x1000) != 0 |
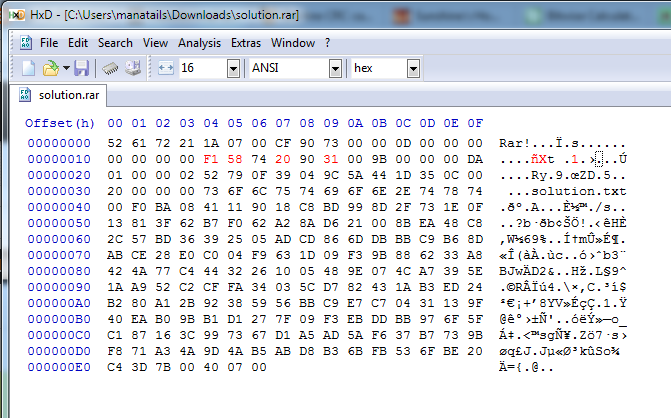
But the actual implementation of HEAD_CRC is the lower bits of CRC32 of header defined as in HEAD_SIZE without HEAD_CRC part calculated with standard polynomial of 0xEDB88320. I write it up here because RAR spec documents are crap. I hope this saves a couple of hours for someone.
트켓몬 블랙이 끝난지도 많이 지났고
다음세대의 트켓몬을 만들어보고 싶었습니다.
하지만 6세대 3DS는 에뮬이 없고
사실 에뮬이 있긴있지만 초기단계이므로 사실상 게임플레이는 불가능한수준
대책을 만들어야 했습니다.
그래서 3DS에 캡쳐보드를 장착하고 컴퓨터로 화면 출력을 돌린 다음
컴퓨터에서 내리는 명령을 직접 3DS로 전달해주는 장치를 직접 개발에 착수했습니다.
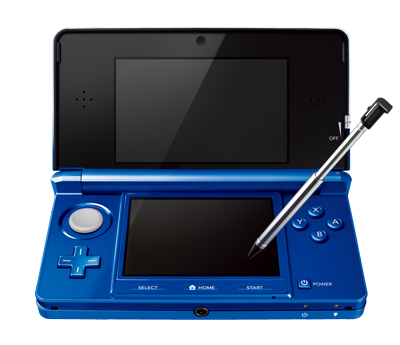
일단 닌텐도 3ds를 하나 새로 구입
다행히 캡쳐보드가 장착된 제품을 구할 수 있었습니다. 귀찮게 캡쳐보드부터 달지않아서 다행.
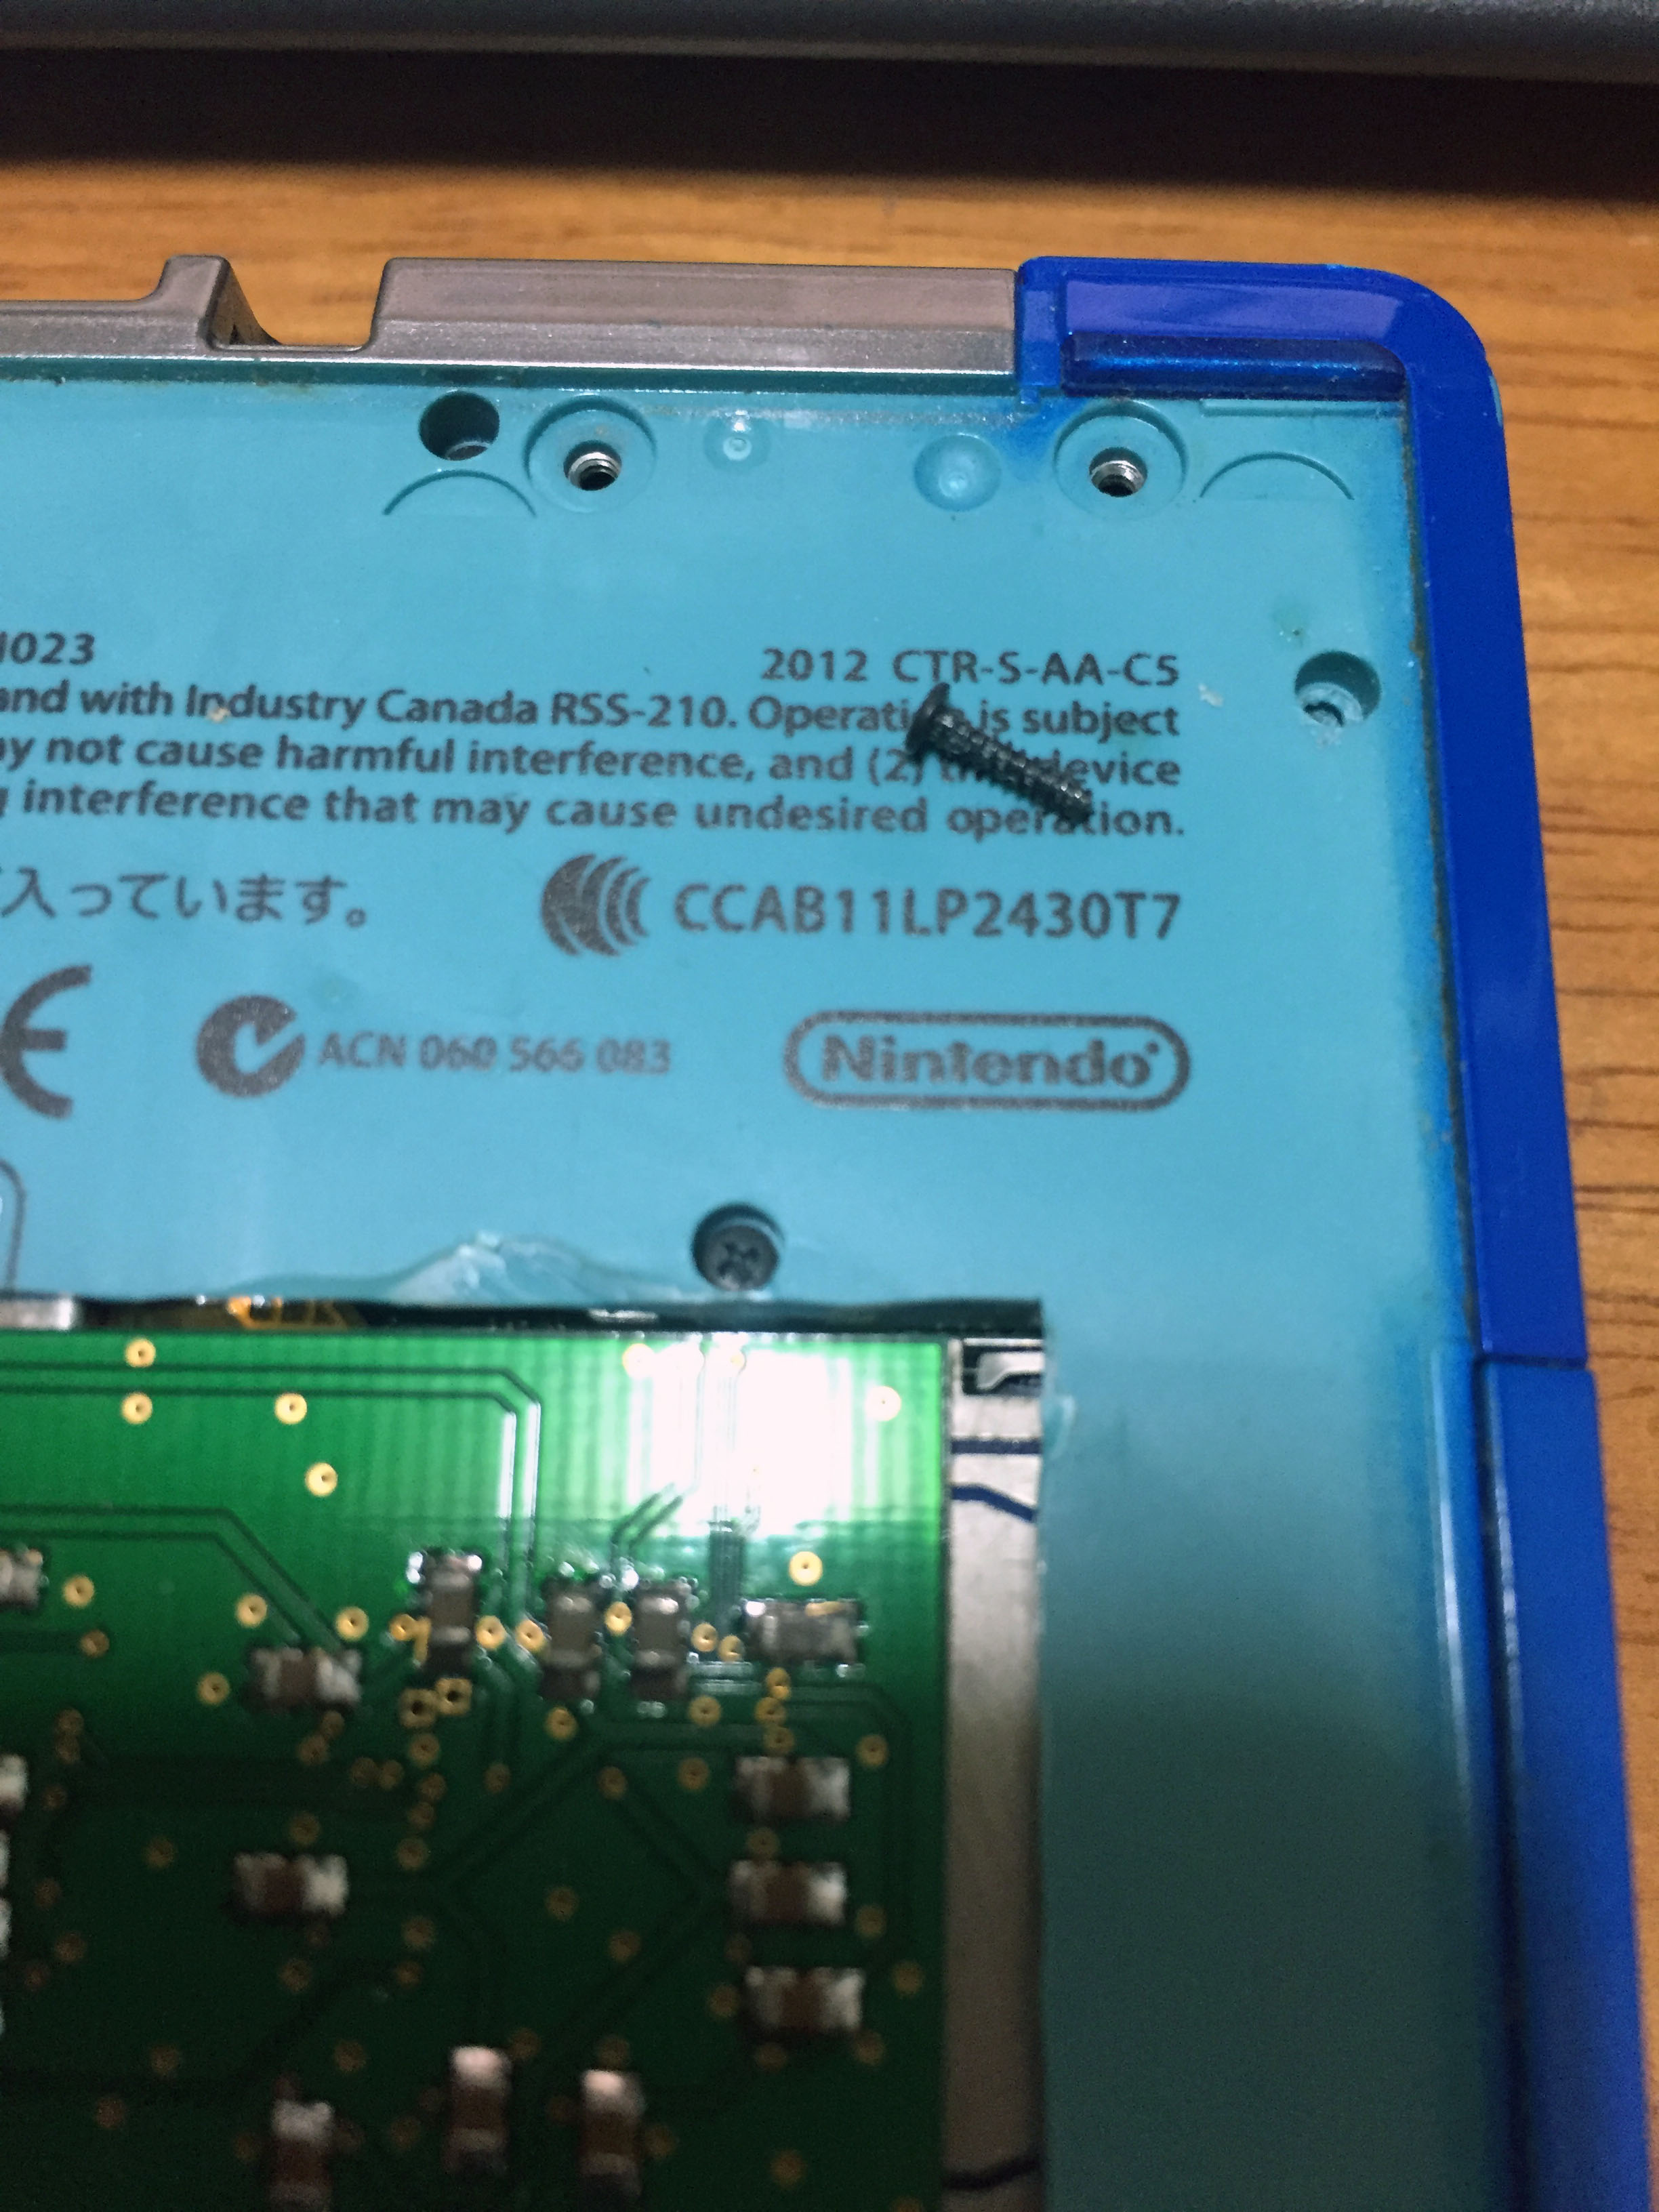
바로 뚜껑따기에 돌입합니다.

충전을 화면출력과 동시에 할수 있도록 커넥터 개조가 되어 있습니다.
이제부터 본격적인 작업에 들어갑니다.

우선 가장자리부터 시작해서 방향패드를 들어냅니다

기타 방해가 되는 모듈과 선들도 분리
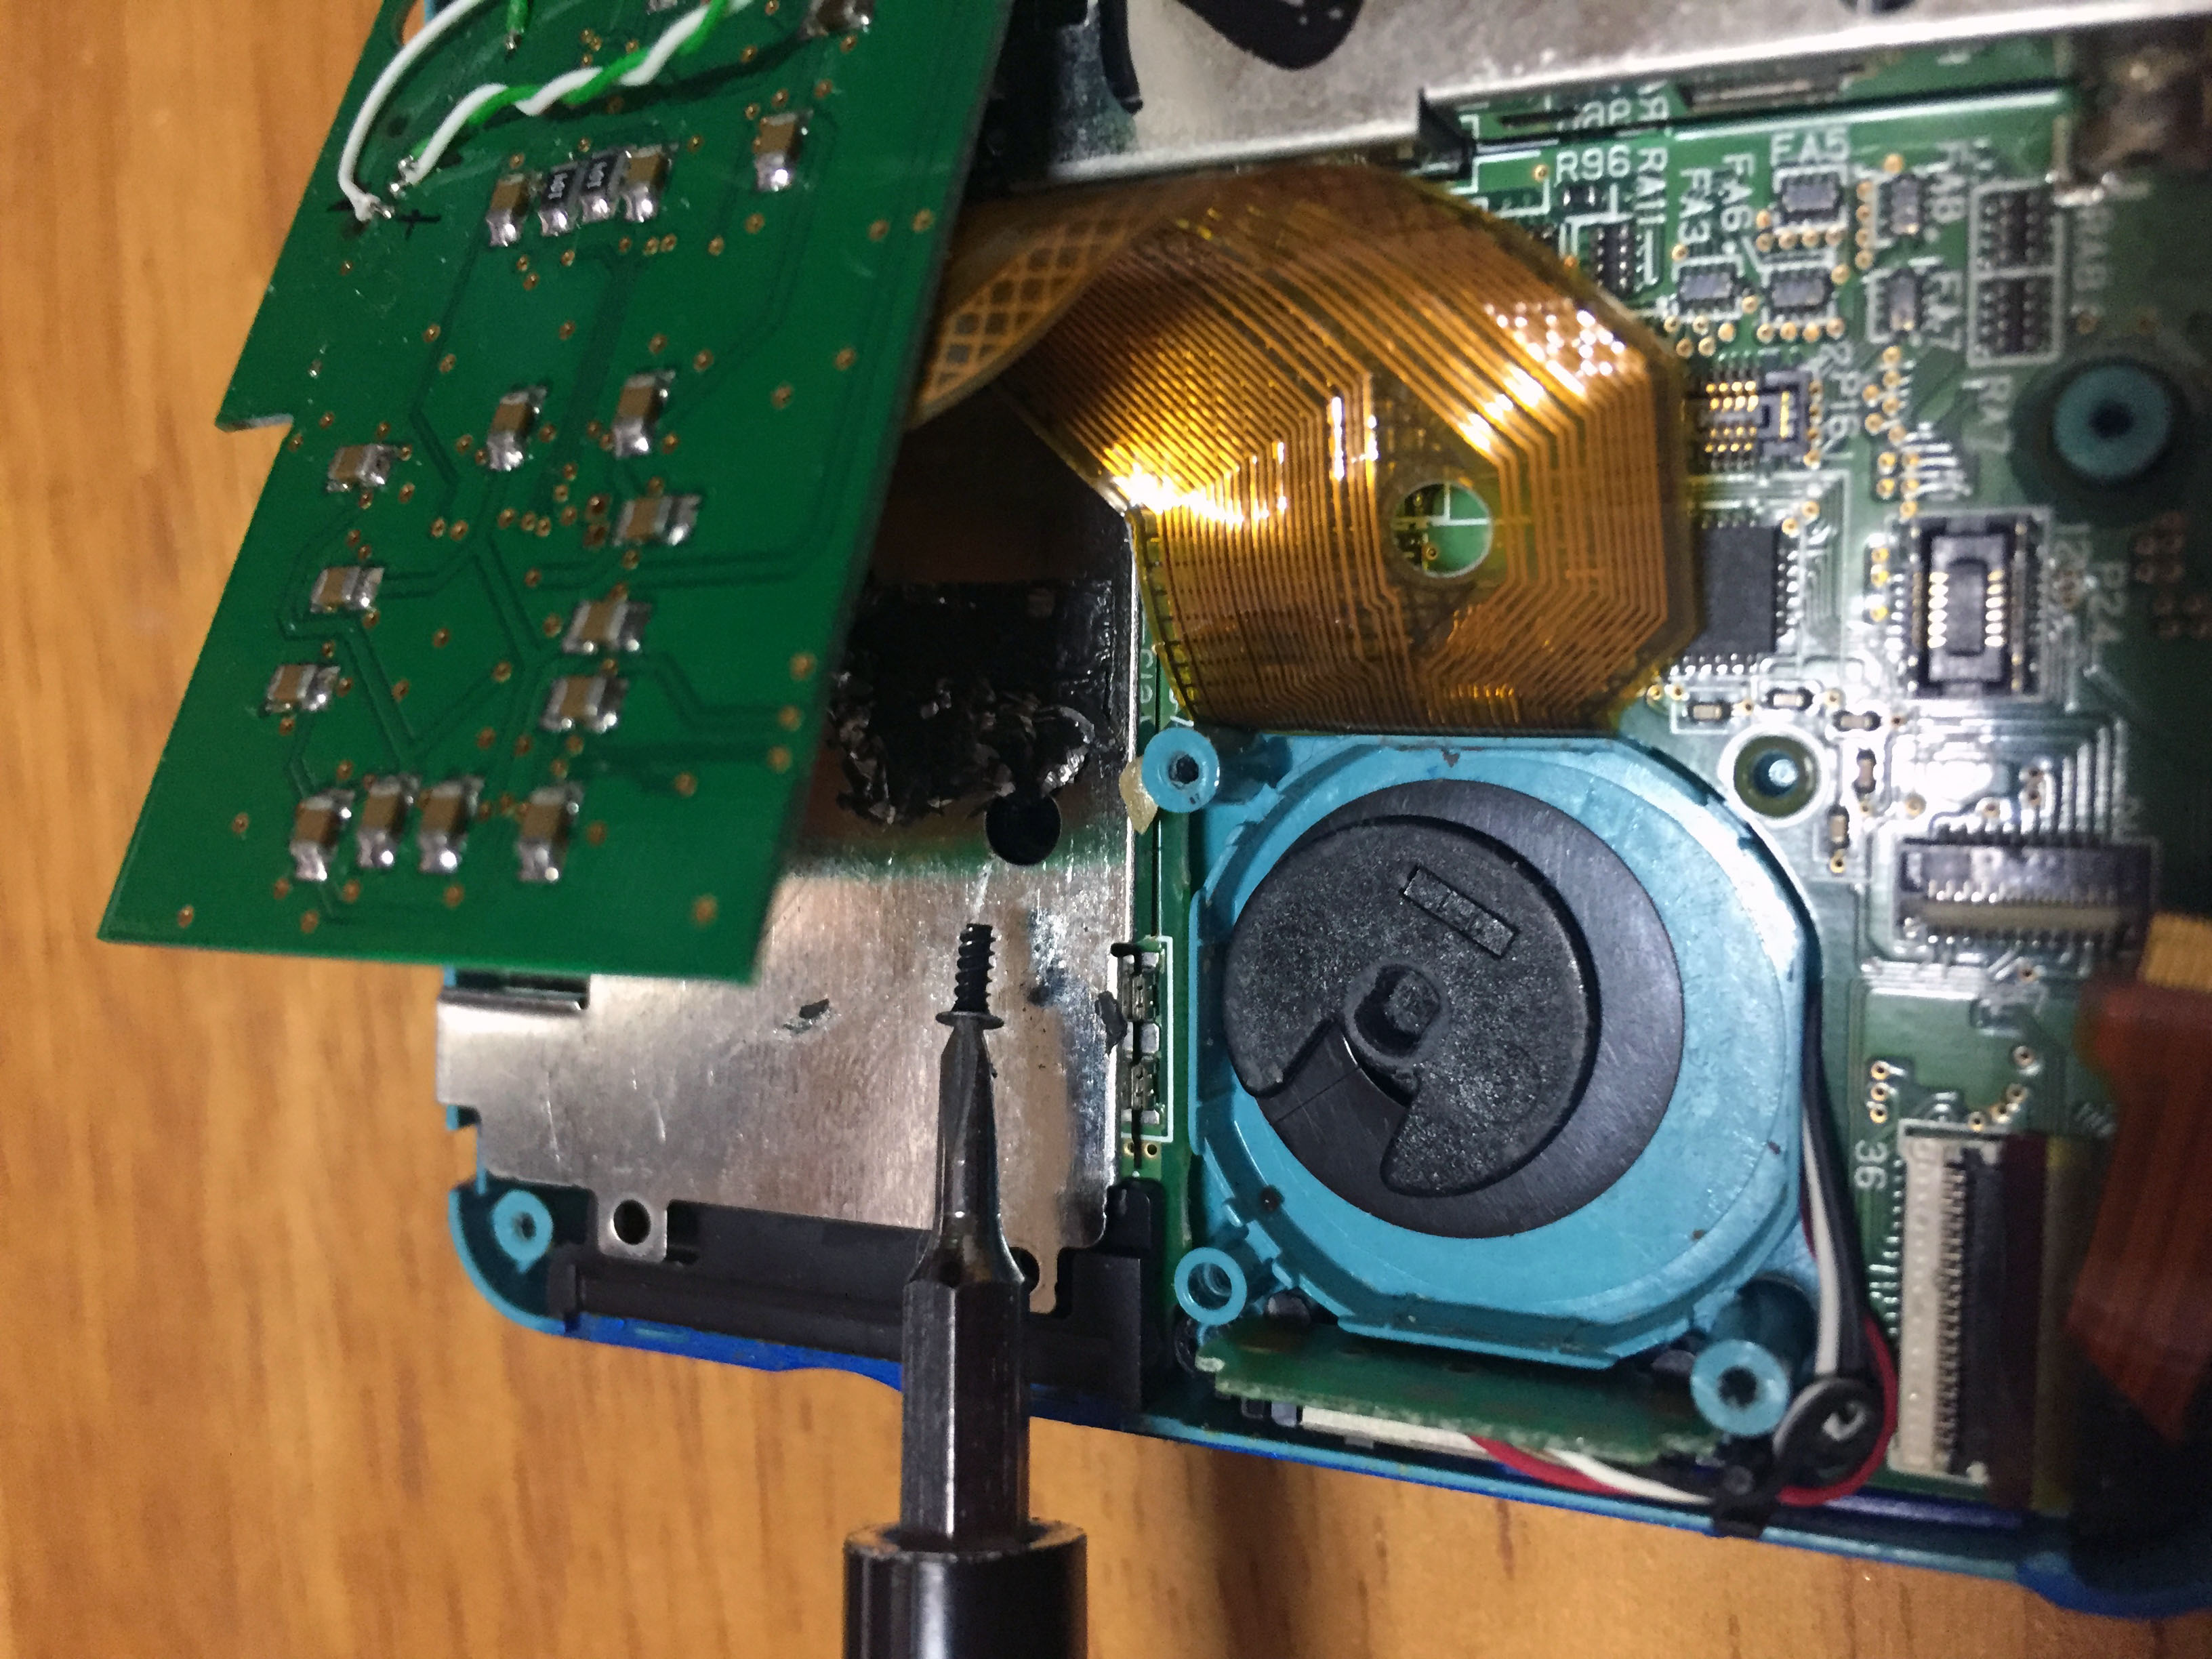
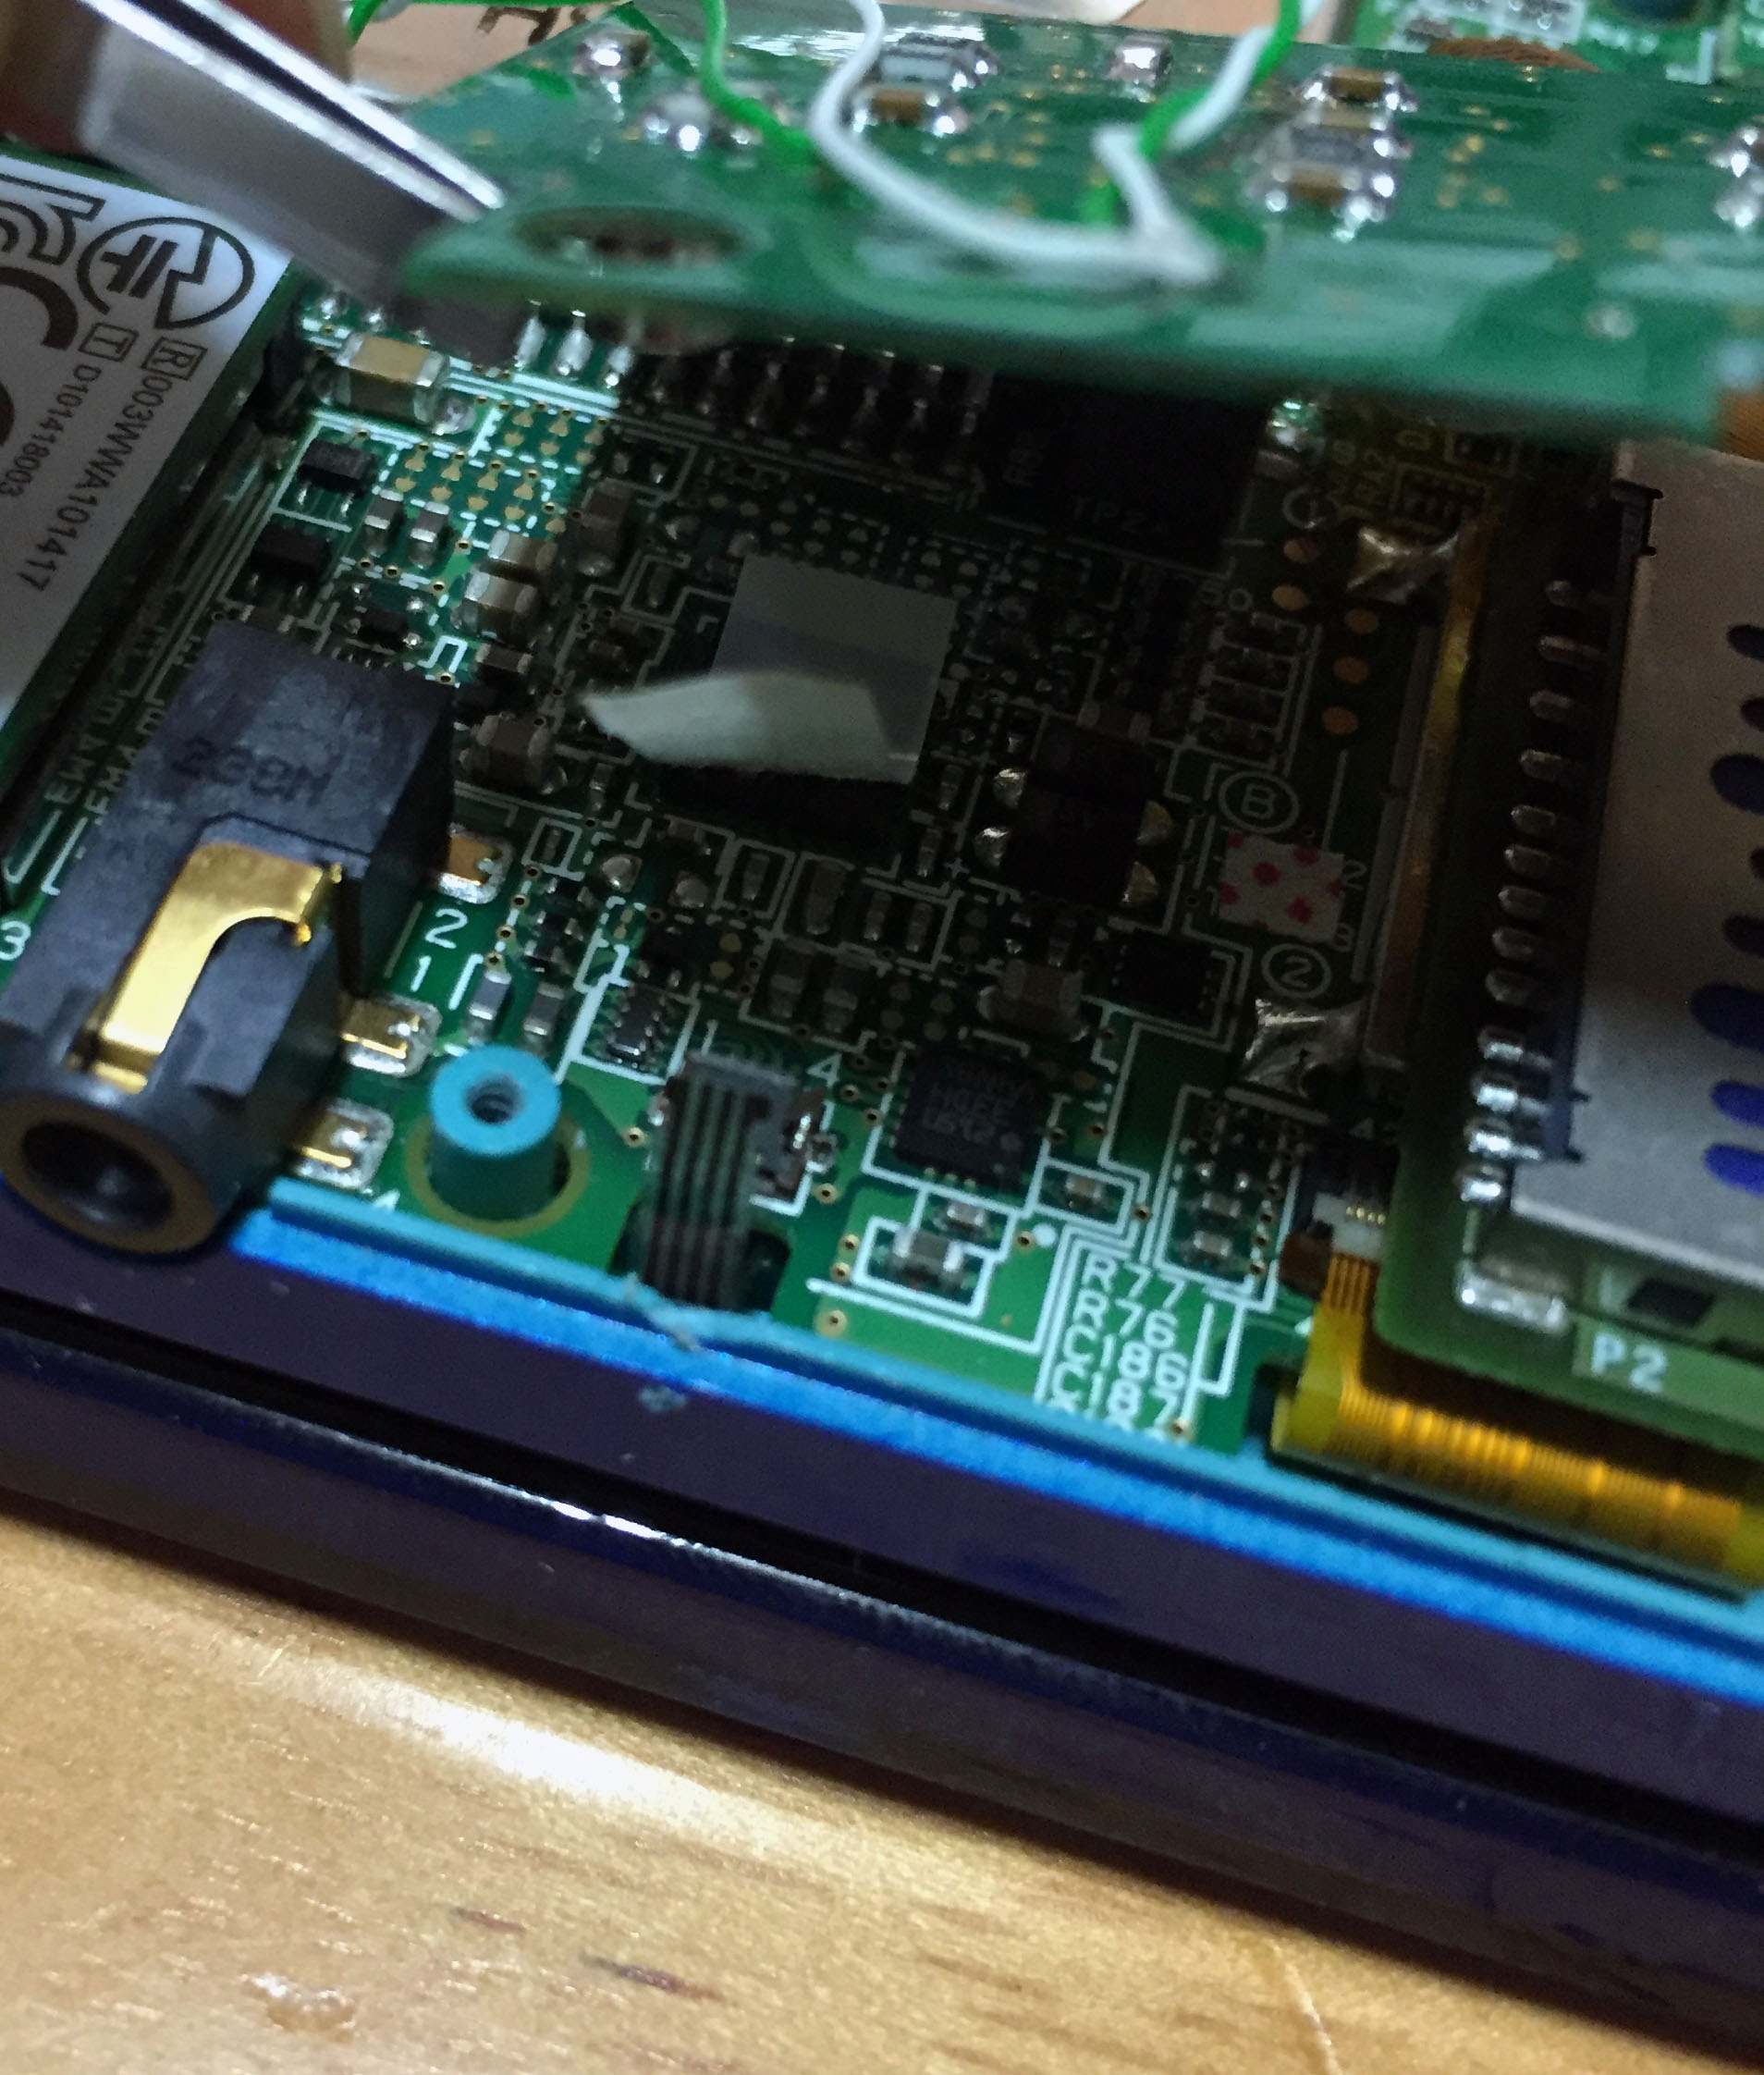
그리고 캡쳐보드를 필름이 끊어지지 않게 조심스레 들어올린뒤 SD카드 슬롯을 빼내고 안에 숨어있는 나사를 제거합니다.
아랫면 확보 성공
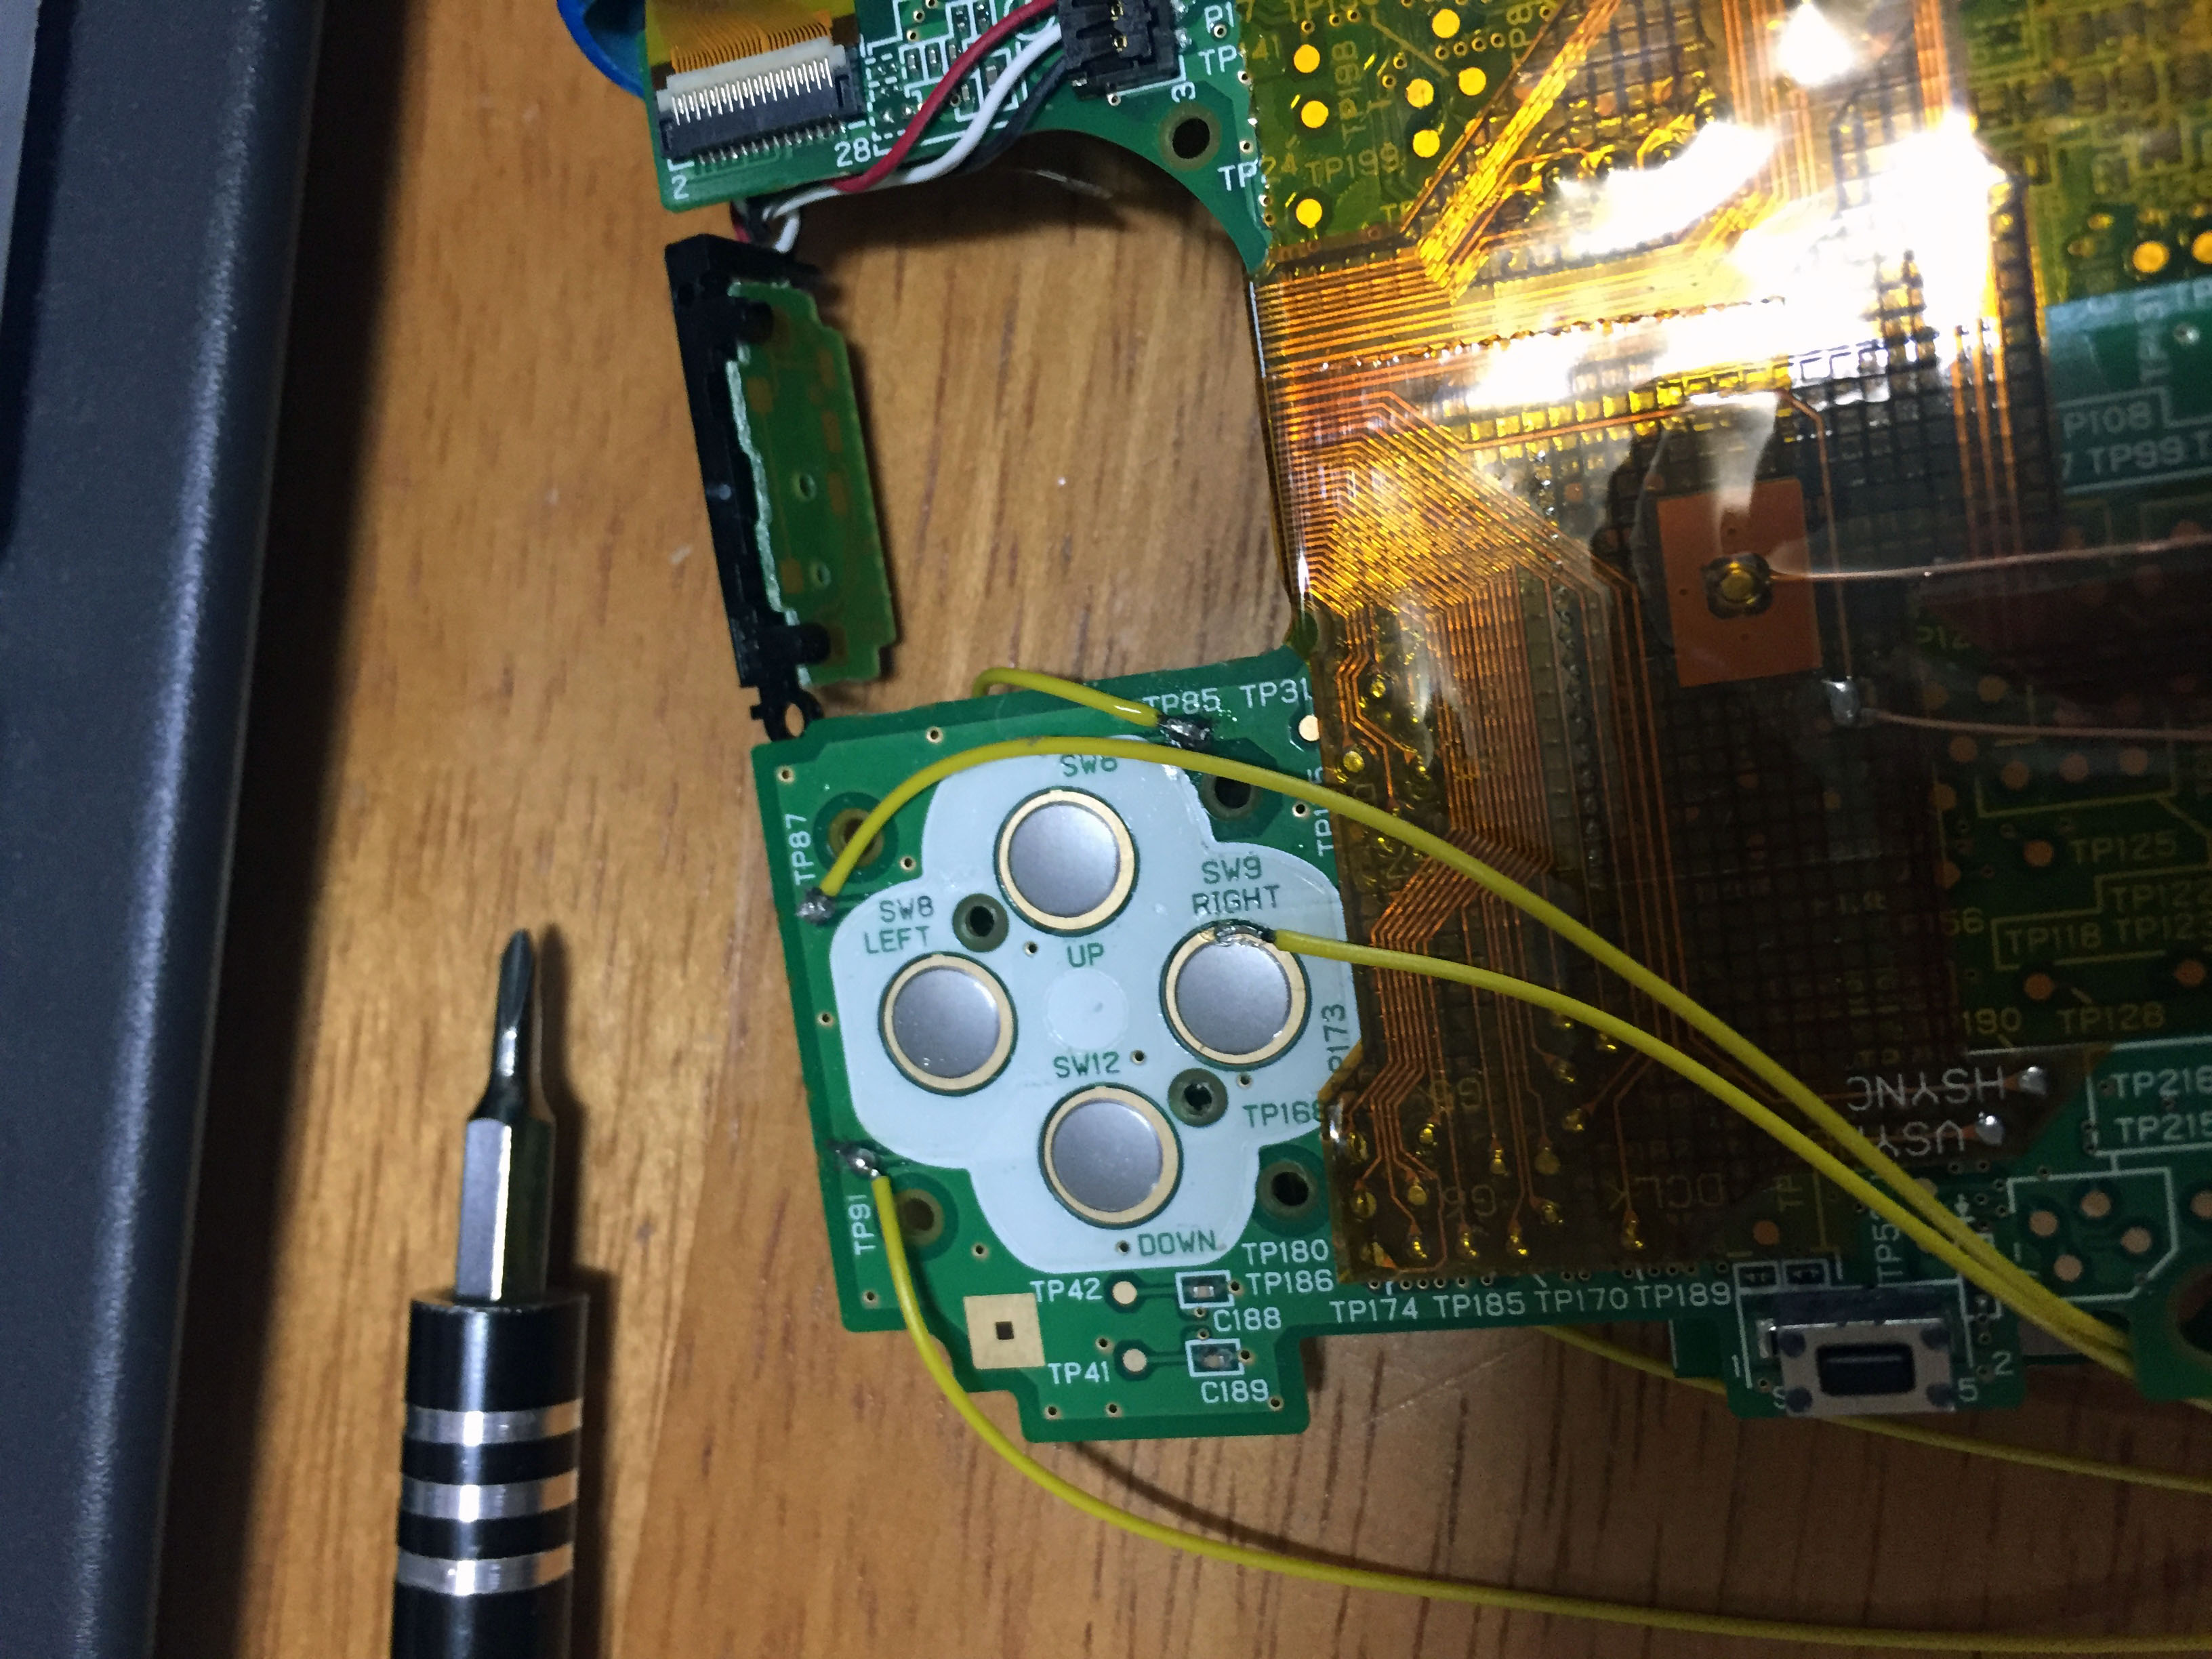
중앙에 노란 필름은 캡쳐보드로 화면과 소리를 출력해주는 기판입니다.
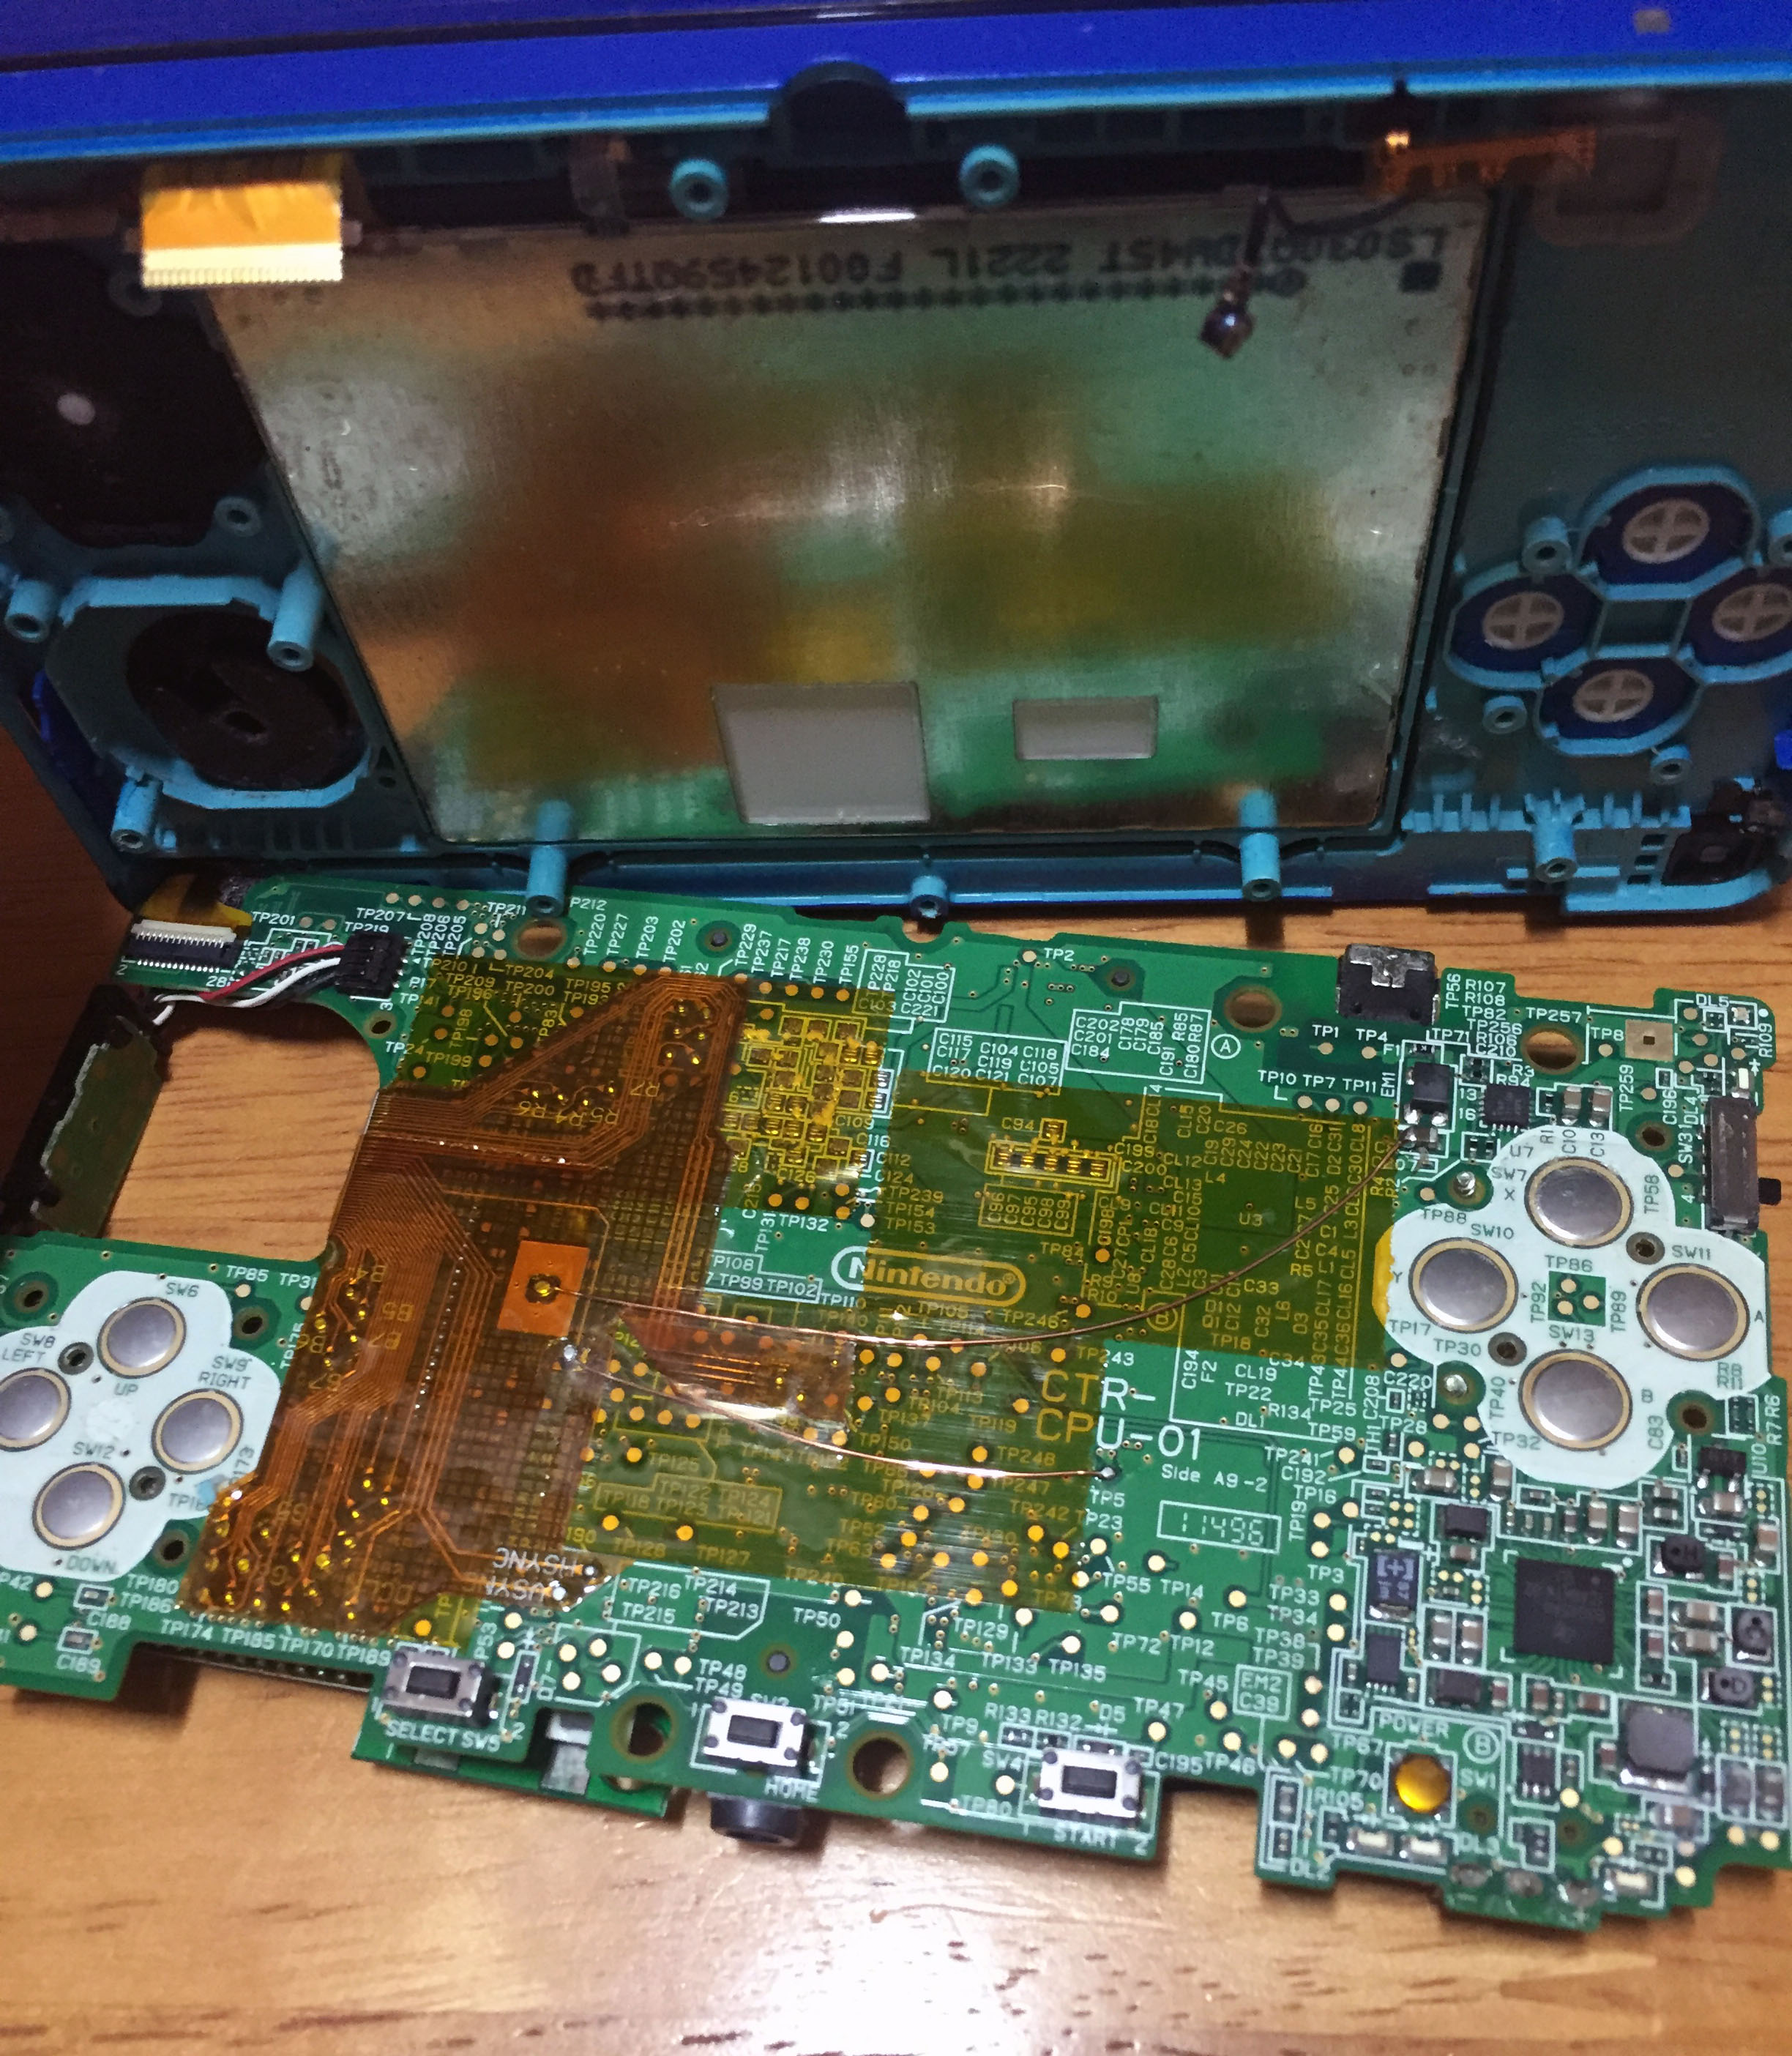
극세선을 조심스레 버튼핀에 납땜해줍니다.
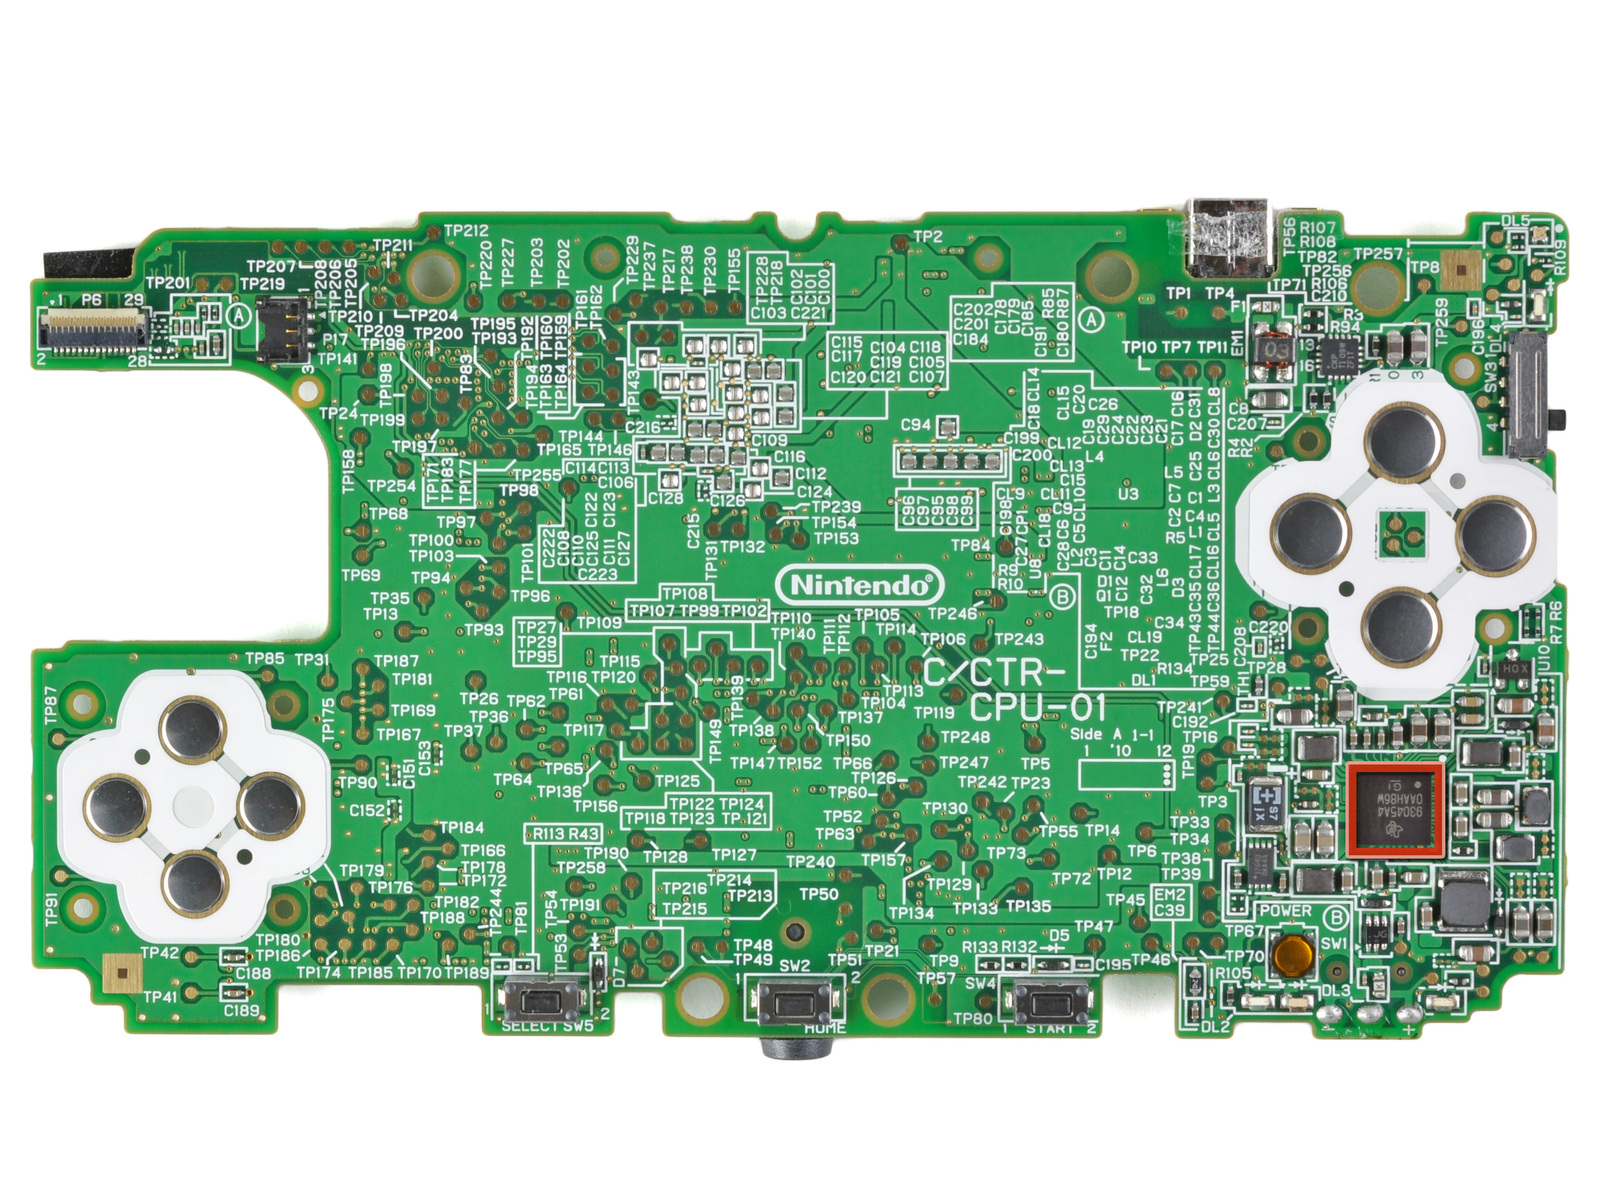
닌텐도 3DS 버튼 구조는 단순합니다.
각 핀이 그라운드로 연결되면 인식이 되는 구조라
버튼키에서 이어져 나오는 포트에 납땜을 하여 도선을 연장시킵니다.
하지만 그중에 방향키 오른쪽에 해당하는 TP90은 캡쳐보드 필름때문에 바로 납땜이 불가능하여 불가피하게 버튼 자체의 코팅을 찢고 그위 구리부분에 납땜을 하였습니다.
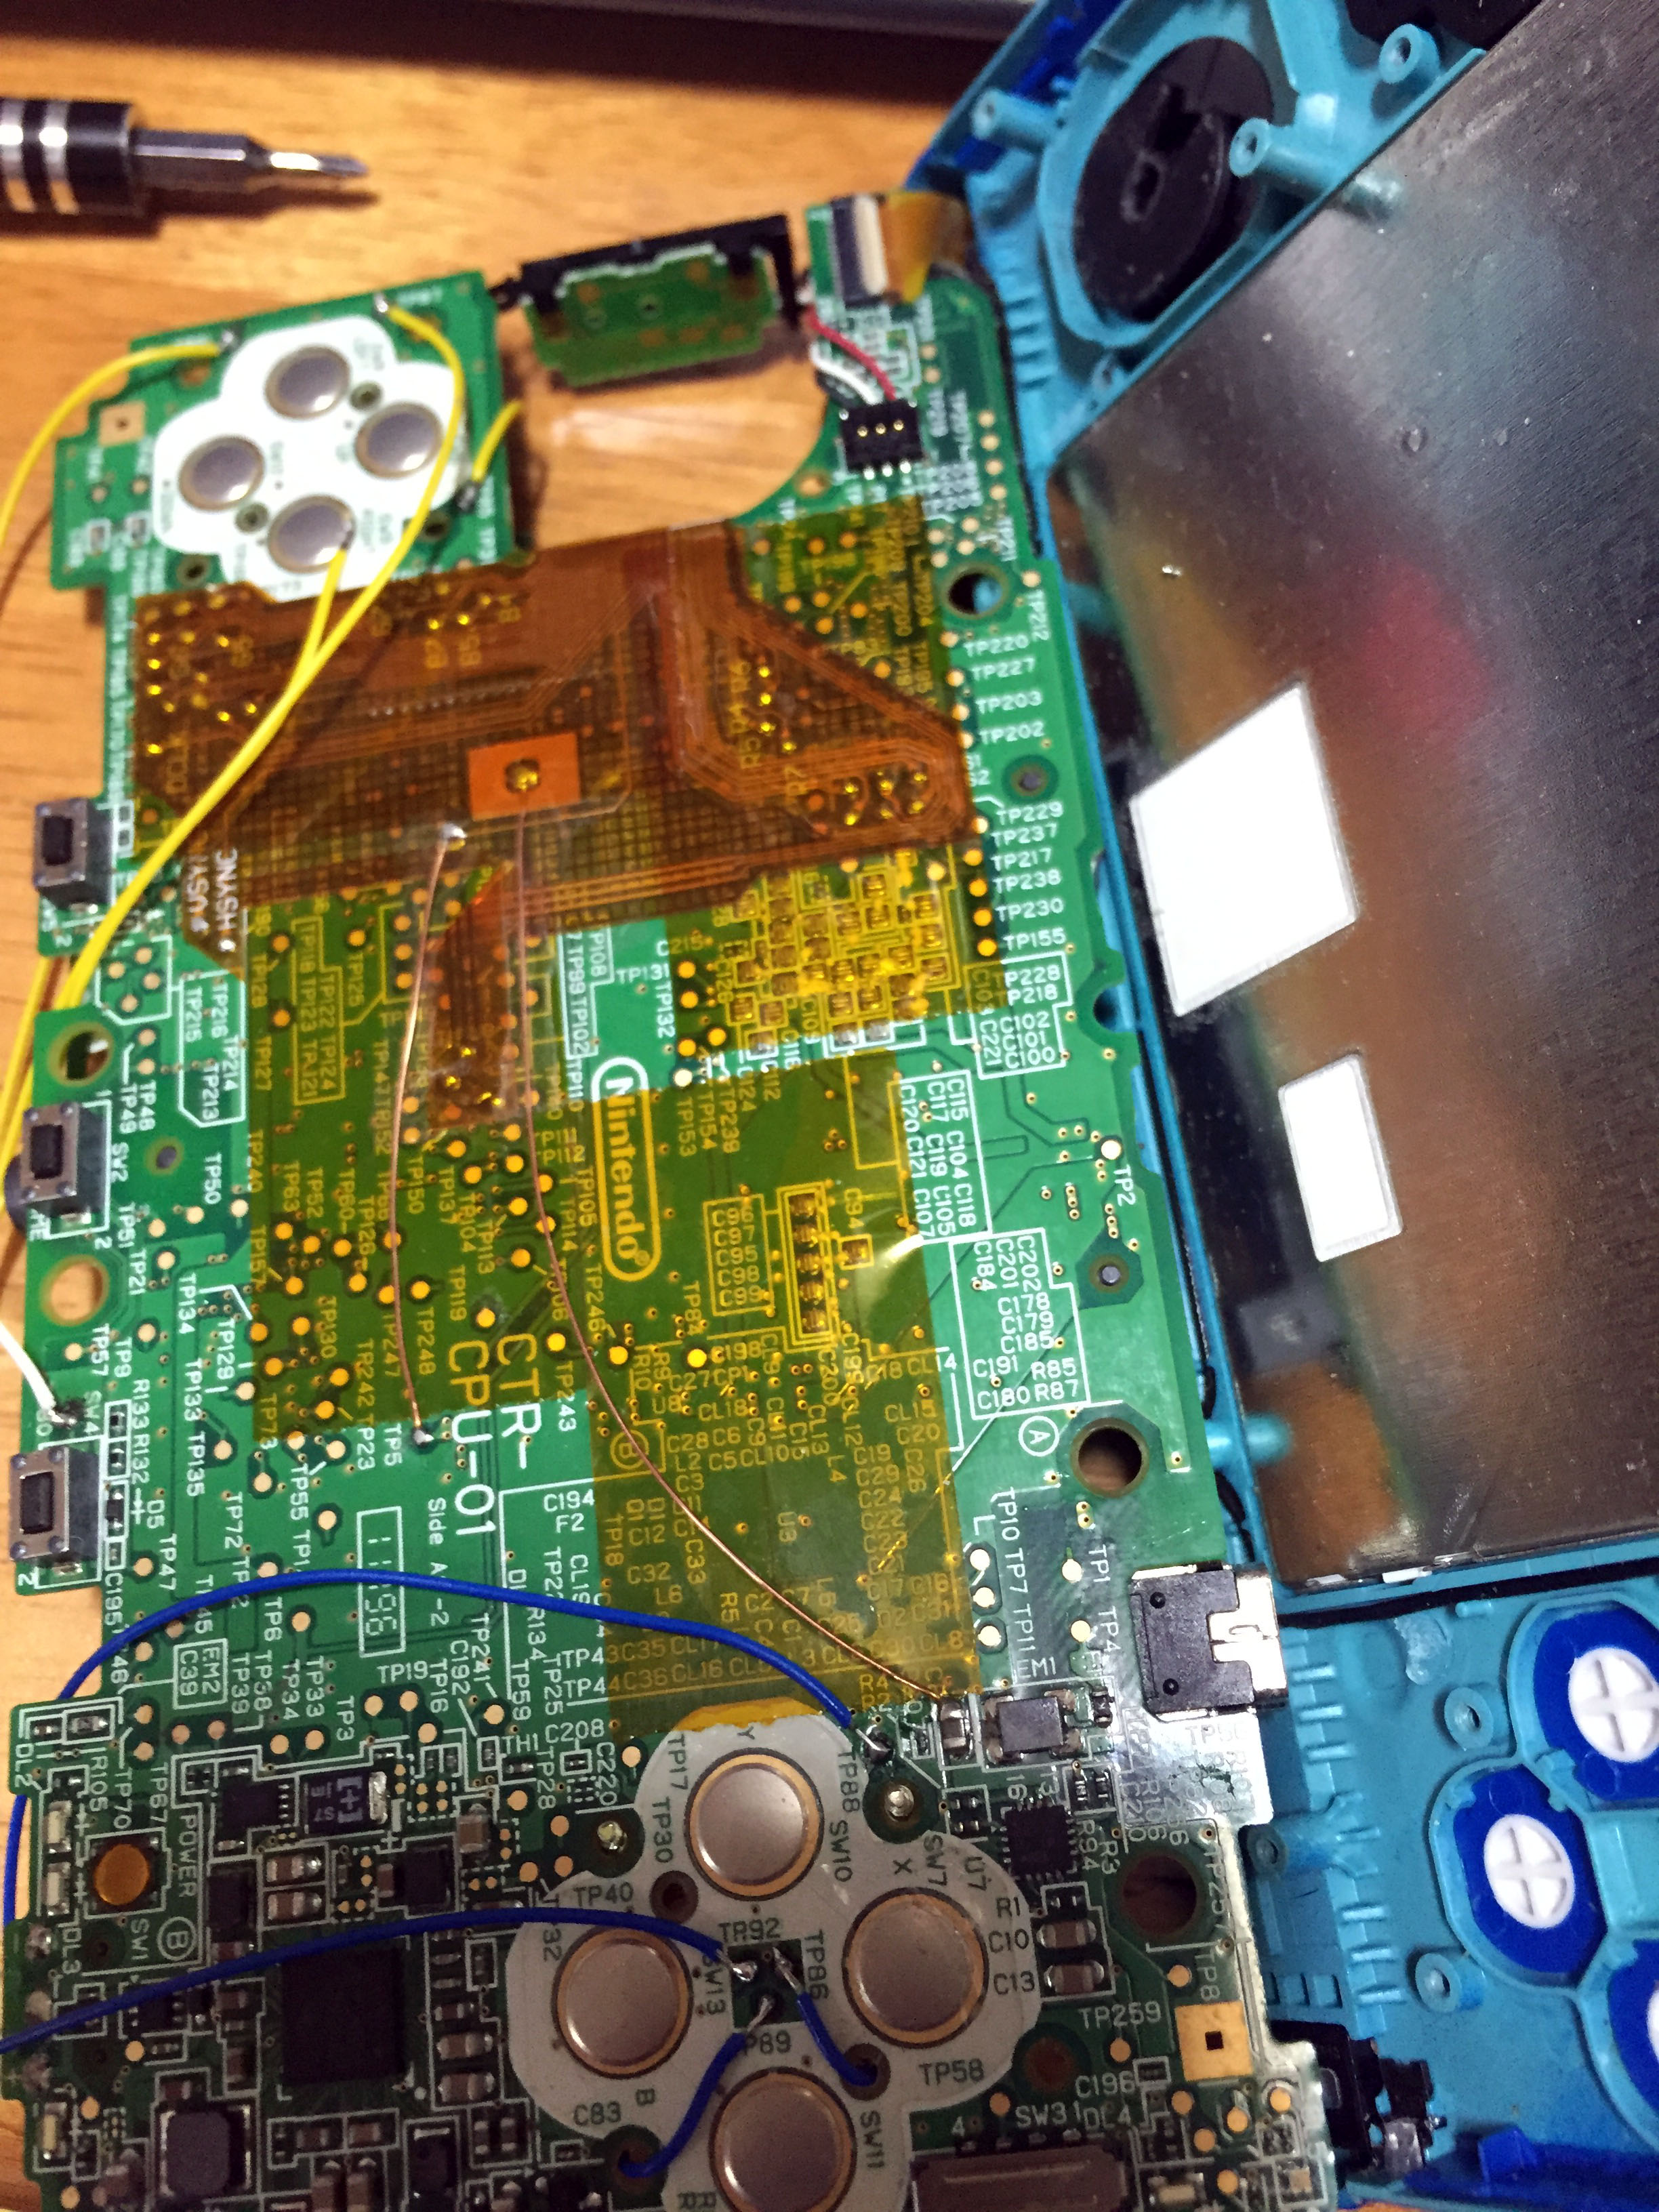
버튼이야 그냥 무난하군요

대충 다시 덮어서 케이블을 뺄만한 공간을 찾았습니다.
오른쪽부분은 그냥 삼각줄로 케이스를 깎아냈습니다.
그리고 보통 게임카드 접속을 위해 카드 슬롯 끝부분은 그라운드이므로 그라운드핀은 게임슬롯에 납땜을 하여 이용했습니다.
혹시나 해서 확인
버튼핀과 그라운드핀을 연결했을때 정상적으로 버튼입력이 인식되는것을 확인 하였습니다.
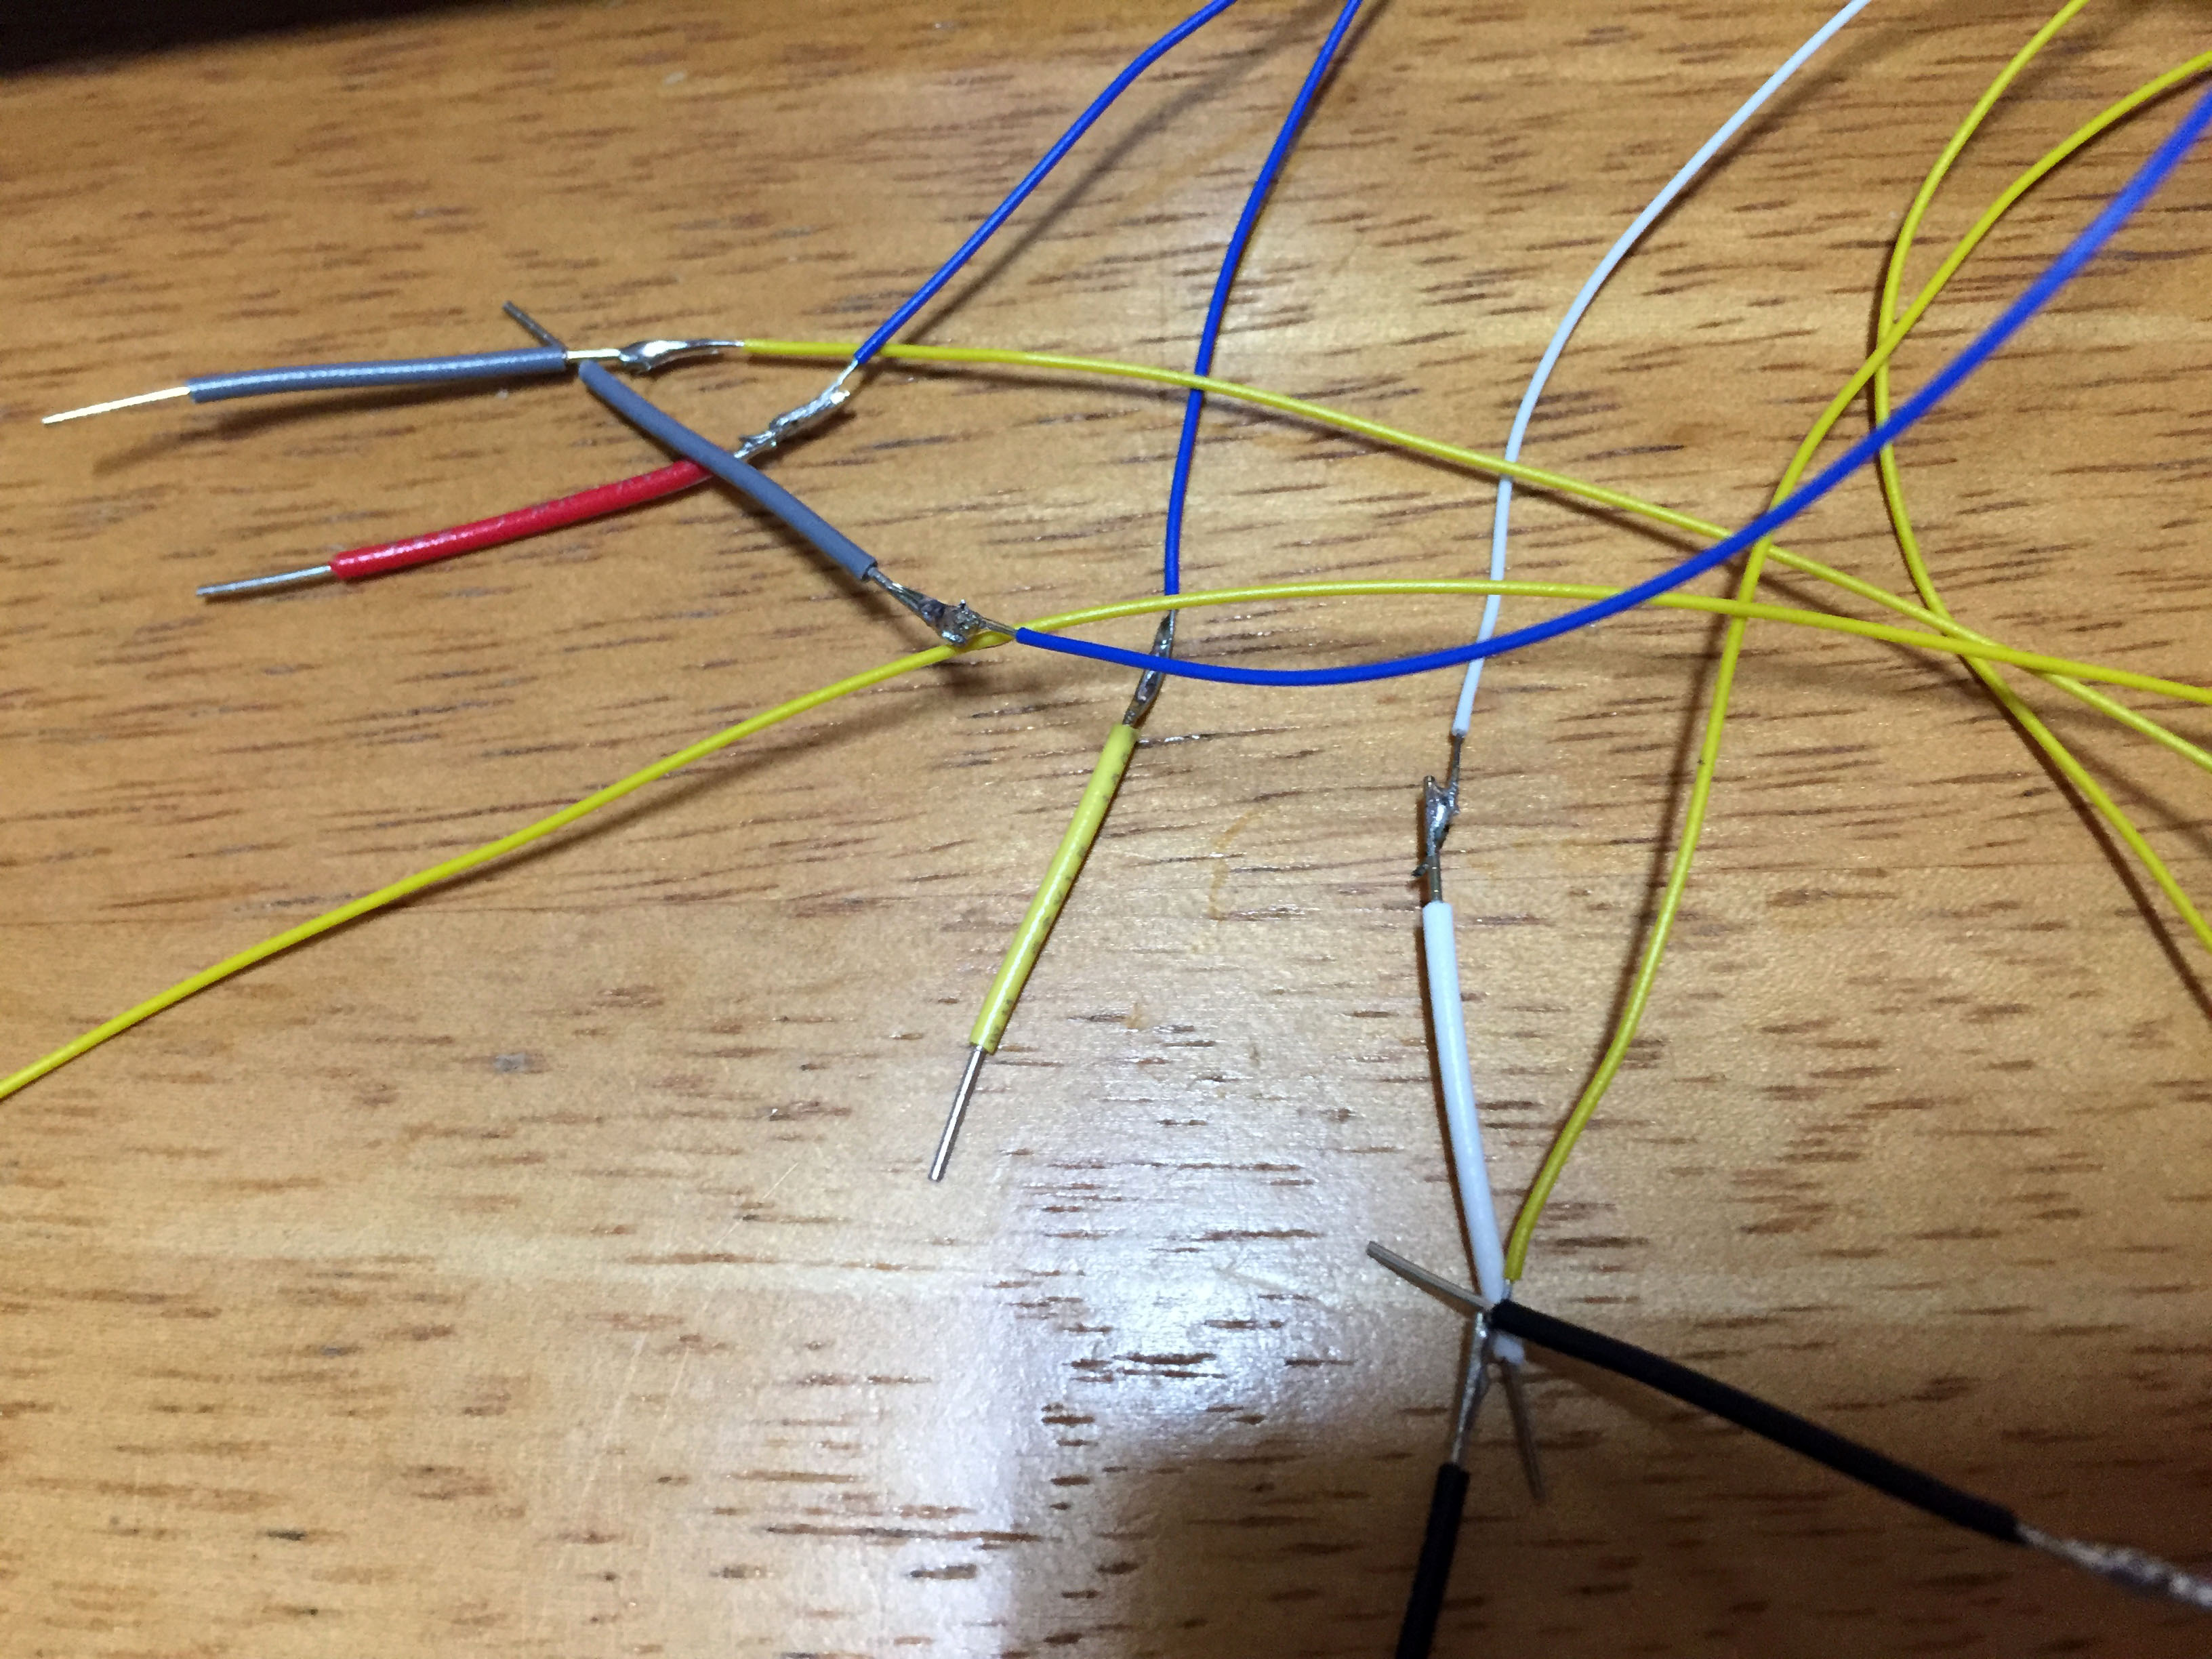
극세사는 브레드보드 연결에 부적합하므로 끝부분은 다시 강도가 있는 단선을 연결후 절연처리를 하였습니다.
마이크로 컨트롤러에 연결후 프로그래밍 하였습니다.
원래 집에 많이 있는 ATMega328칩셋으로 쓸려 하였으나 후에 터치스크린 구현에서 필요한 DAC 성능 때문에 틴지보드를 사용하였습니다.
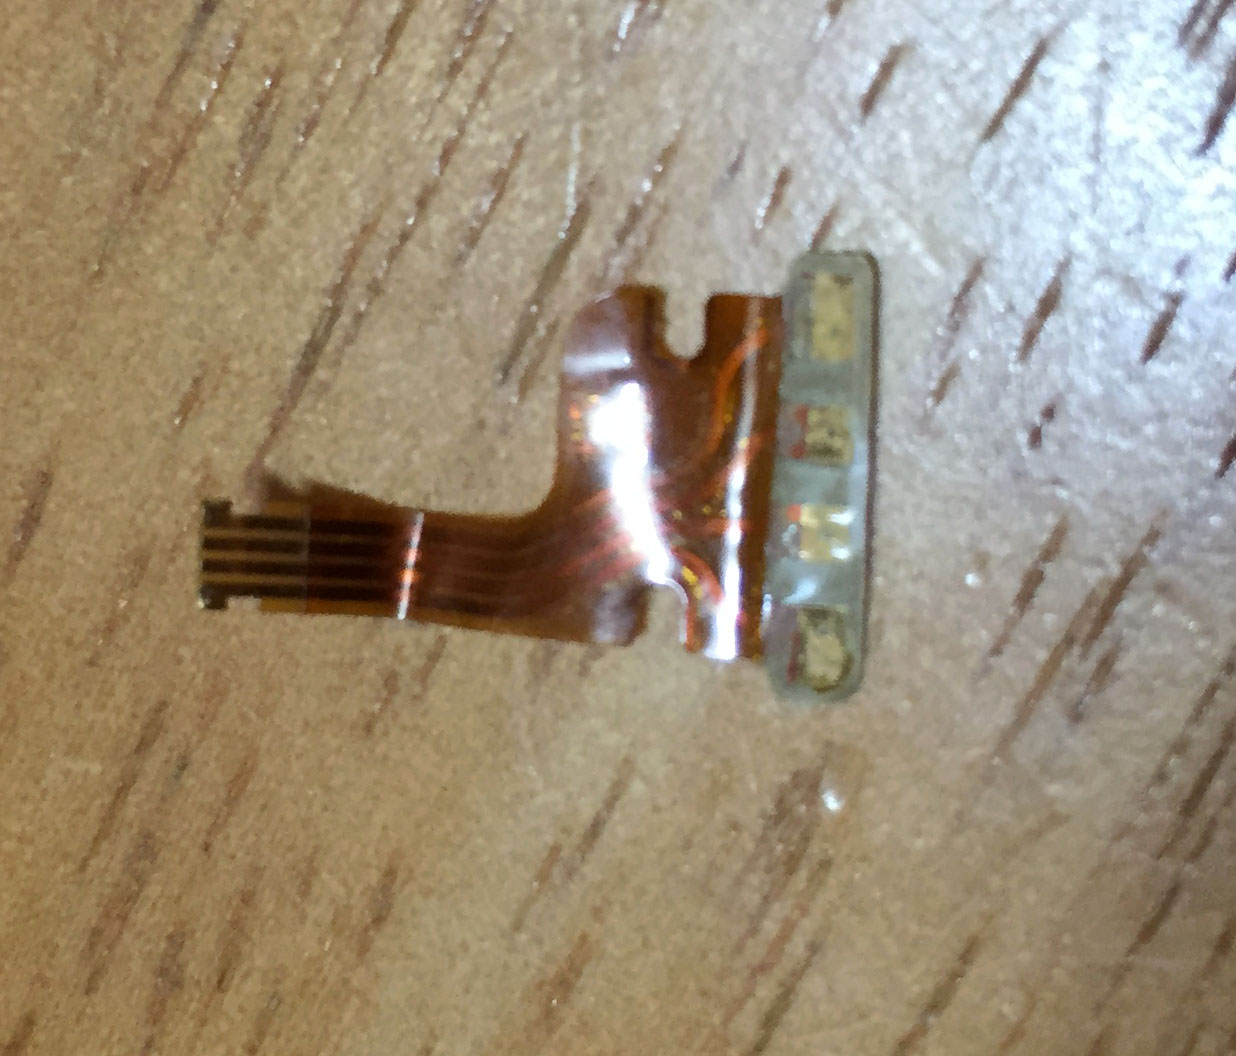
그리고 감압식 터치패드 입력을 분리합니다.
그런데 터치패드로 연결되는 선이 0.5mm FPC라 납땜으로 연결하기는 불가능한 크기이고 다른 대안을 찾아야 했습니다.
그와중에 집에있는 구형 PSP가 FFC케이블을 사용하던게 생각나서 바로 적출했습니다.

가장자리에 4선을 제외하고 오려서 사용을 시도해보았는데
결과는 패망
대충 커넥터에 접속은 되나 극세사랑 연결시 납땜을 하면 케이블이 바로 녹아버립니다.
FFC의 한계를 체험
이런걸 주문제작으로 살려 하면 주문제작으로 최소 몇천개는 세트로 구해야하기때문에 너무 비효율적이고 시간도 오래 걸립니다.
그러던와중에 서랍에 넣어둔 옛날 NDS를 발견
바로 분해에 들어갔습니다.

액정을 들어내니 같은 종류의 커넥터를 사용하고 있었습니다.
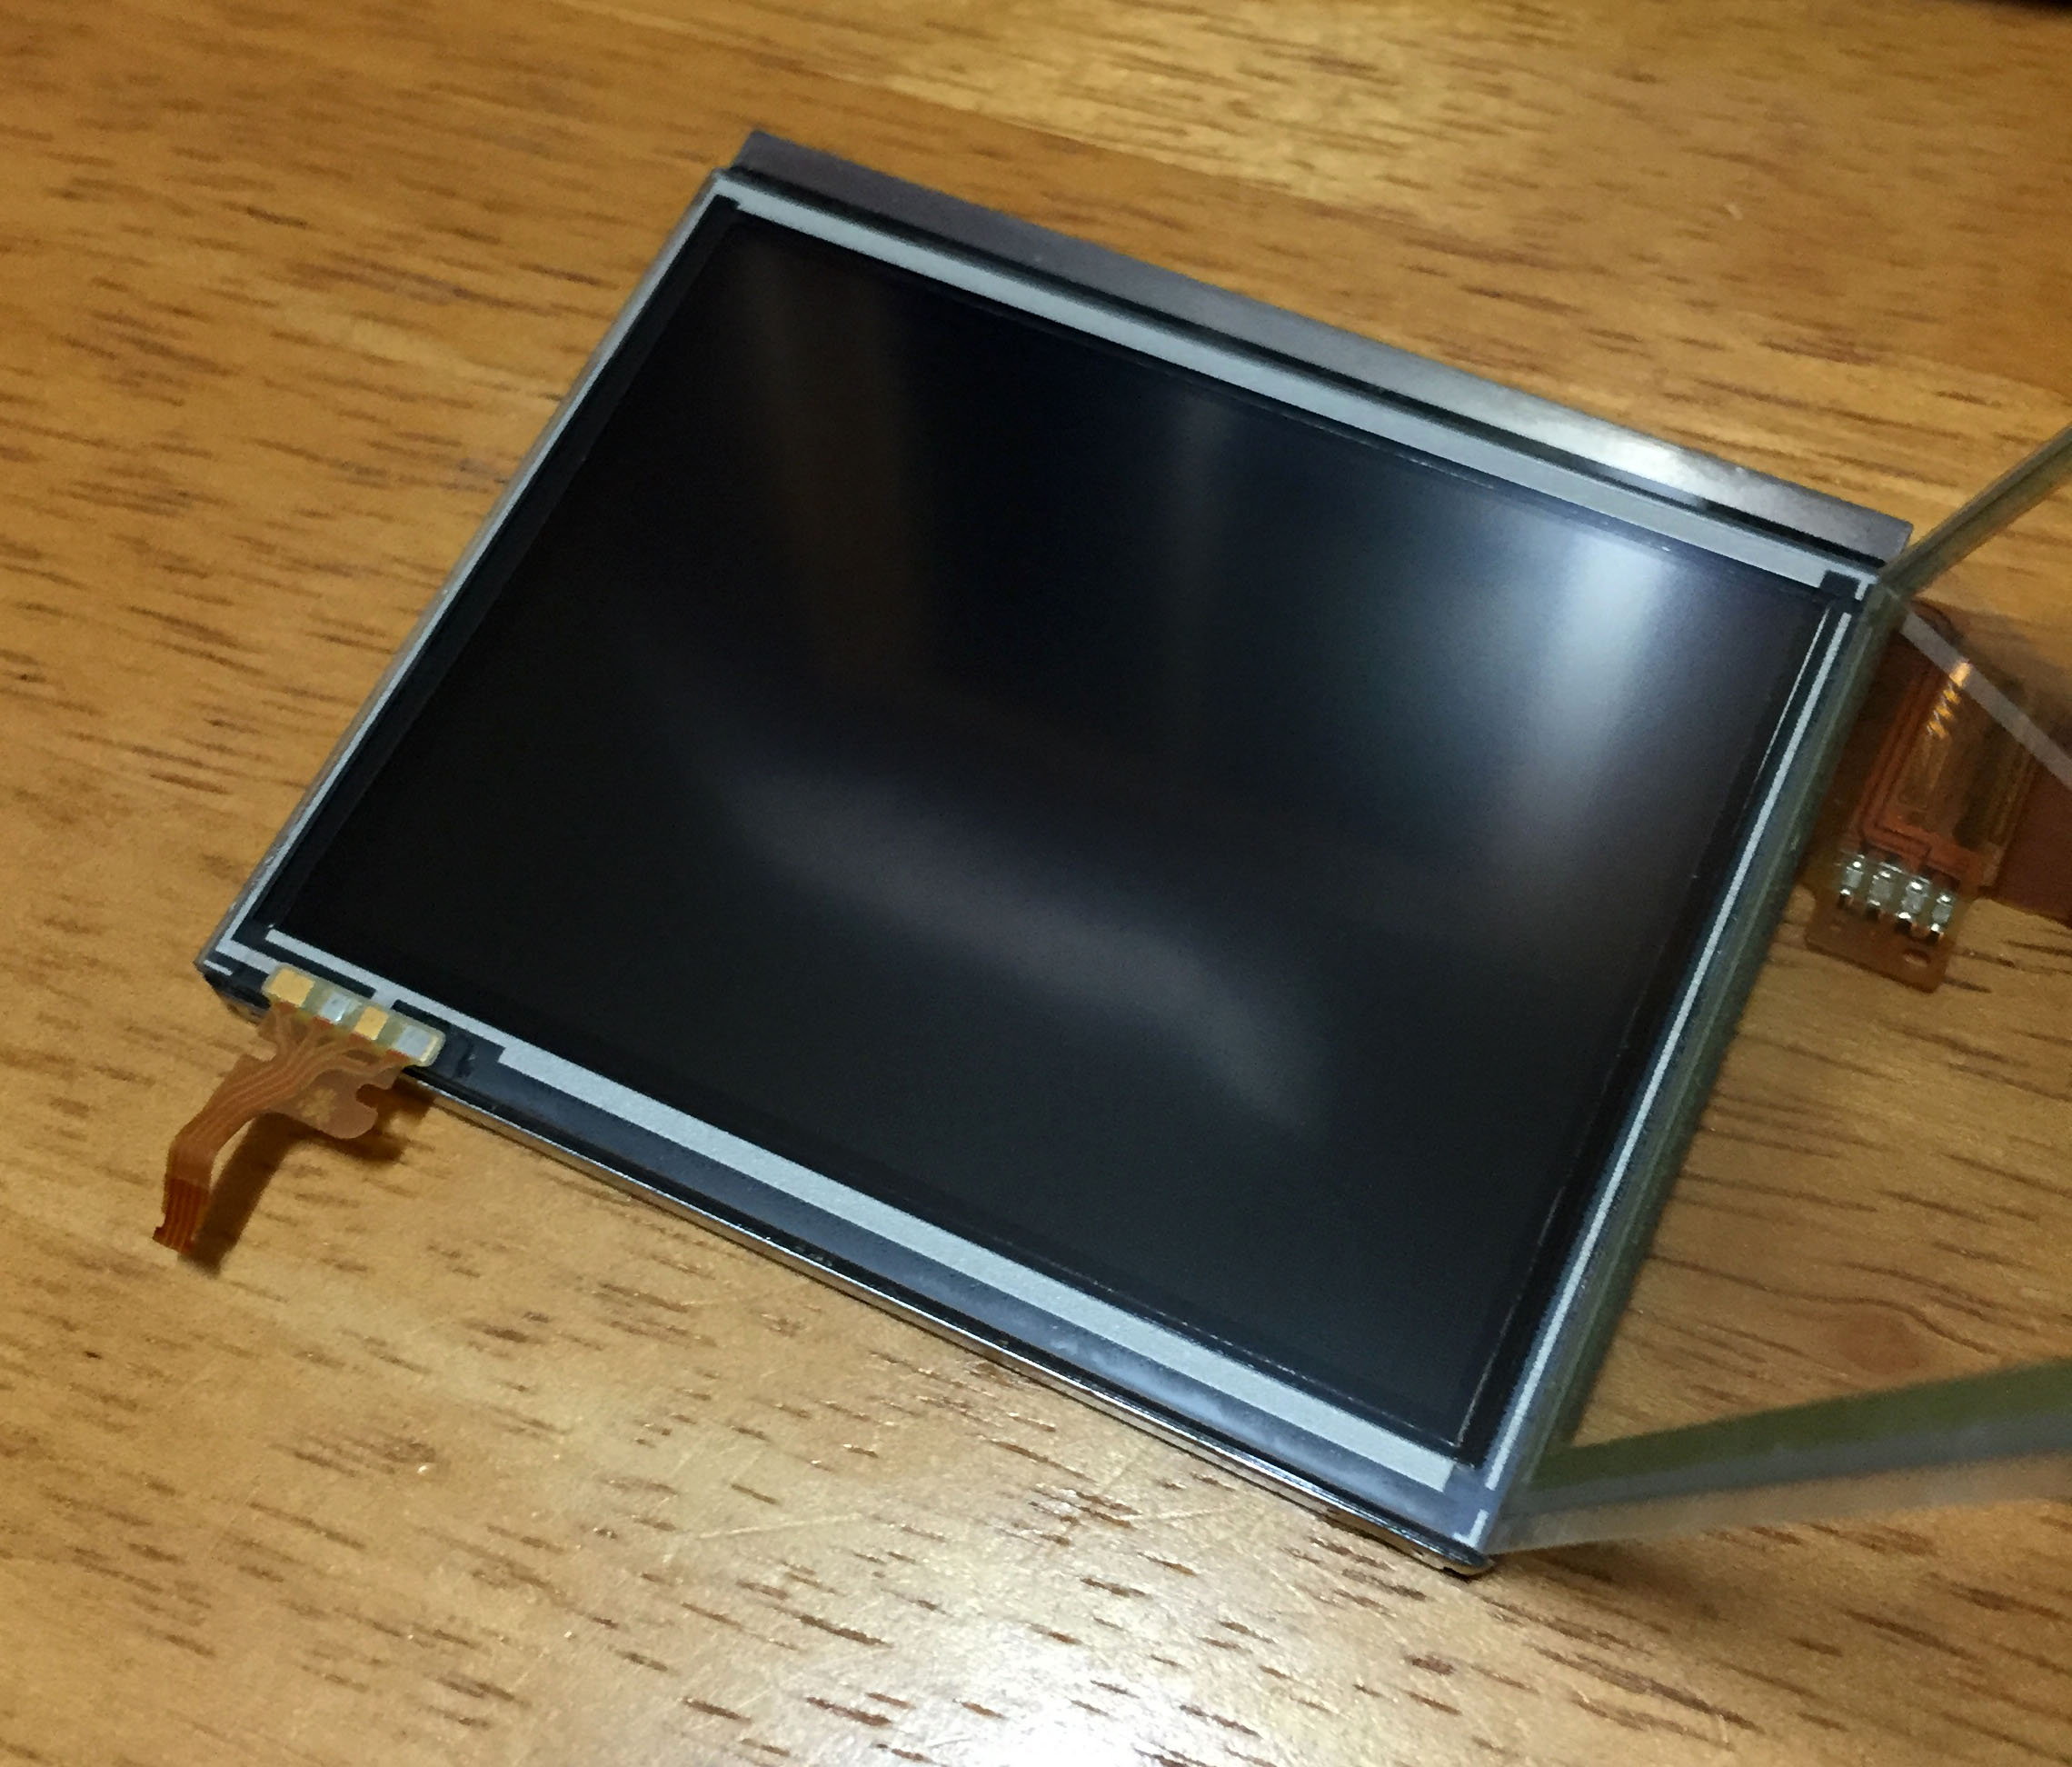
조심스레 액정 커버와 터치패널, 액정을 분리합니다.
터치패널에서 커넥터부분을 떼어내고
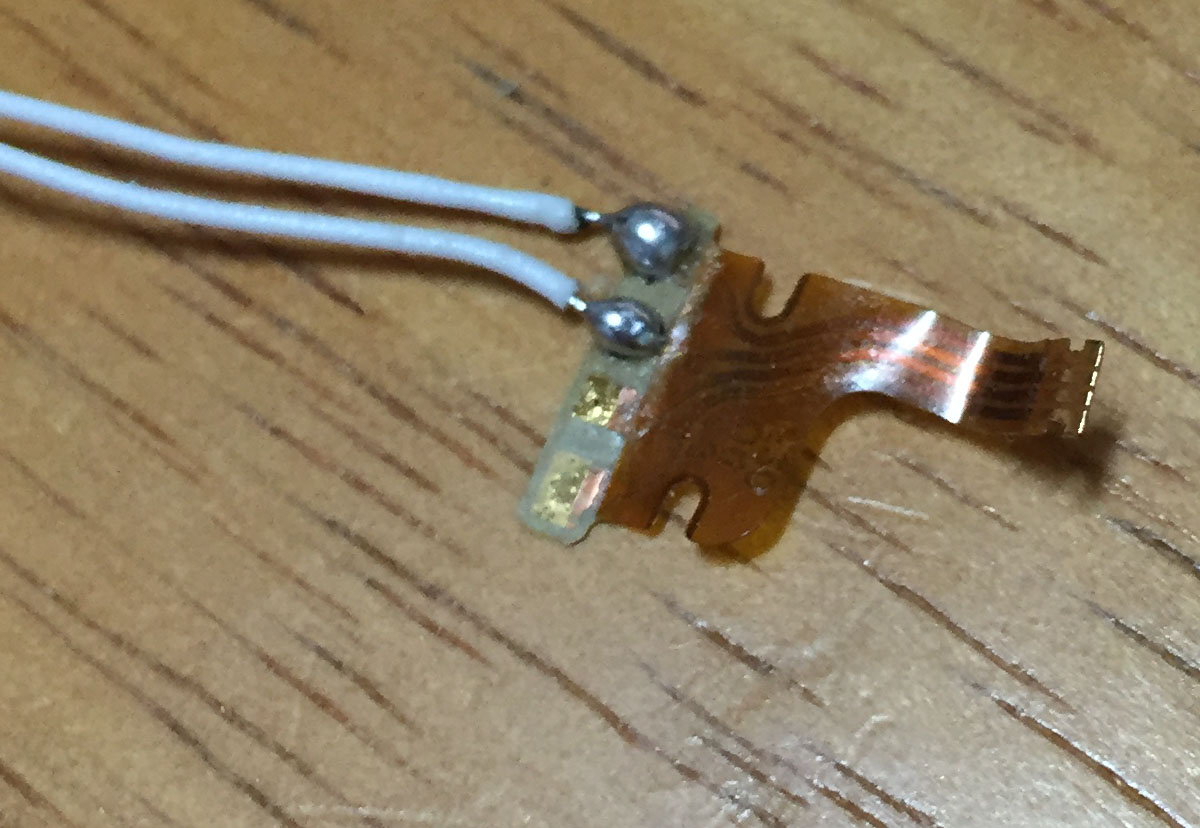
알코올로 접착제를 긁어낸뒤 극세사 납땜을 해줍니다.
접촉이 잘 되었는지 확인을 위해 시험삼아 한번 꽂아 보았습니다.

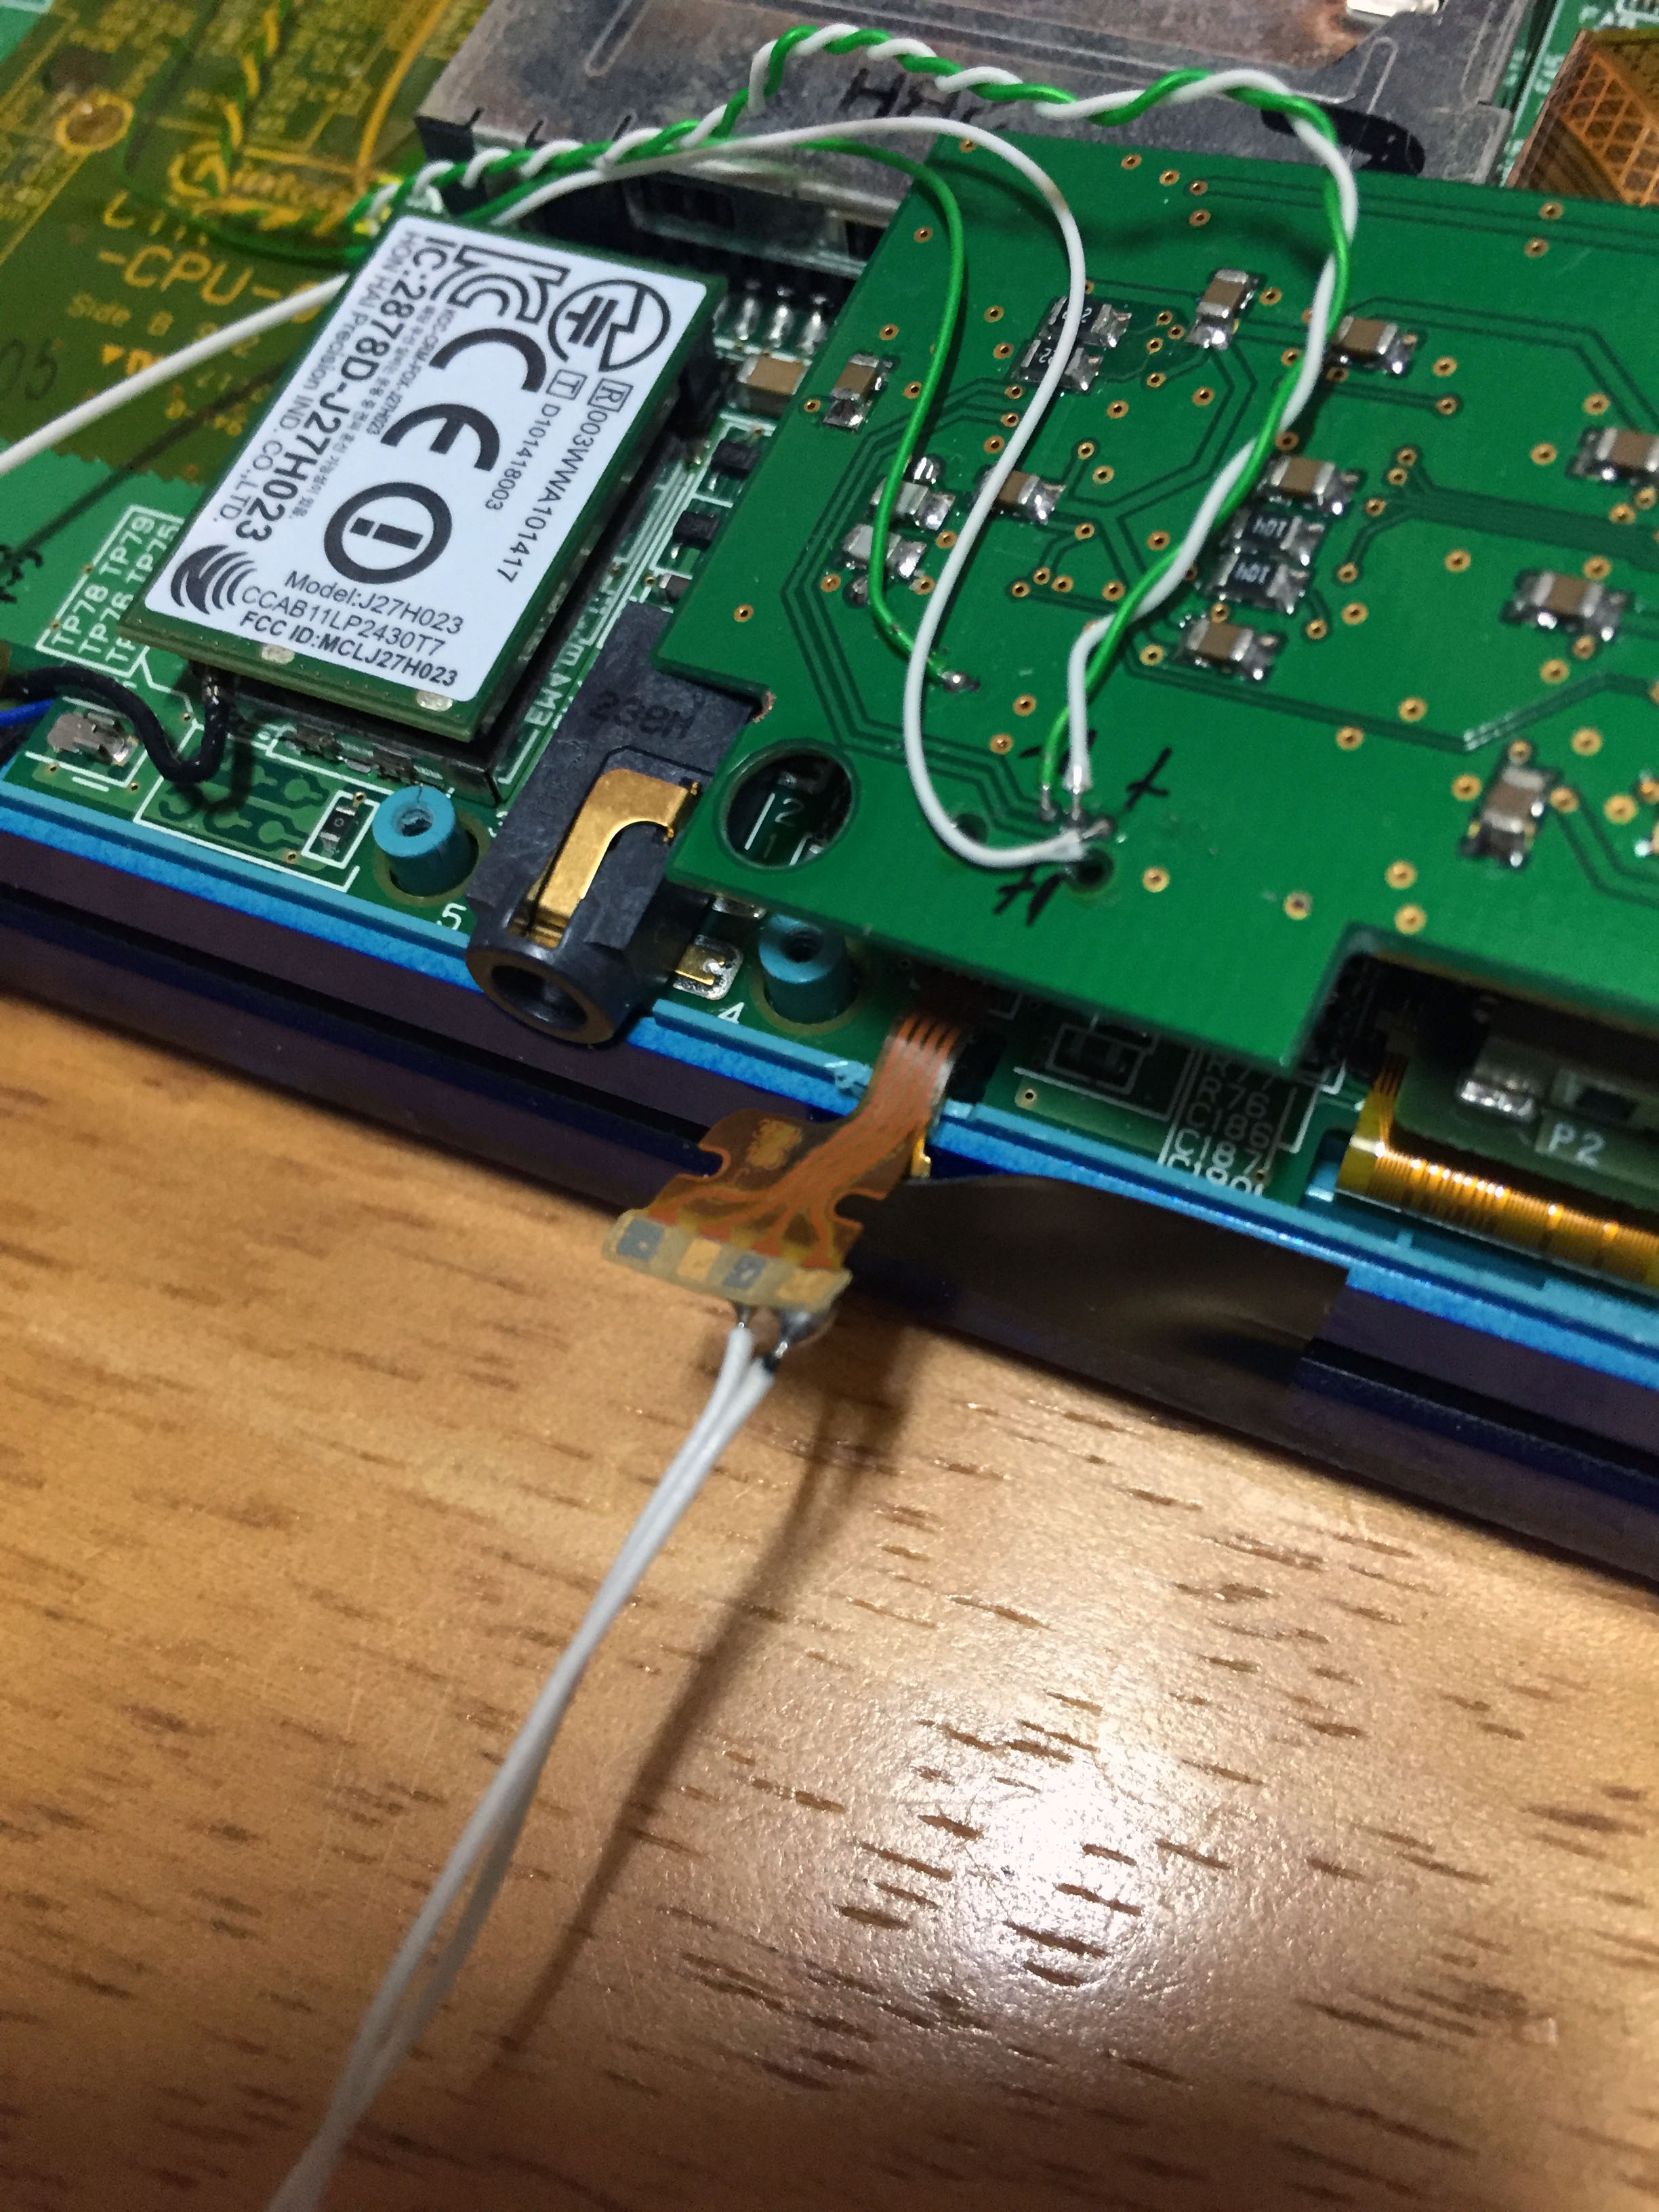
나머지 부분도 납땜후 대충 전류를 흘려주니 어떻게 입력이 되긴합니다.
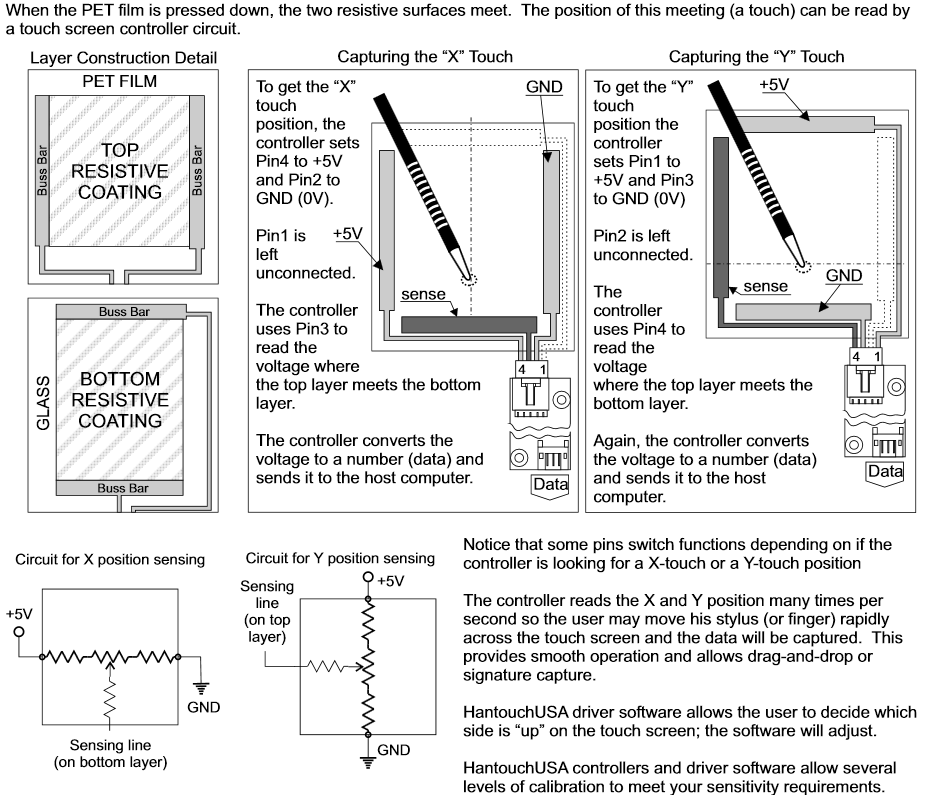
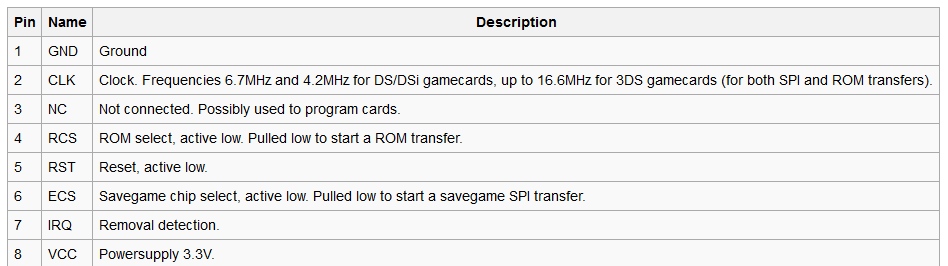
데이터시트를 통해 알아보니 NDS/3DS는 이 방식을 사용하는 듯 합니다. VCC는 1.8V이였습니다.
볼트미터로 전압을 측정해보니 3DS는 대충 Y+ X+ X- Y- 의 순서로 핀이 배열된듯 합니다.
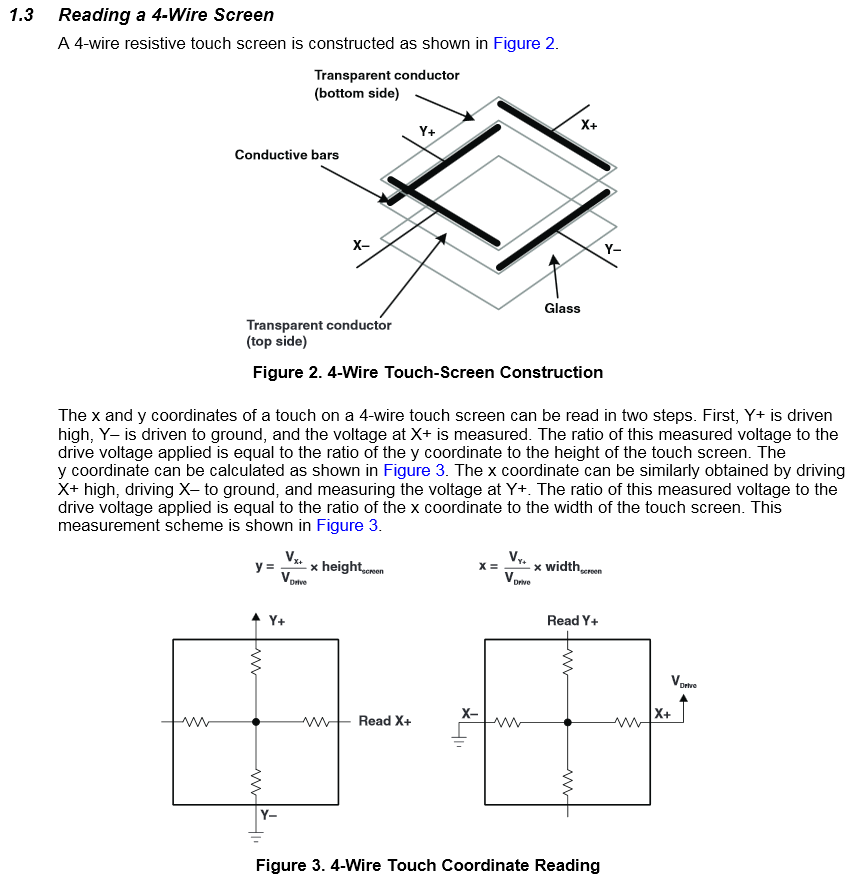
자 이제 대충 컨셉은 알겠습니다.
3DS의 VCC는 1.8V인데 틴지보드는 3.3V입니다. 버퍼를 사용할 수도 있지만 터치스크린을 아예 안 쓸 예정이므로 그냥 볼트미터로 아날로그 1.8V 출력이 가능한 값을 찾아서 그 값에 비례하여 줄이는 방법을 사용 하였습니다.
3DS의 경우 Y+가 GND로 연결되어 터치 인터럽트가 발생되면 바로 0.0005초 후에 X+ 전압을 읽어내고 Y+ 이 입력모드로 전환후 0.0002초동안 Y+ 전압을 측정하는 방식으로 작동합니다.
이젠 엄청나게 정밀한 타이밍이 요구됩니다.
우선 X+ 핀은 시간적 여유가 있으므로 PWM 으로 연결하고 Y+는 ADC에서 출력하는 방식으로 코드를 짰습니다.
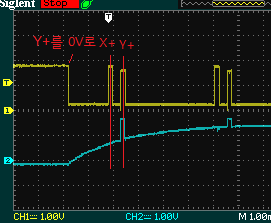
오실로스코프에선 대충 이렇습니다.
그리고 좀 귀찮은 노가다끝에 정확한 타이밍을 맞추는 코드를 작성할 수 있었습니다
심지어 머신코드 최적화 컴파일러가 타이밍을 틀어버리는바람에 매우 귀찮은 반복의 연속이였습니다.
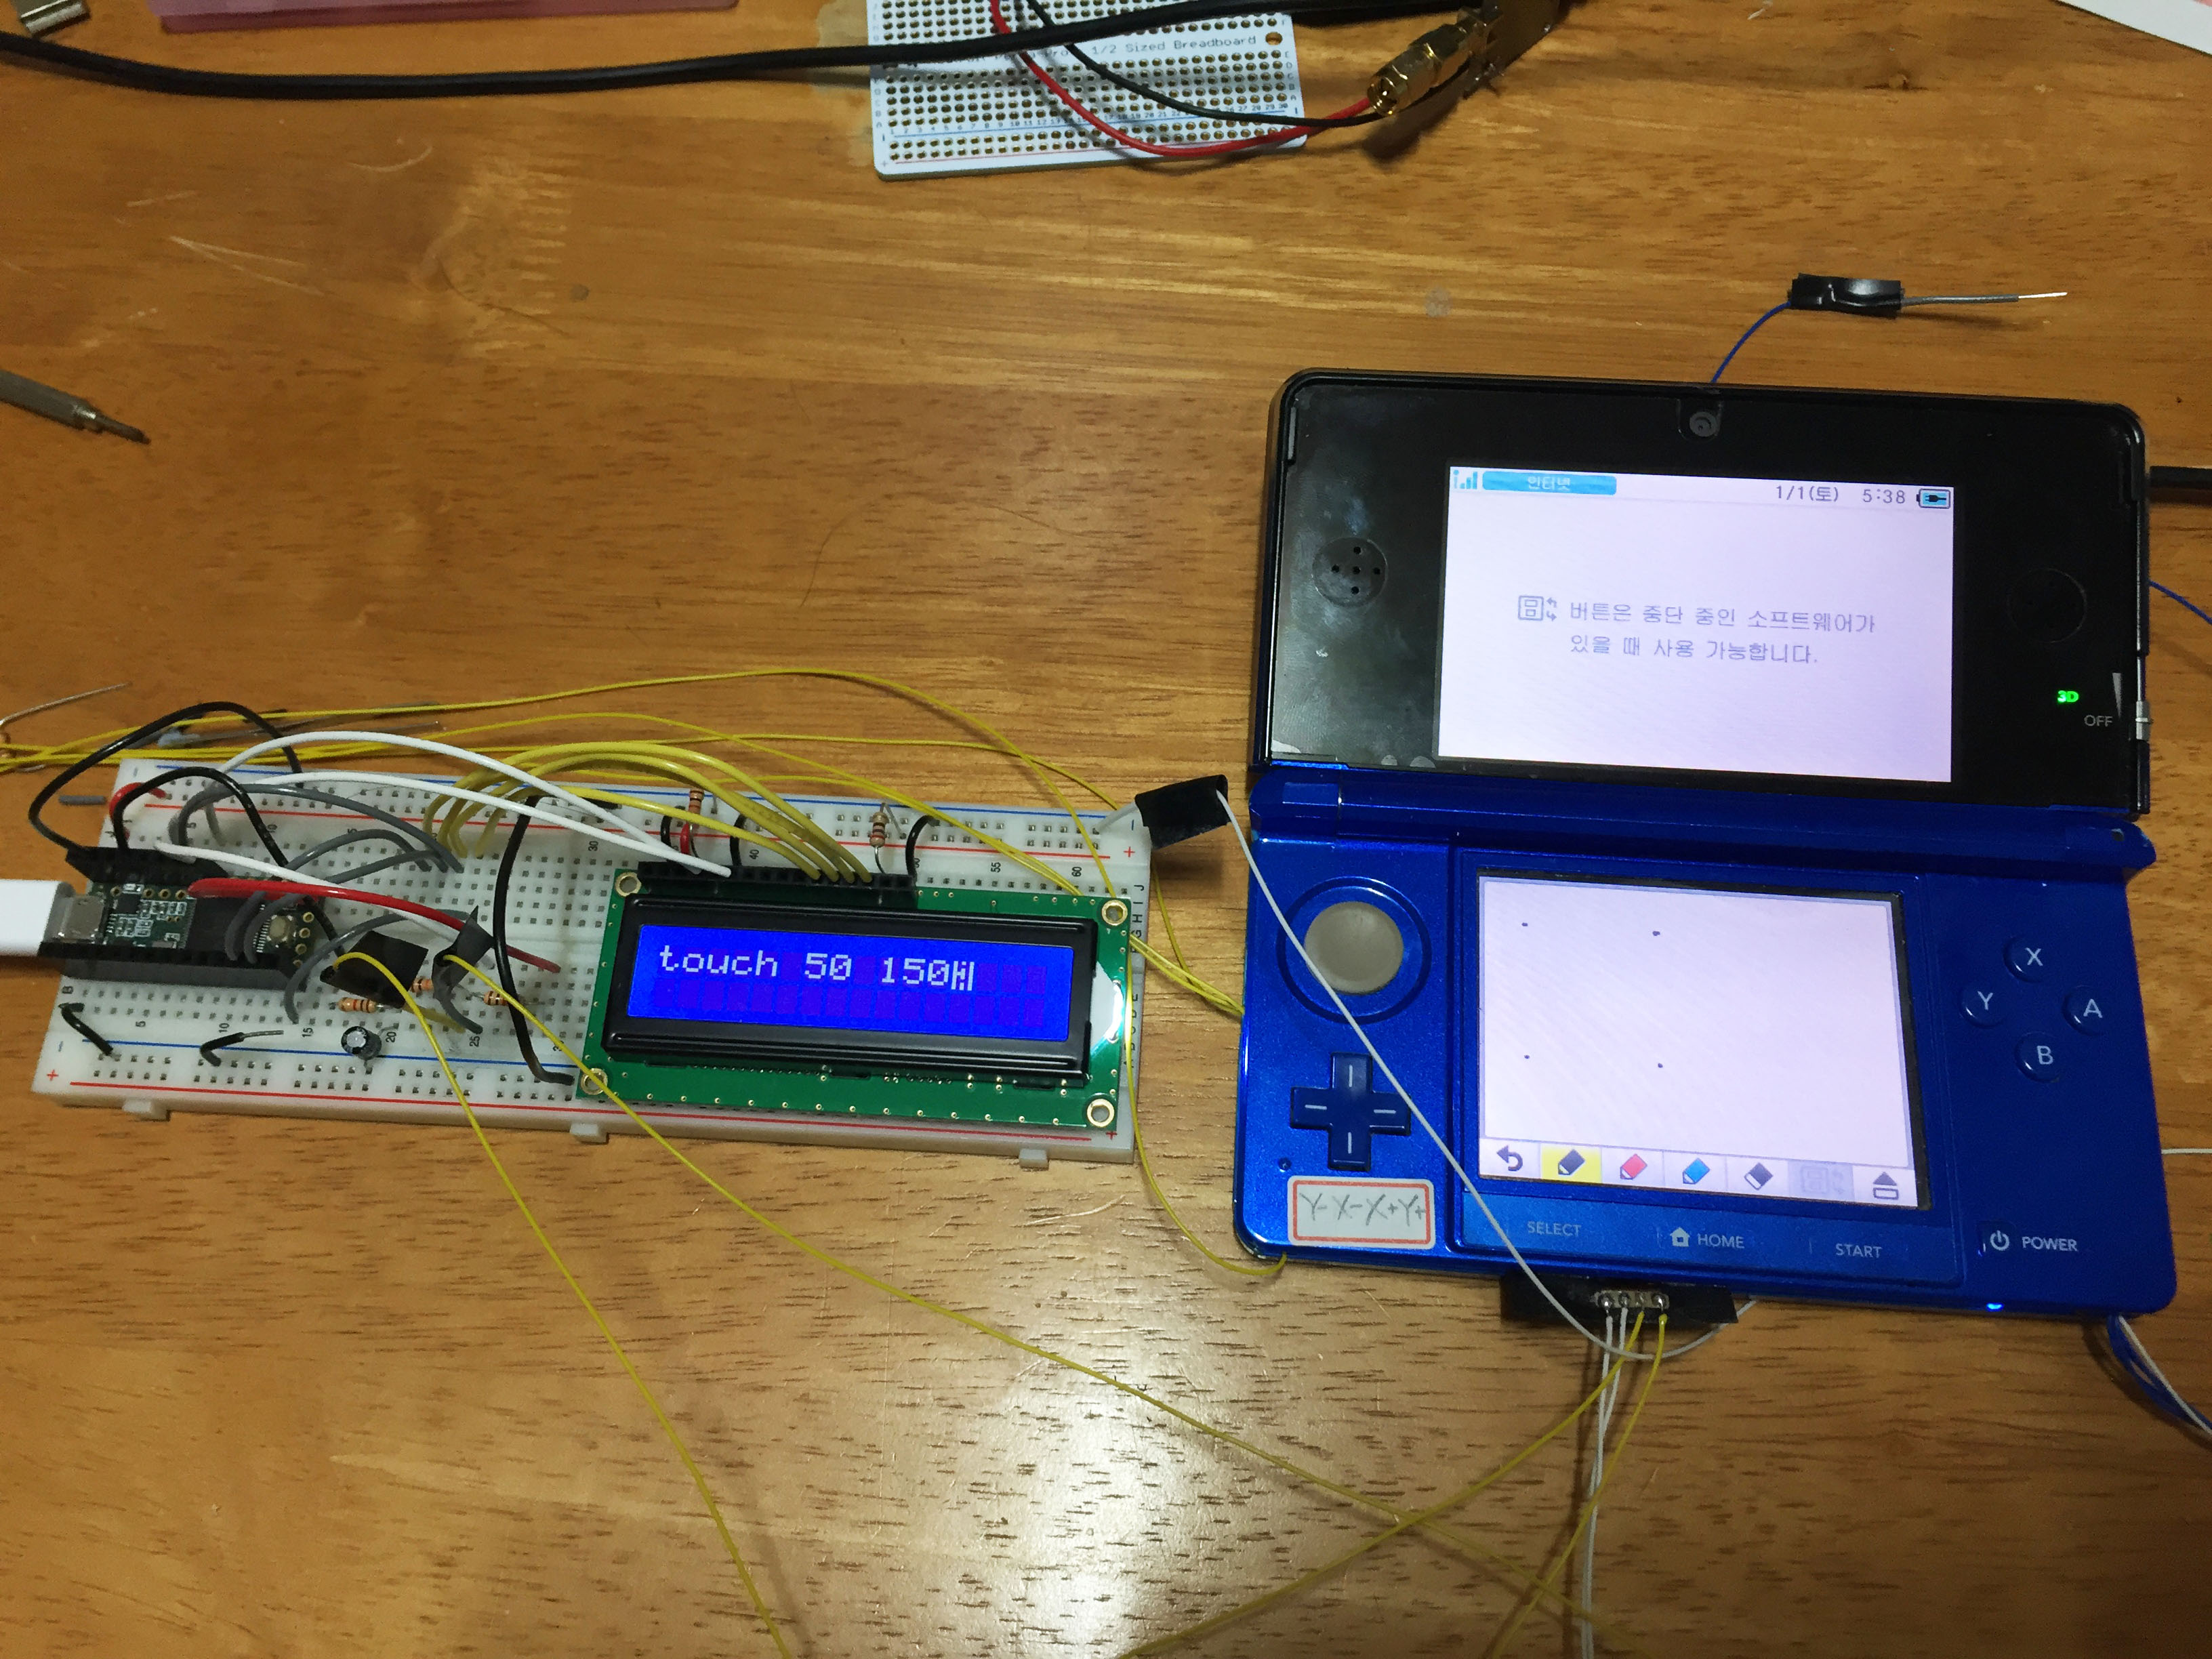
드디어 완벽한 정사각형을 그려내는 컨트롤러의 모습입니다.
나머지 선들을 전부 연결후 마무리 하였습니다.
극세선들이 매우 복잡하긴 하지만 귀찮으므로 정리는 하지 않습니다.
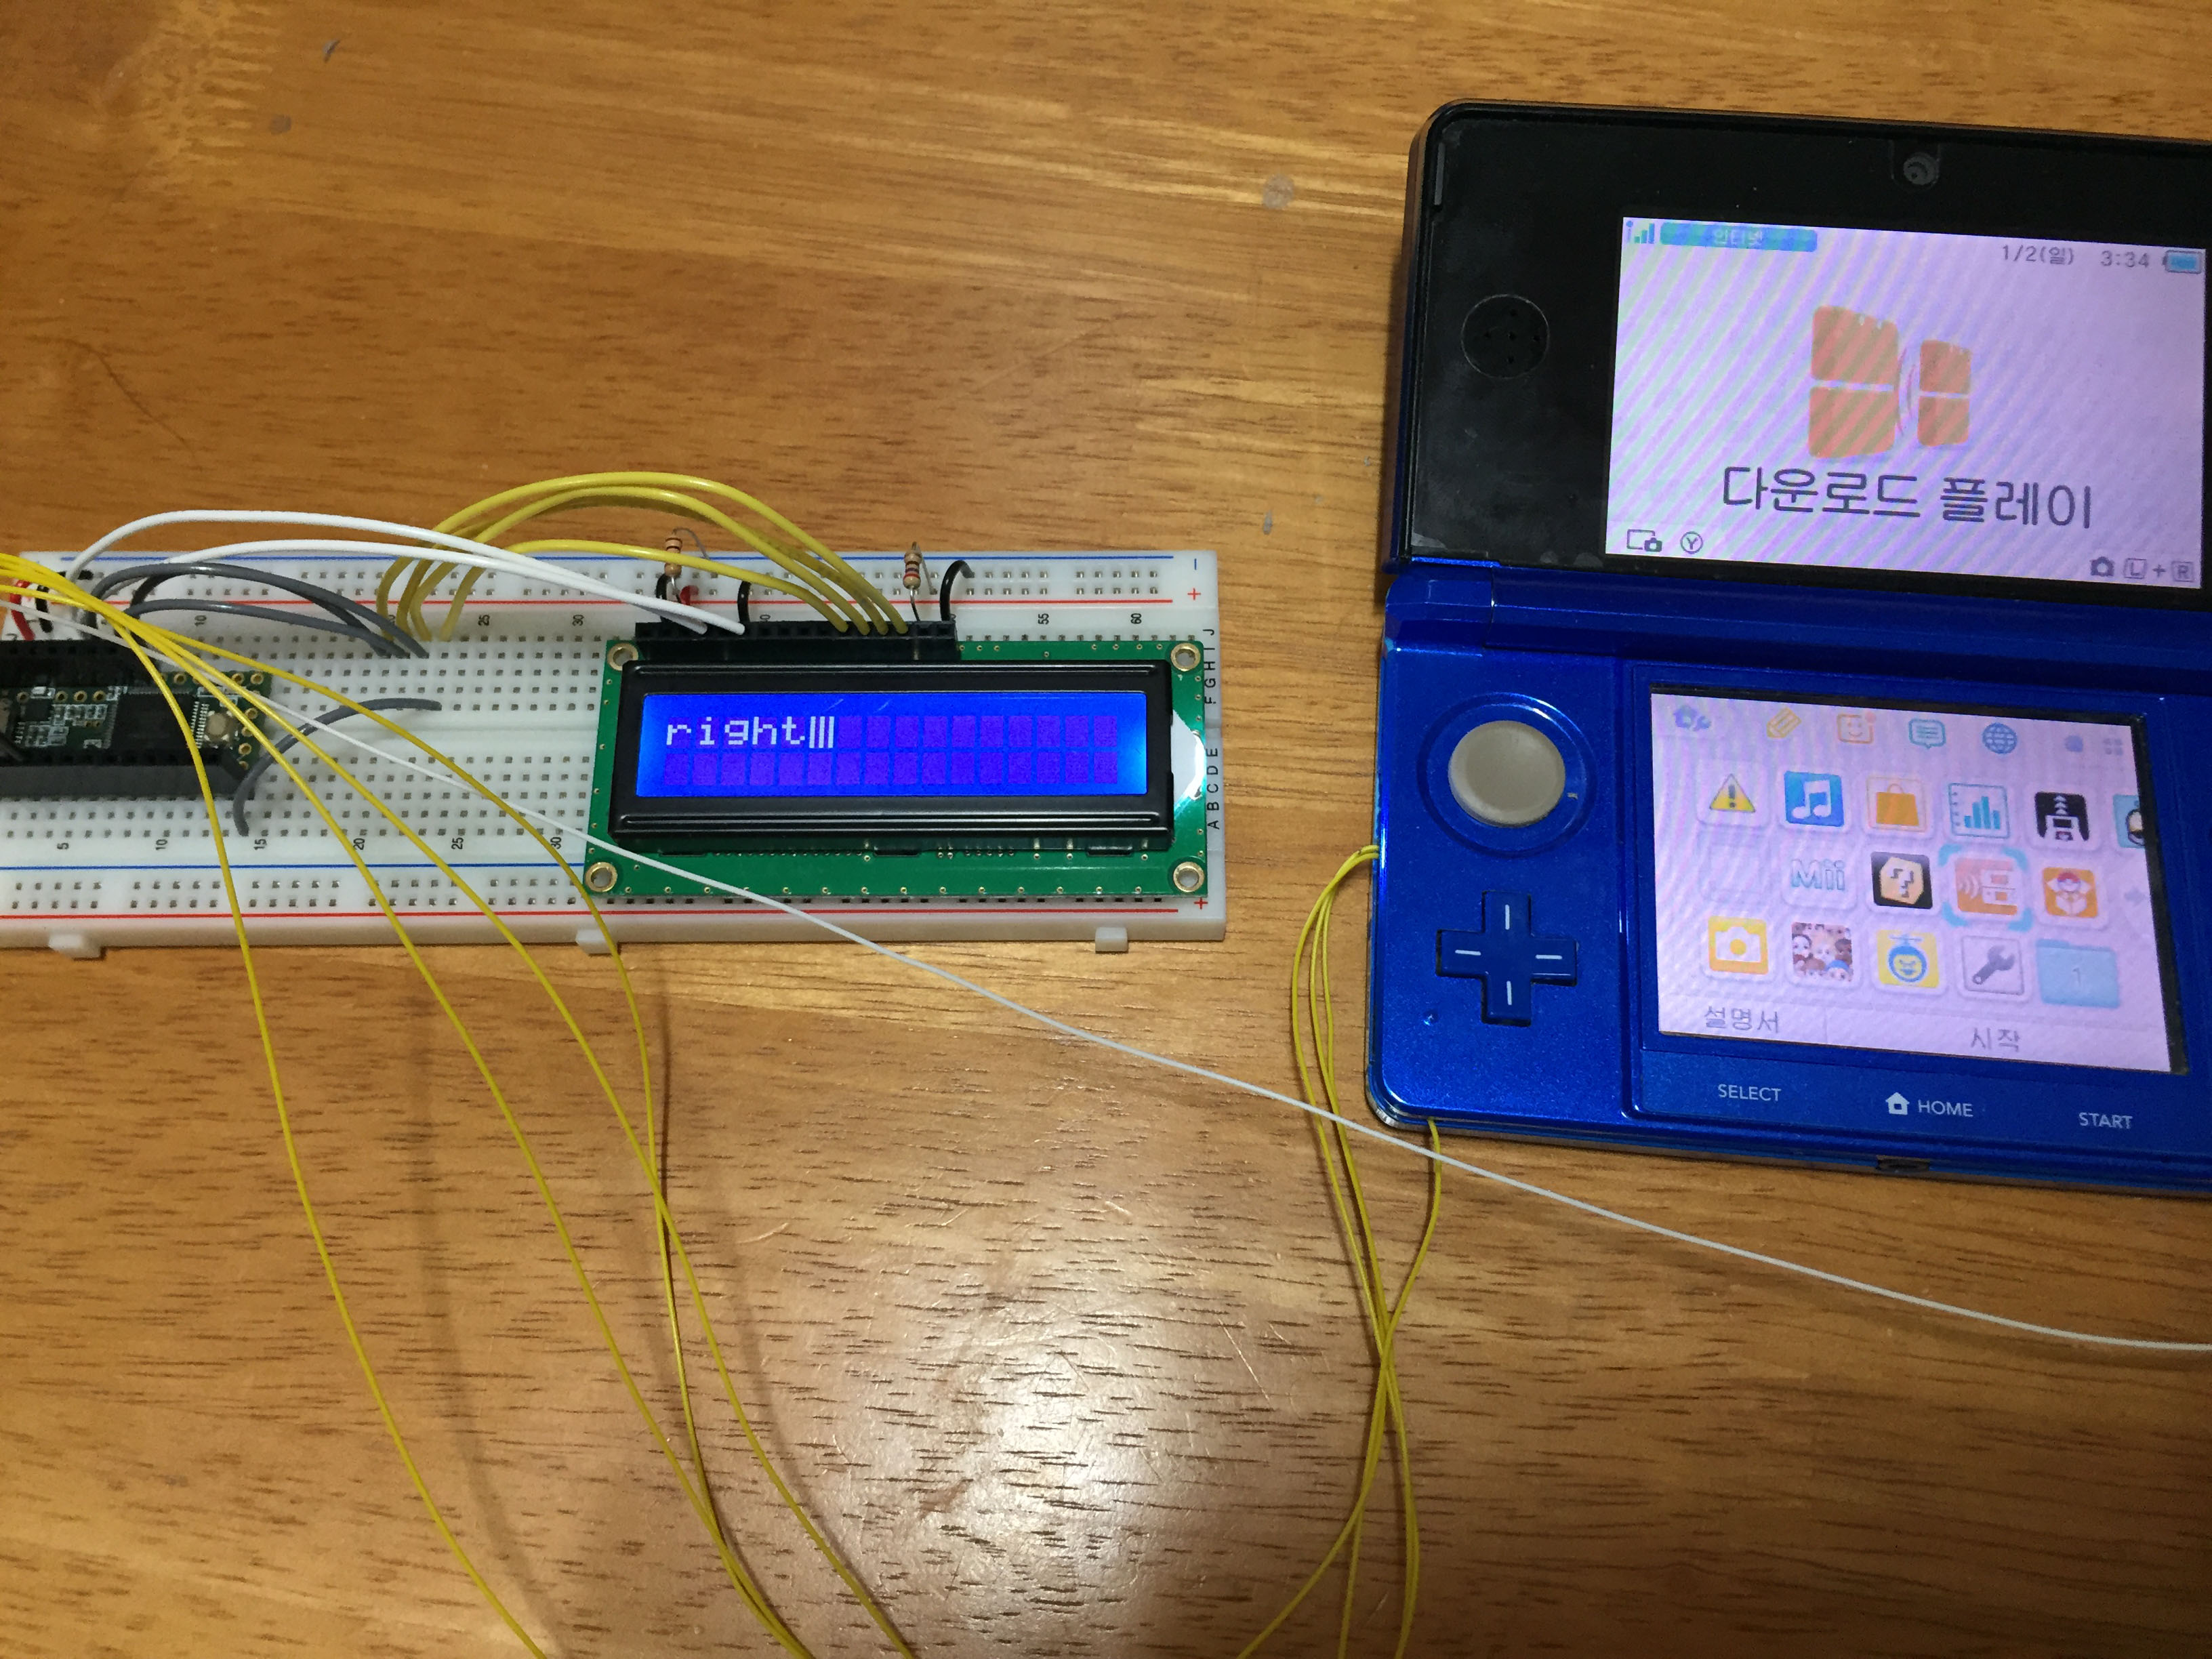
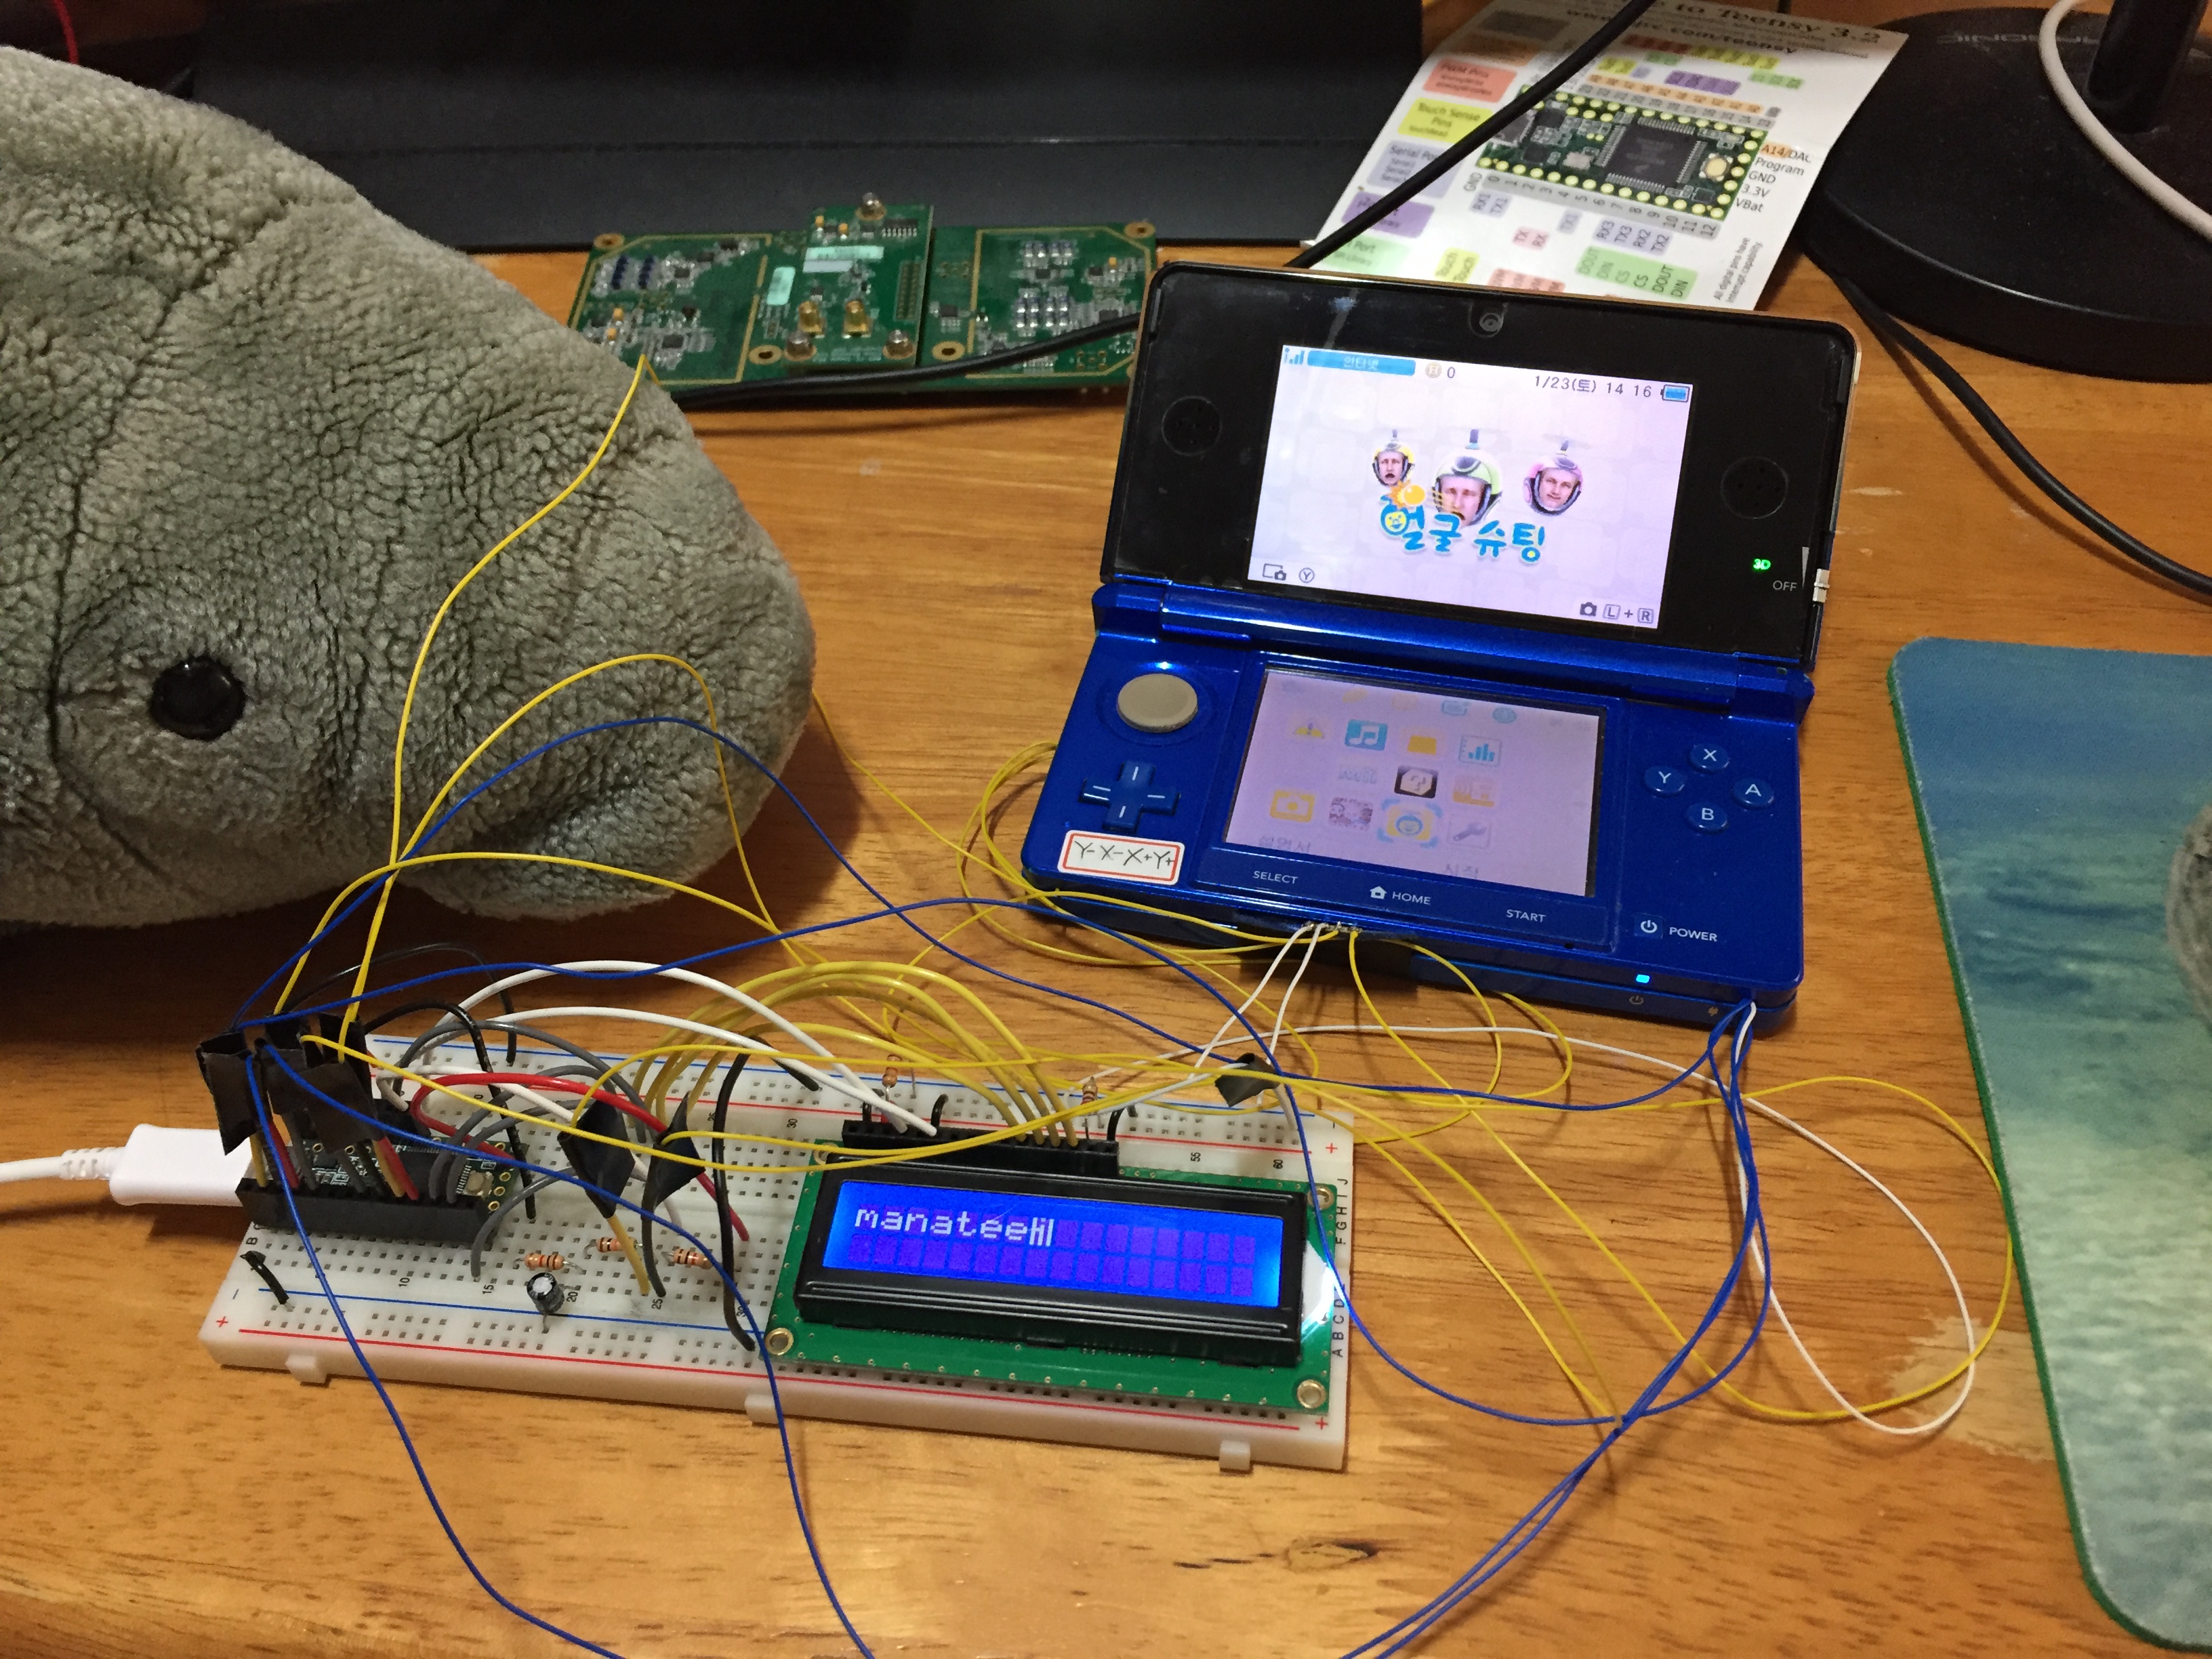
이제 컴퓨터로 화면 출력과 동시에 게임을 할수 있는 장비가 완성되었습니다.
어제 새벽에 전체적인 시험을 거친 후 채팅 처리 프로그램을 업데이트 하였습니다.
국내판 콘솔에 국내판 소프트웨어로
인터넷 접속도 가능하도록 하였습니다.
3DS 콘솔이 있으신분은 본인 포켓몬과 교환도 가능.
모험의 시작은 오늘 6시 정각입니다
http://twitch.tv/manatails
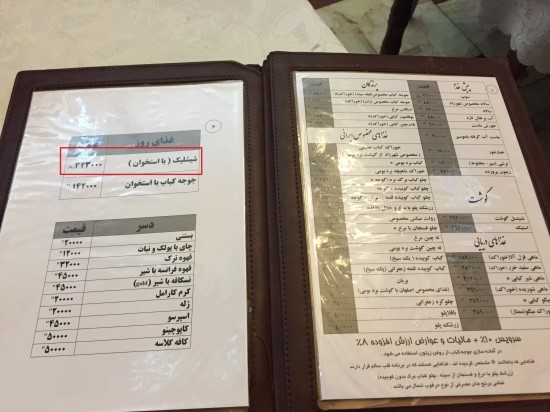
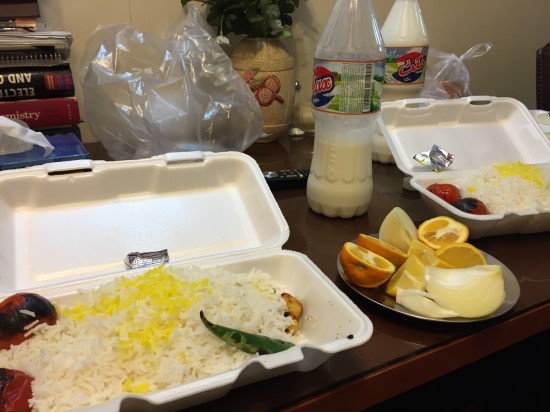
그냥 요즘 물가이야기 많이 올라오길래 올해 초의 기억을 되살리며 적어봅니다
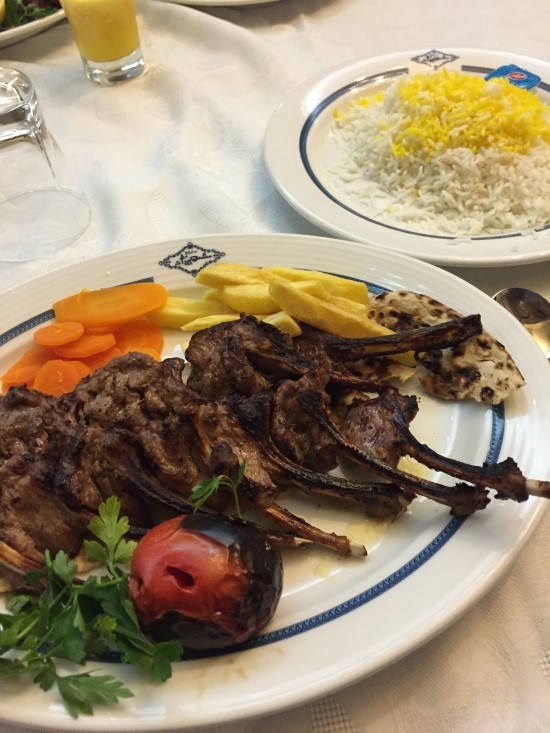
동네 레스토랑에서 먹은 양고기 스테이크


포켓몬스터 기라티나 한국지역 롬에서 제거된 도박장을 활성화시키는 패치입니다.
한글판 포켓몬스터 PT 기라티나 롬에 사용 가능합니다.
프로그램을 실행 후 롬파일을 열고 패치버튼을 누른 뒤 패치된 롬파일을 저장할 경로를 선택해 주시면 됩니다.
올바른 롬파일을 사용했는데도 패치할 수 없는 파일이라고 뜨는 경우엔 롬이 변형된 경우이므로 새로운 순정 롬파일을 구하셔야 합니다.
Enable SSH and add the following lines to the .vmx file
You might need to change the pciSlotNumber to something else in order to avoid collision
sound.present = "true"

sound.allowGuestConnectionControl = "false"

sound.virtualDev = "hdaudio"

sound.fileName = "-1"

sound.autodetect = "true"

sound.pciSlotNumber = "35"
Login HAML location for Ubuntu 12.04 is as follows
/opt/gitlab/embedded/service/gitlab-rails/app/views/layouts/devise.html.haml
Edit the file as you need. Then run
sudo gitlab-ctl restart
to apply the edited HAML and restart gitlab.
The old way of calling bundle rake or gitlab-ctl rake is useless now. You don’t have to use it nor you should use it.